Many of you might be frustrated with the Windows unable to check for new updates error message when trying to update your operating system. This is a frustrating problem as you can't install any updates to fix any errors and issues. Don't worry! You can easily fix the issue by following some simple and effective troubleshooting steps. If you are also facing the same error, this guide will help you a lot. So what are you waiting for? Continue reading the article to fix the Windows unable to check for new updates issue.
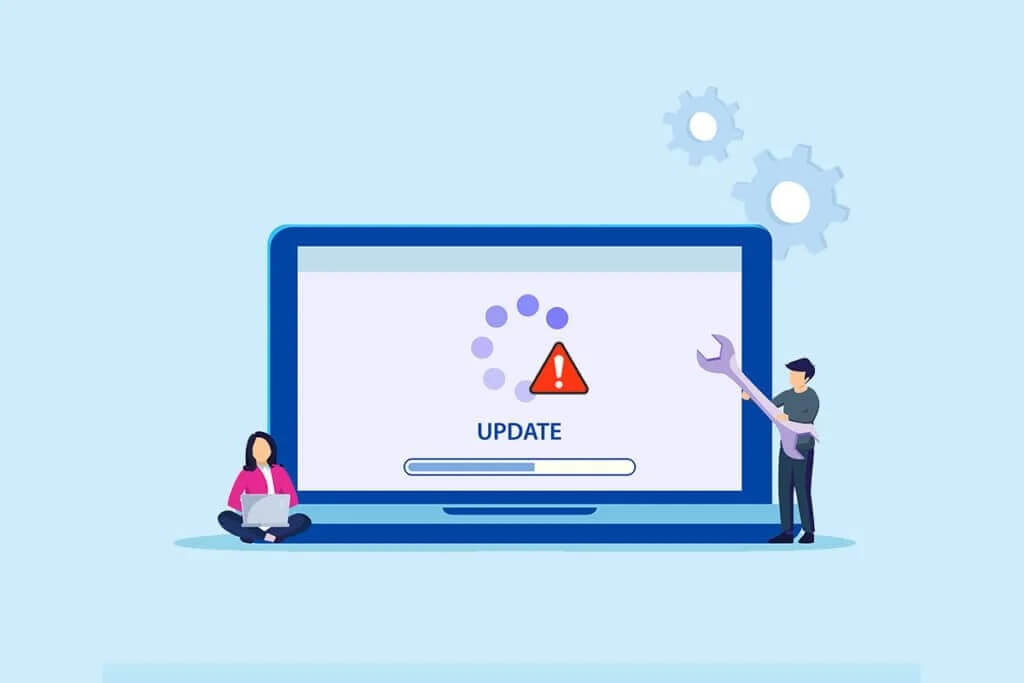
How to Fix Unable to Search for New Updates on Windows
You may encounter several error codes while updating or upgrading your computer. Apart from Windows 10 computers, this also happens in Windows 11. You may encounter several error codes associated with this issue such as 80244001, 80244001B, 8024A008, 80072EFE, 80072EFD, 80072F8F, 80070002, 8007000E, and many more. Below are some of the exact reasons that cause these errors on your Windows 10 computer. Analyze the underlying cause of the issue to easily resolve the same issue.
- Lost or damaged files on your computer.
- Corrupted programs.
- Virus or malware attack on your computer.
- Incomplete or intermittent Windows Update components on your computer.
- Other background programs interfere with the update process.
- Invalid Windows registry keys on your computer.
- Antivirus software interference.
- Unstable internet connection.
In this guide, we've compiled a list of methods to resolve the Windows unable to check for new updates error. The methods are arranged from simple to advanced so you can achieve faster results. Follow them in the order shown below.
Note: Make sure to create a restore point when something goes wrong.
Basic troubleshooting tips
Before following the advanced troubleshooting methods, here are some basic fixes that will help you fix the Windows could not search for new updates error.
- Restart the computer.
- Check your internet connection.
- Remove external USB devices.
- Temporarily disable your antivirus software on your computer.
- Then run an antivirus scan.
- Make sure you have enough space on your hard drive to install new updates.
Method 1: Run the Windows Update Troubleshooter
If you can't resolve the issue, try running the Windows Update Troubleshooter. This feature, built into Windows 10 PCs, helps you analyze and fix all update errors. Here are some instructions for running the Windows Update Troubleshooter.
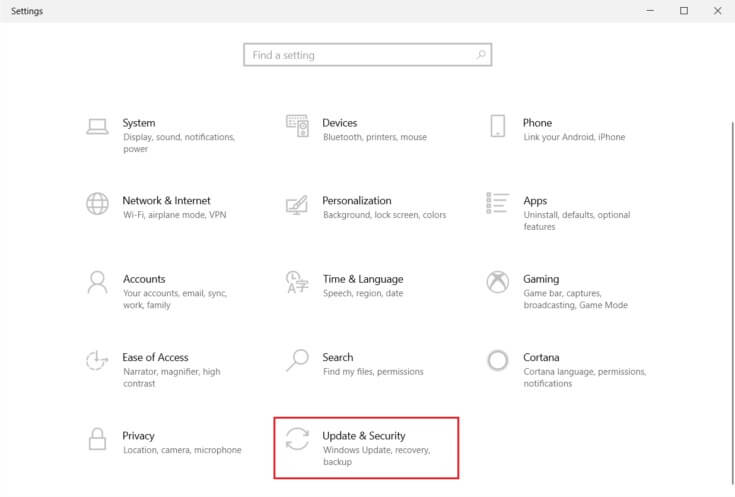
1. Press Windows key + I At the same time to run Settings.
2. Click on the box Update and security , as shown.
3. Go to the menu Troubleshooting in the right pane.
4. Select Windows Update Troubleshooter and click the . button Run the troubleshooter described below.
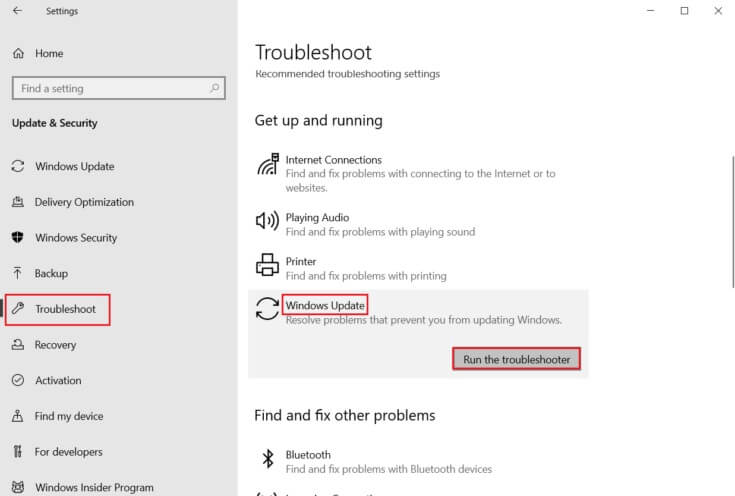
5. Wait for the troubleshooter to detect and fix the issue. Once the process is complete, Restart your computer.
Method 2: Synchronize Windows date and time
When you update your computer, the server ensures that your computer's date and time are aligned with the date and time of the server in that specific geographic location. You may also experience Windows not being able to check for new updates when you have incorrect date and time settings on your Windows 10 computer. Ensure the date and time on your computer are correct by following the steps below.
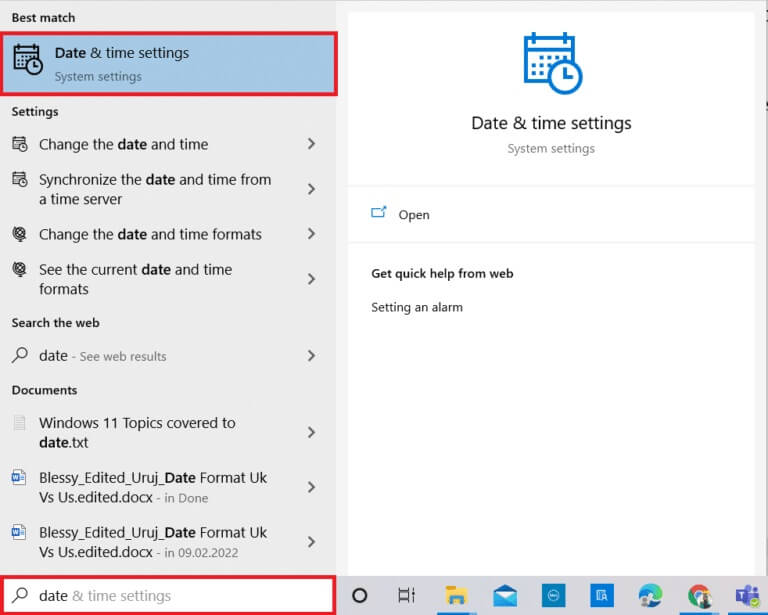
1. Press Windows key. Write Date and time settings And open it.
2. Now, check and select the time zone from the drop-down list and make sure it is your current geographic region.
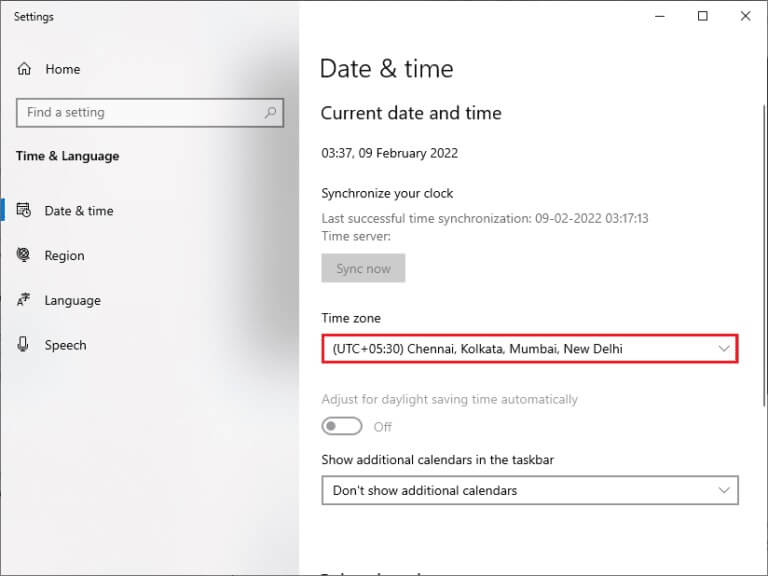
3. Next, make sure the time and date match. World time and date.
Method 3: Clean up disk space
If your Windows PC doesn't have enough space to install new updates, you'll encounter a number of errors. In this case, you can use the built-in Windows Free Up Space tool to clear up space and remove large junk files. This tool deletes all temporary files, installation logs, caches, and thumbnails. You can clear up several gigabytes of space on your PC by following the steps below.
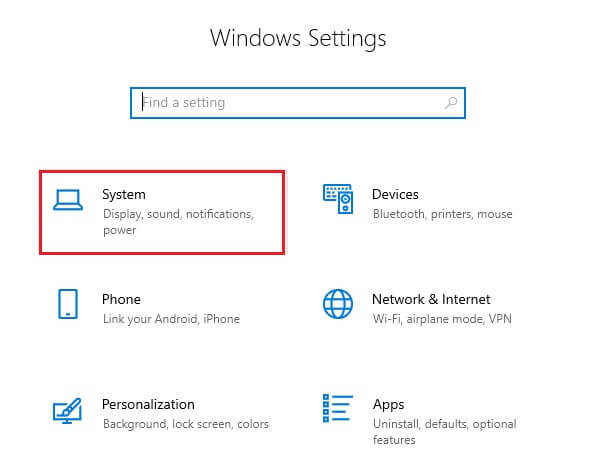
1. Press and hold Windows key + I Together to open Windows Settings.
2. Now, click on the system As shown below.
3. Then, in the right pane, click Storage tab
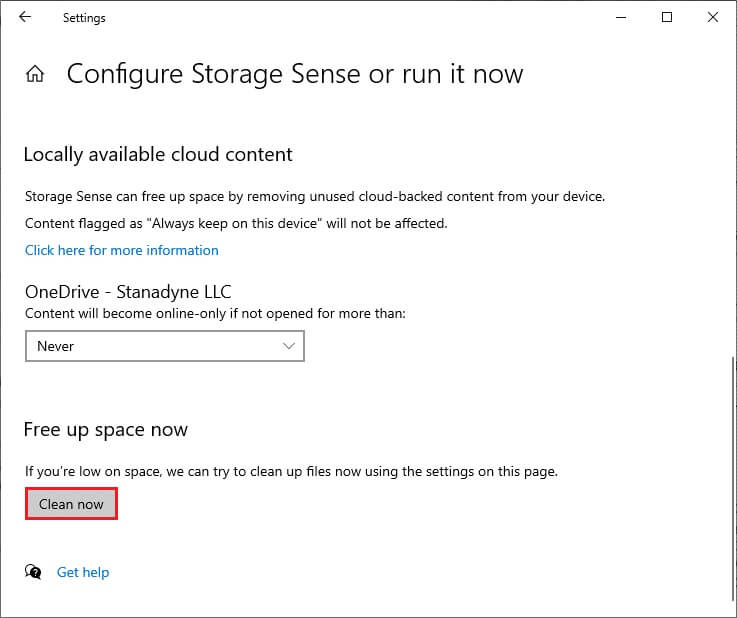
4. In the left pane, select Configure. storage sensor Or run it now as highlighted.
5. In the next window, scroll down to Free up space now section and select option Clean now As shown.
Method 4: Disable the proxy
Proxy servers will divert the network, and it may take some time for the server to respond to a Windows Update request. This may trigger the issue discussed above. Here are some simple instructions for disabling the proxy on Windows 10 devices.
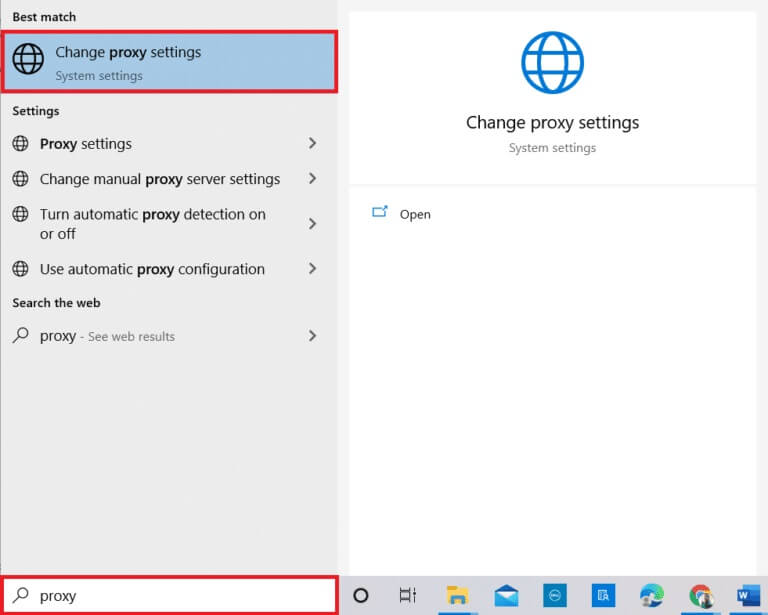
1. Press Windows button And type proxy As shown below.
2. Now, open Change proxy settings from the search results.
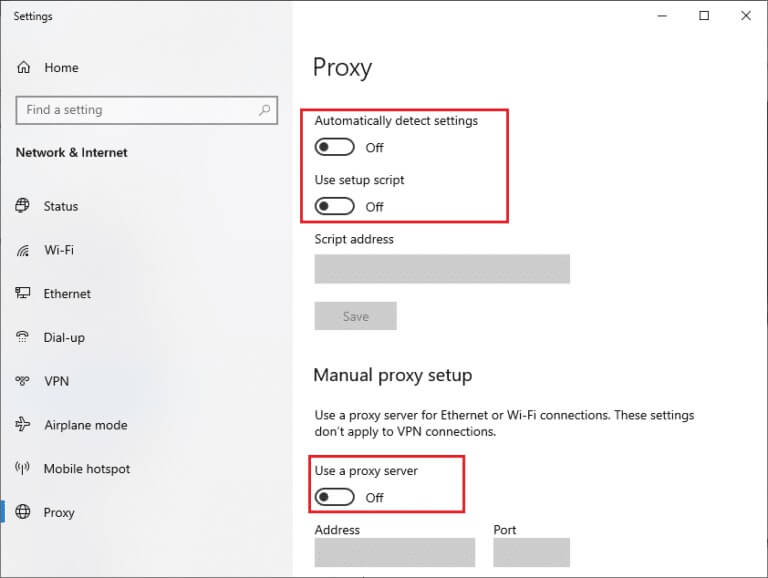
3. Here, turn off the following settings.
- Automatically detect settings
- Use the setup script
- Use a proxy server
Note: If the problem persists, try connecting your computer to another network such as Wi-Fi or a mobile hotspot.
Method 5: Reset update components
To resolve all update-related issues, an effective troubleshooting method is to reset Windows Update components. This procedure restarts BITS, Cryptographic, MSI Installer, Windows Update services, and update folders such as SoftwareDistribution and Catroot2. Here are some instructions for resetting Windows Update components to fix the "Windows cannot search for new updates" issue.
1. Turn on Command Prompt Using administrative privileges as discussed in the previous methods.
2. Now, type The following commands One by one and press Enter key After every order.
net stop wuauerv
net stop cryptSvc
net stop bits
net stop msiserver
ren C:\Windows\SoftwareDistribution SoftwareDistribution.old
ren C:\Windows\System32\catroot2 Catroot2.old
net start wuauserv
net start cryptSvc
net start bits
net start msiserver
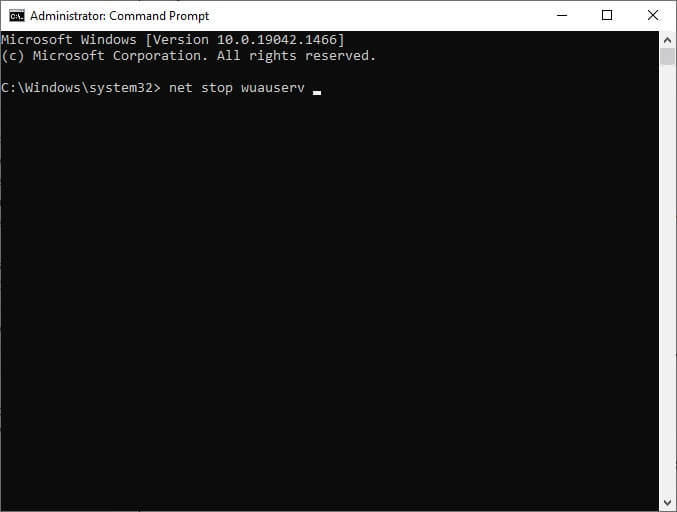
Wait for the commands to be executed and check if Windows cannot search for new updates, Windows 10 is fixed in your system.
Method 6: Repair System Files
If you encounter this Windows can't check for new updates issue, you may have corrupted files on your computer. However, Windows 10 has built-in features like SFC (System File Checker) and DISM (Deployment Image Servicing and Management) to scan and remove malicious corrupted files.
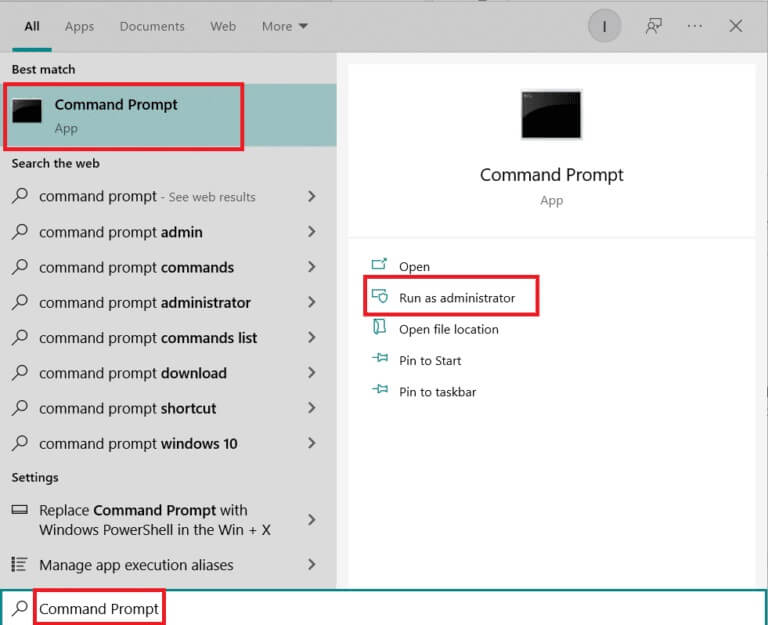
1. Press Windows key. Write Command Prompt And click Run as administrator.
2. Now, type the command chkdsk C: / f / r / x And press Enter key.
3. If you are asked for a message, Chkdsk cannot be run... The volume... is in use. , Click on Y key وRestart your computer.
4. Again, write sfc /scannow command And press Enter key.
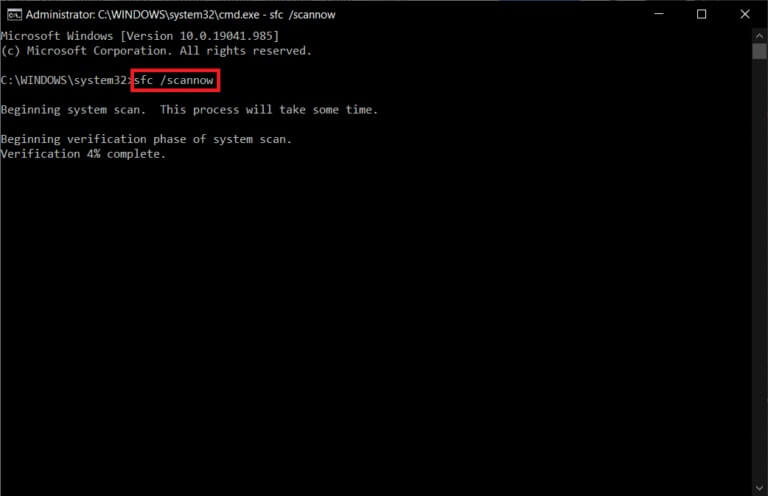
Note: System File Checker will automatically scan and repair all programs in the background. You can continue your activities until the scan is complete.
5. After the scan is complete, any messages will appear.
- Windows Resource Protection did not find any integrity violations.
- Windows Resource Protection could not perform the requested operation.
- Windows Resource Protection found and successfully repaired corrupted files.
- Windows Resource Protection found corrupted files but was unable to repair some of them.
6. Restart the system Your.
7. Now, open Command Prompt As happened before in this way.
8. Type the following commands one by one and press Enter.
Note: You must be connected to a network for DISM to run properly.
DISM.exe /Online /cleanup-image /scanhealth
DISM.exe /Online /cleanup-image /restorehealth
DISM /Online /cleanup-Image /startcomponentcleanup
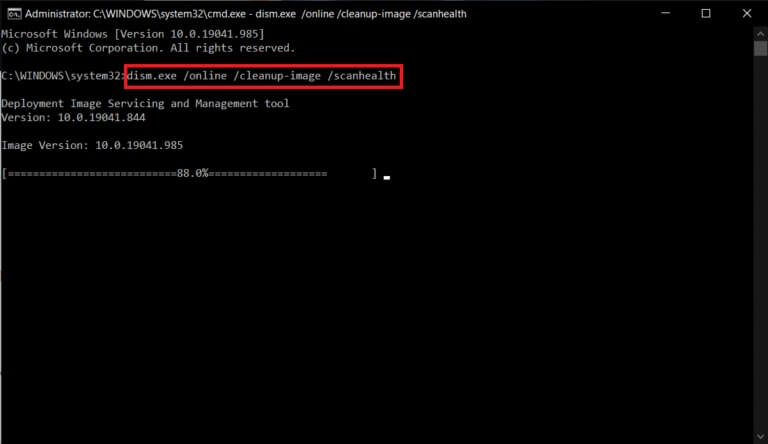
9. Finally, wait for the process to complete successfully and close the window.
Method 7: Re-enable Windows Update
You can also fix the "Windows couldn't search for new updates" error in Windows 10 using simple command lines. This is an effective troubleshooting method to resolve the error using simple commands.
1. Turn on Command Prompt as Administrator.
2. Write The following commands One by one. Press Enter key After every order.
SC config wuauserv start= auto
SC config bits start=auto
SC config cryptsvc start=auto
SC config trustedinstaller start= auto
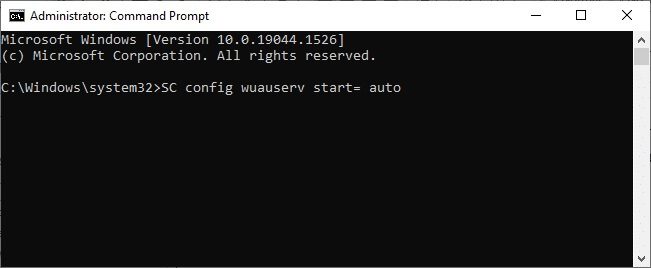
3. Once the commands are executed, restart your computer.
Method 8: Reset the Winsock Catalog
To resolve this issue, it is recommended to flush the DNS cache (ipconfig /flushdns), edit and update the NetBIOS names (nbtstat -RR), reset the IP configuration settings (netsh int ip reset), and reset the Winsock Catalog (netsh winsock reset). This can be done using the corresponding command lines as shown below.
1. Open Command Prompt as Administrator.
2. Now, type the following commands one by one and press Enter key After every order.
ipconfig / flushdns
nbtstat -RR
netsh int ip reset
netsh winsock reset
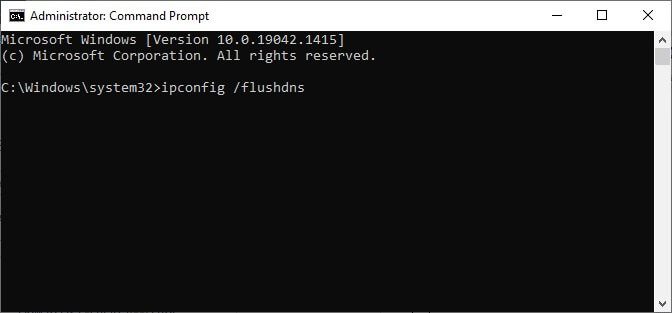
3. Wait until the process is complete and restart your computer.
Method 9: Restart the Windows Update service
Sometimes, you can fix Windows not checking for new updates for Windows 10 by manually restarting the Windows Update service. Then, follow the instructions below to do so.
1. You can run Run dialog box by pressing Windows + R keys.
2. Write services.msc As follows and click on "OK" To start a window “Services”.
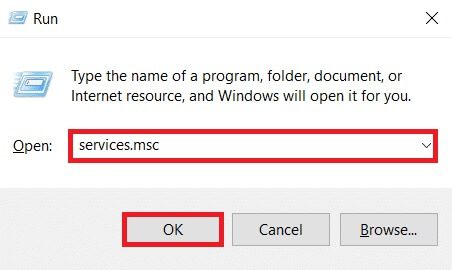
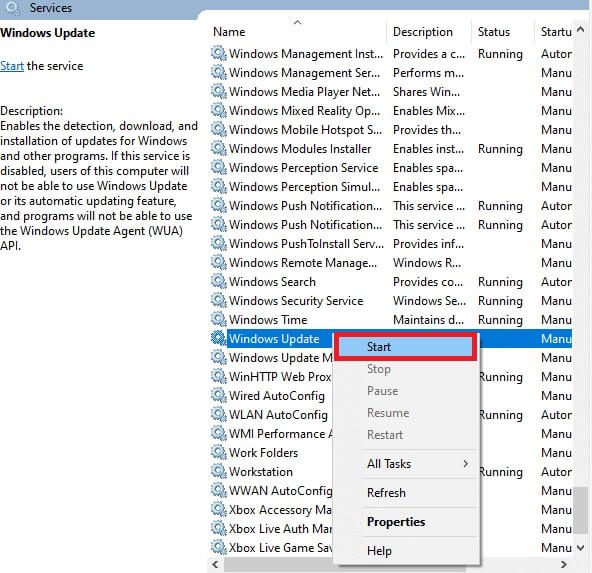
3. Now, scroll down the screen and right-click on Windows Update.
Note: If the current status is not running, you can skip the step below.
4. Here, click "turning off" If the current status shows Running.
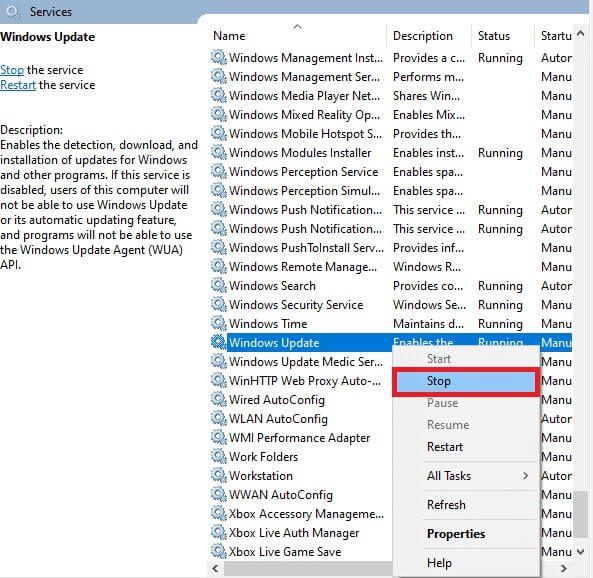
5. Now, open File Explorer by clicking Windows + E keys together.
6. Now, move to the next track.
C: \ Windows \ Software \ Datastore
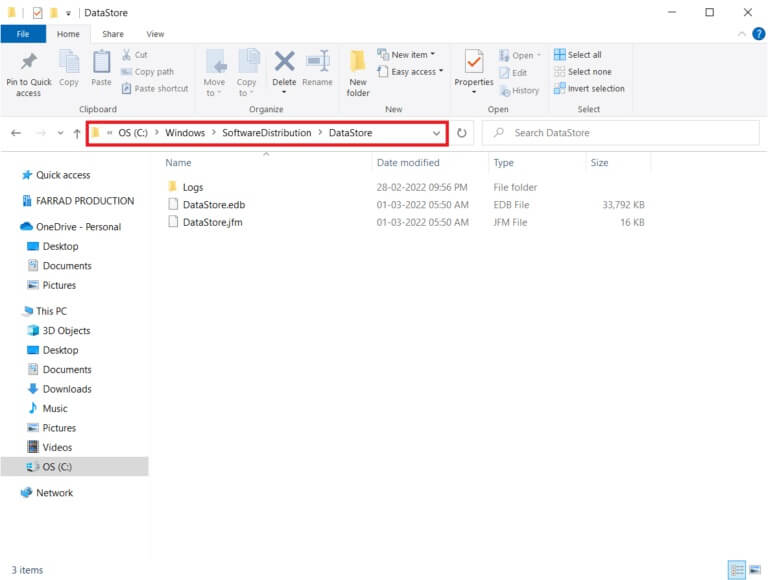
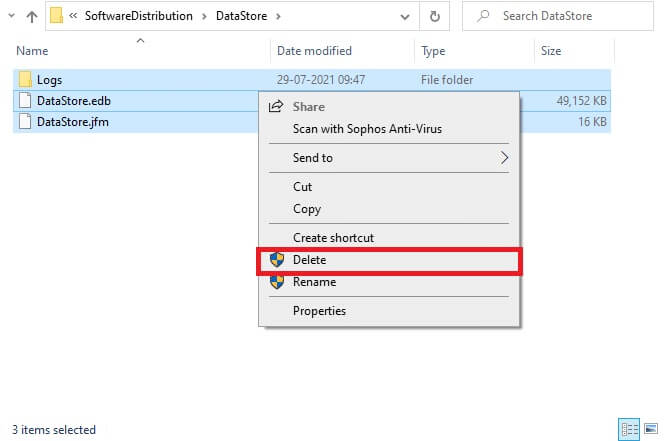
7. Now, select All files and folders by pressing Ctrl + A keys Together and right click on it.
Note: You can only delete these files using an administrator user account.
8. Here, select Delete option To remove all files and folders from the DataStore site.
9. Now, go to the path:
C: \ Windows \ SoftwareDistribution \ Download
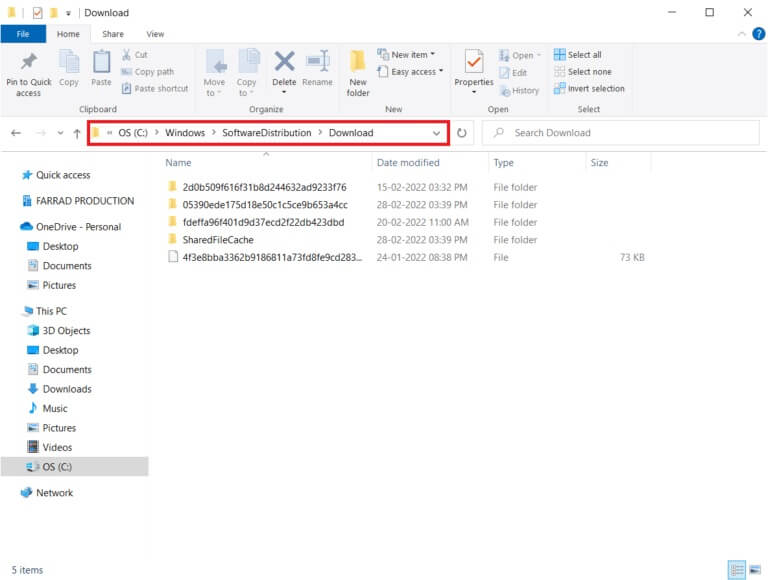
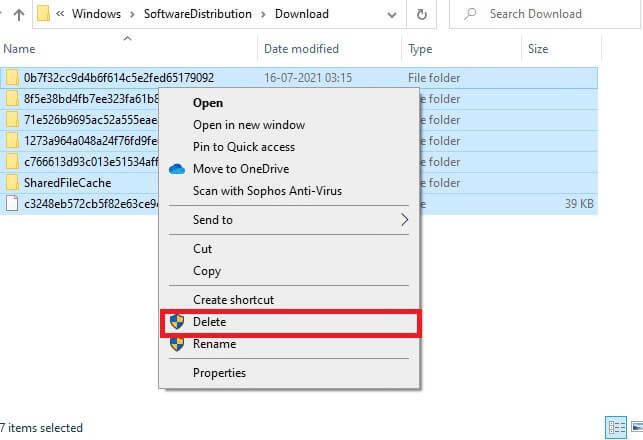
10. Delete all files located in the downloads site as mentioned in the previous steps.
Note: You can only delete these files using an administrator user account.
11. Now, go back to the Services window and right-click on Windows Update.
12. Here, select Start option As shown in the image below.
Method 10: Modify the Registry Editor
If the above methods don't resolve the issue of Windows not being able to search for new updates, try modifying registry keys. Here are some instructions for modifying keys in the Registry Editor. Be careful while modifying them, as incorrect changes can cause serious problems.
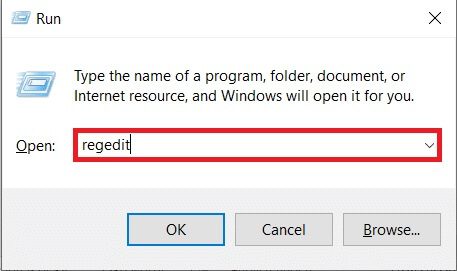
1. Press and hold Windows + R keys Together to open Run . dialog.
2. Now, type regedit in the box and press Enter.
3. Click "Yeah" In the User Account Control prompt.
4. Now, move to the next track.
HKEY_LOCAL_MACHINE\Software\Microsoft\Windows\Windows Update\AU
Note: If you cannot find this path or subkey, follow other troubleshooting methods.
5. Now, double-click on NoAutoUpdate in the right pane.
6. Change Value data to 1 To disable automatic updates.
Note: You can change the value data to 0 to enable automatic updates.
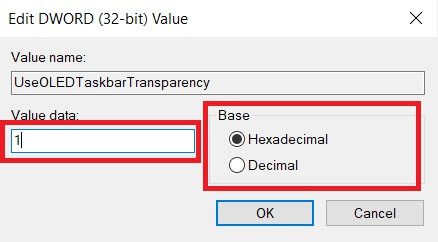
7. Then click "OK" to save changes and restart the computer.
Method 11: Delete software distribution files in safe mode
If you haven't achieved any fixes by manually deleting the Software Distribution Folder components, or if you encounter any errors while removing the files, follow the steps below to fix the "Windows couldn't find new updates" issue. These instructions will boot your computer into recovery mode so you can remove it without any problems.
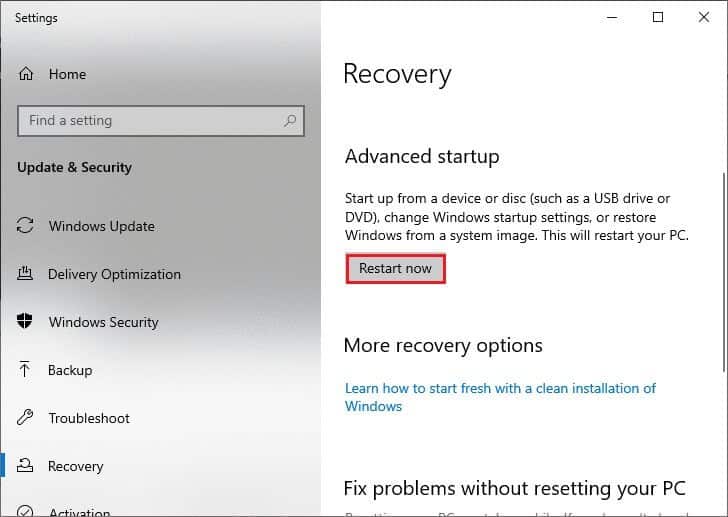
1. Press Windows key Enter the recovery options as shown. Open the best results.
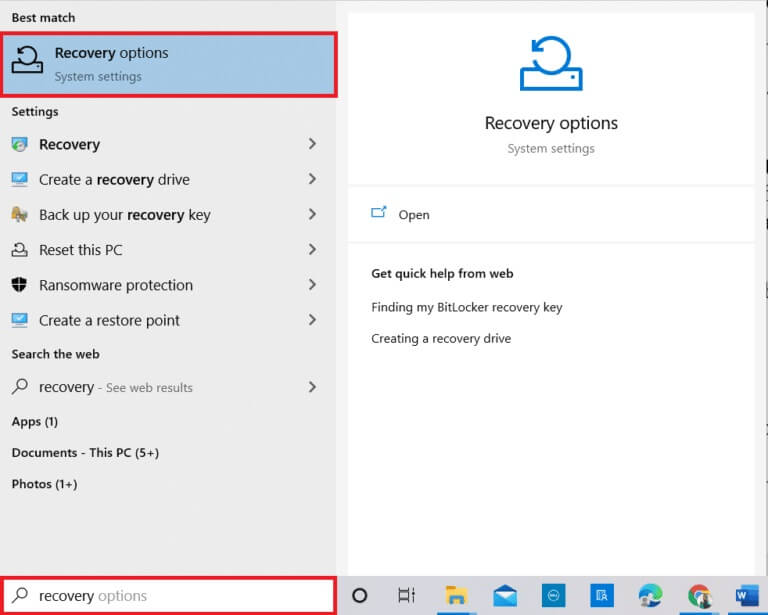
2. In a window Settings , click Option Reboot now Under Advanced Startup as shown.
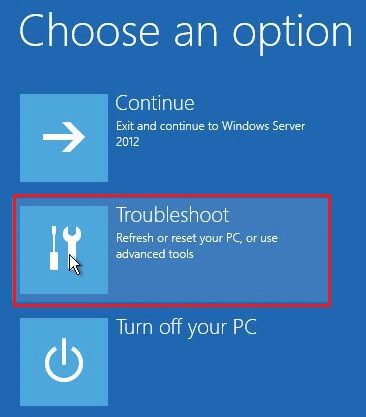
3. Once Restart your system , Click find the mistakes and resolve it In the Choose an option window.
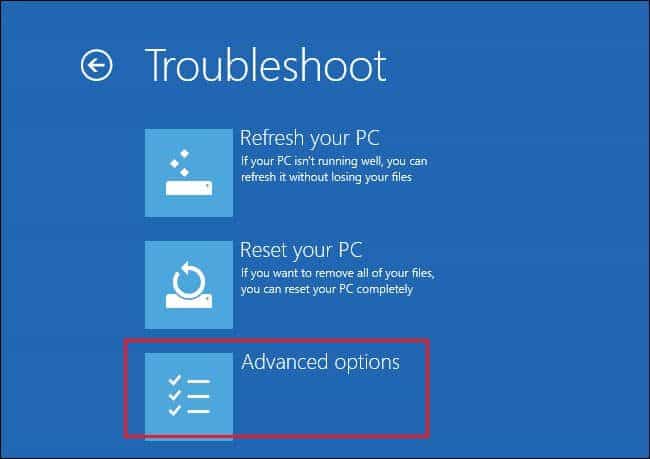
4. Then click "Advanced Options" As shown.
5. Now, click on Startup Settings As shown.
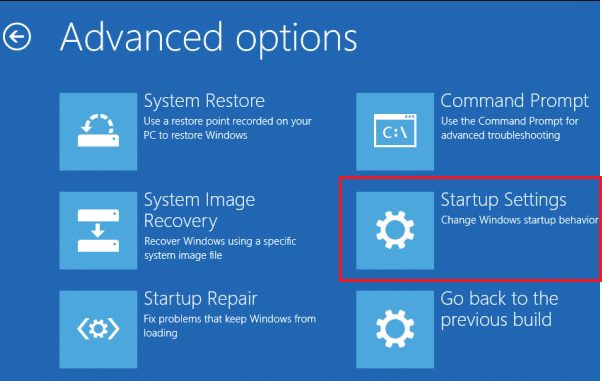
6. Now, in Startup Settings window , Click Reboot.
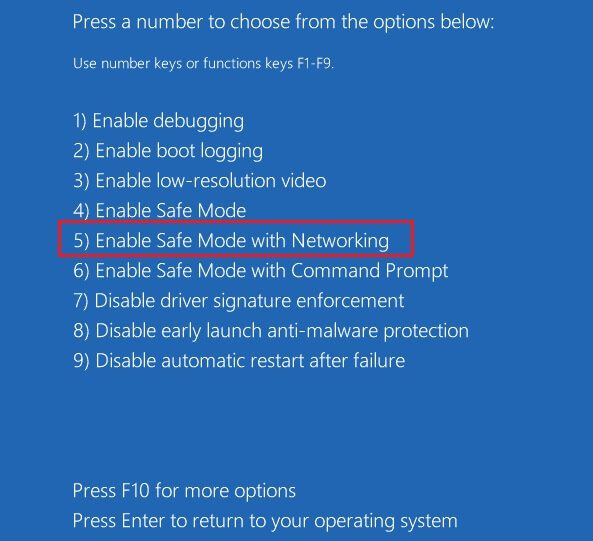
7. When your computer restarts, press F5 . key to enable The safe option With network connection.
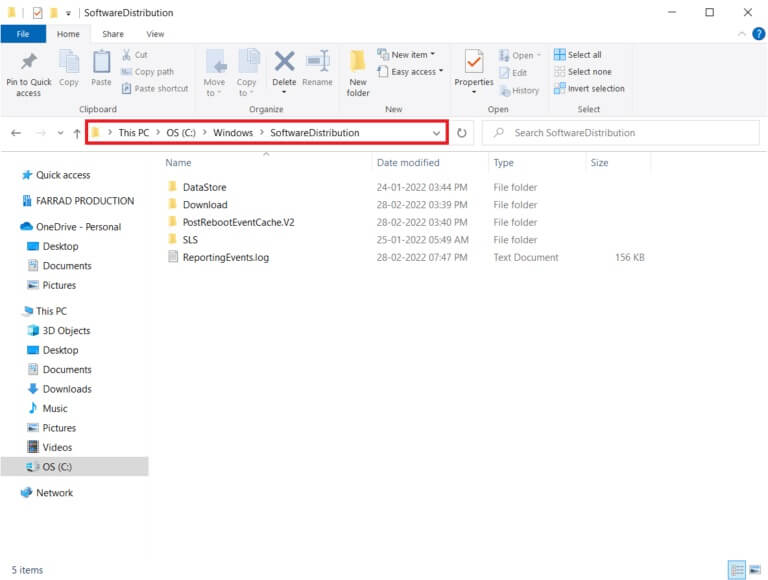
8. Now, press and hold Windows + E keys Together to open File Explorer. Go to the next site.
C:\Windows\SoftwareDistribution.
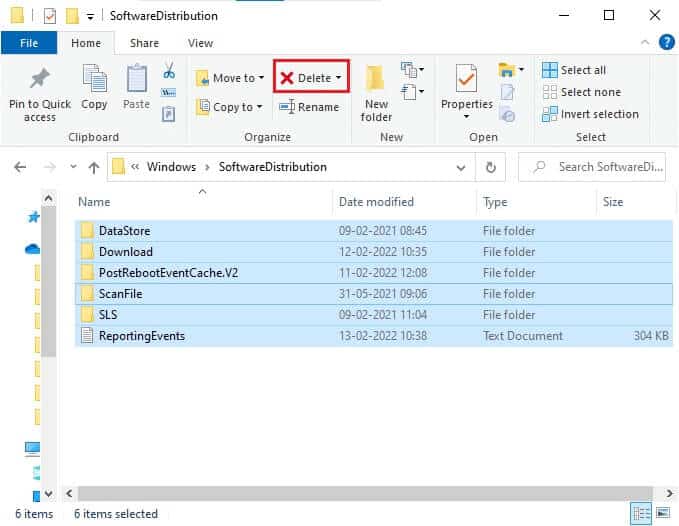
9. Select all files in Software Distribution Folder And delete it.
10. After that, Restart your computer And try Windows Update.
Method 12: Download updates manually
If none of these methods work, try downloading the updates manually as described below.
1. Press Windows key + I Together to open Settings In your system.
2. Now, select Update and security.
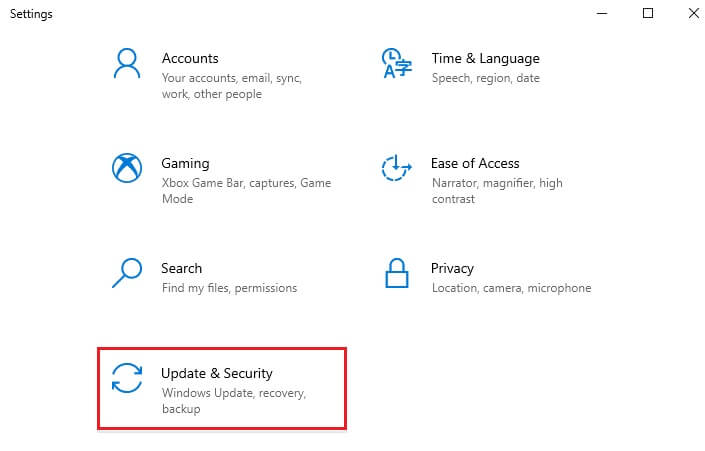
3. Now, click on the option View update history As shown below.
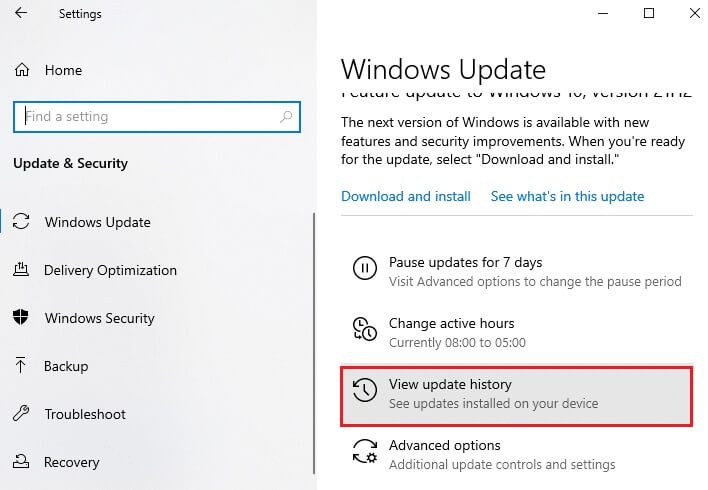
4. In the list, write down the number. Commentary Knowledge Base To be downloaded due to an error message.
5. Here, type Knowledge Base Number in search bar Microsoft Update Index.
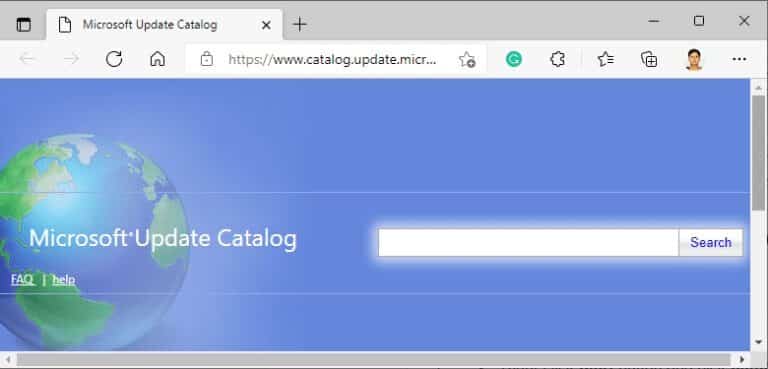
6. Follow the on-screen instructions to manually download and install the update.
Method 13: Reset your computer
If you haven't found any fixes using the methods above, reset your PC as a last resort. Follow the instructions below.
1. Press Windows key + I Together to open Settings In your system.
2. Now, scroll down the list and select Update and security.
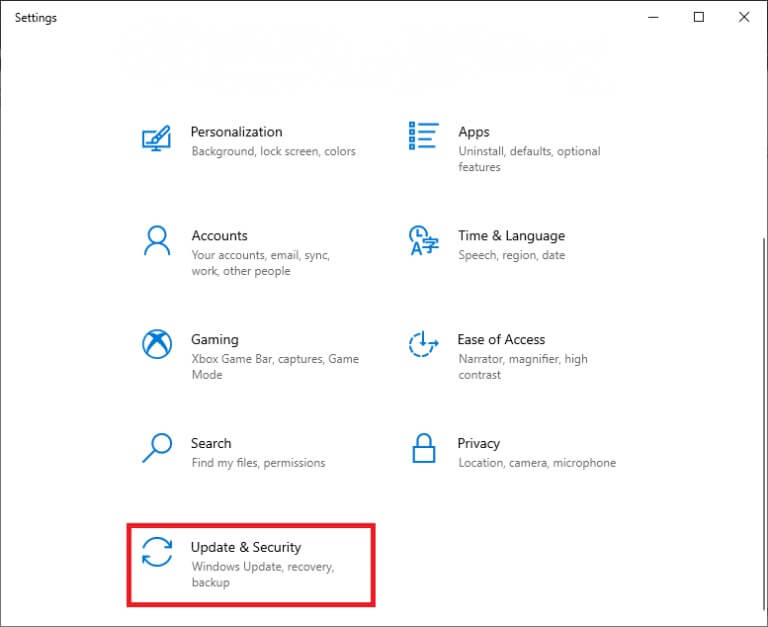
3. Now, select the Recovery option from the right pane and click on "Getting Started" in the right pane.
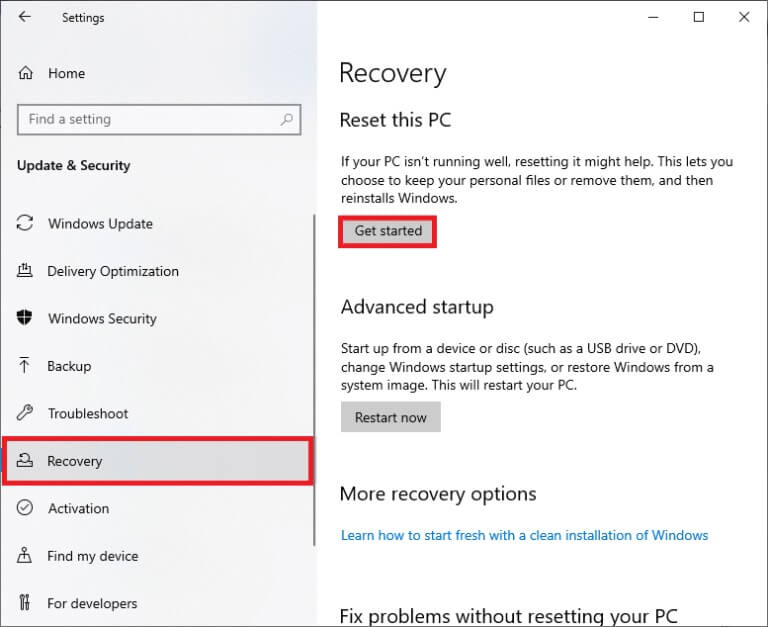
4.a. If you want to remove apps and settings while keeping your personal files, select the option keep my files.
4b. If you want to remove all your files, apps, and personal settings, select Remove everything option.
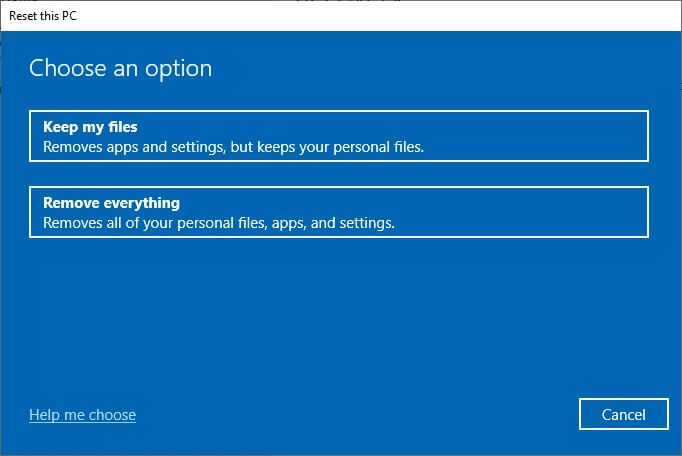
5. Finally, follow the on-screen instructions to complete the process. Reset.
Note: However, if you encounter this issue, you can roll back the system to its previous version.
We hope this guide was helpful and that you've fixed the issue of unable to check for new updates on Windows. Let us know which method worked best for you. Also, if you have any questions or suggestions regarding this article, feel free to leave them in the comments section. Let us know what you'd like to learn next.


