بغض النظر عن مدى حرصك ، ستكون هناك دائمًا أوقات يؤدي فيها تحديث برنامج تشغيل جديد إلى العبث بجهاز الكمبيوتر الخاص بك. هذا هو الحال في كثير من الأحيان مع برامج تشغيل GPU. بعد التحديث إلى برنامج تشغيل GPU غير مستقر ، قد تلاحظ حدوث وميض في الشاشة أو ظهور مشكلات في الشاشة السوداء. في حين أن إلغاء تثبيت برنامج تشغيل GPU هو السبيل للقيام بذلك ، فمن المحتمل أنه قد لا يحل مشاكلك. يحدث هذا لأن أداة إلغاء التثبيت الافتراضية لا تزال تترك وراءها بعض الملفات وإدخالات التسجيل. لذلك عندما تقوم بتثبيت برنامج تشغيل ثابت على جهاز الكمبيوتر الخاص بك ، فإن هذه الملفات المتبقية سوف تتسبب في حدوث مشكلات في التثبيت. سيوضح هذا الدليل كيفية إلغاء تثبيت برامج تشغيل GPU الموجودة تمامًا بالطريقة الصحيحة باستخدام برنامج Display Driver Installer (DDU). بحيث يتيح الحصول عليه.

لماذا استخدام برنامج إلغاء تثبيت برنامج التشغيل (DDU)
برنامج إلغاء التثبيت الافتراضي يترك الملفات المتبقية على جهاز الكمبيوتر الخاص بك. ومع ذلك ، تم تصميم Display Driver Uninstaller للبحث عن جميع الملفات والمجلدات المتبقية وإزالتها ، وتنظيف إدخالات التسجيل الفاسدة ، وإزالة جميع آثار برامج تشغيل GPU. بشكل أساسي ، عند محاولة تثبيت برنامج تشغيل GPU بعد استخدام DDU ، سيكون مشابهًا للتثبيت النظيف.
في حين أن DDU هي بلا شك أداة رائعة للاستخدام ، إلا أن الخيارات وإعدادات التكوين المختلفة التي تقدمها يمكن أن تربك المستخدمين لأول مرة. هذا هو السبب في أننا سنسلط الضوء على أسهل طريقة لاستخدام DDU دون التسبب في أي ضرر لجهاز الكمبيوتر الخاص بك.
أشياء يجب مراعاتها أثناء استخدام DDU
يعد استخدام برنامج DDU أمرًا بسيطًا ، ولكن عليك أن تضع في اعتبارك بعض الأشياء. أولاً ، تأكد من أن نظامك غير متصل بالإنترنت. هذا للتأكد من أن Windows Update لا يتداخل مع إلغاء تثبيت برامج تشغيل GPU. ثانيًا ، لن يعمل DDU على محرك أقراص الشبكة. لذلك ستحتاج إلى تثبيته وتشغيله على جهاز الكمبيوتر الذي يعمل بنظام Windows. يوصى أيضًا باستبعاد مجلد DDU من برنامج مكافحة الفيروسات.
يوصى باستخدام DDU في الوضع الآمن لـ Windows. ومع ذلك ، إذا اخترت استخدام DDU في الوضع العادي ، فستحتاج إلى تكرار العملية بأكملها مرتين للتأكد من أنها تنظف جميع الملفات بشكل صحيح. الآن ، دعنا ننتقل إلى العملية الفعلية.
كيفية إلغاء تثبيت برامج تشغيل GPU باستخدام DDU
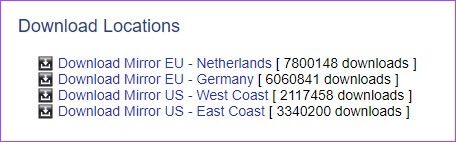
الخطوة 1: قم بتنزيل مثبت DDU الموجود في الجزء السفلي من موقع Guru3D. اختر موقع التنزيل الذي تختاره.
تنزيل DDU لنظام التشغيل Windows
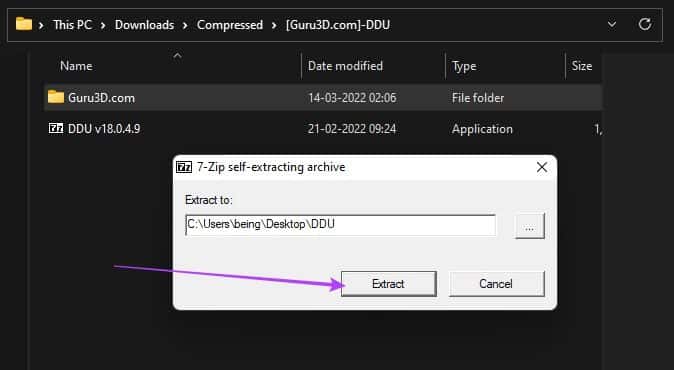
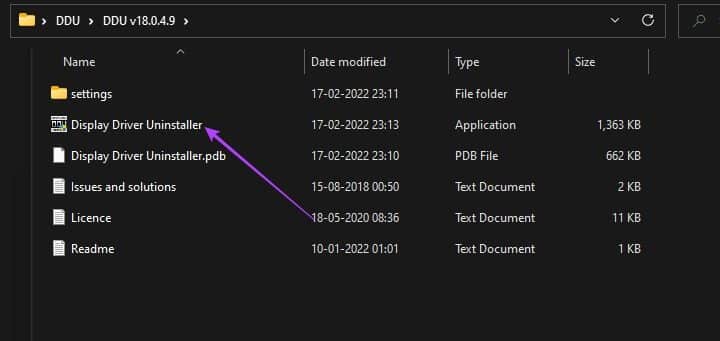
الخطوة 2: بمجرد تنزيل ملف المثبت ، قم بفك ضغط الملف إلى الموقع الذي تختاره. افتح الآن المجلد المستخرج وانقر نقرًا مزدوجًا فوق DDU.exe لتشغيل أداة الاستخراج الذاتي.

خطوة 3: بمجرد استخراج الملفات ، سيتعين عليك إعادة تشغيل نظامك إلى الوضع الآمن.

الخطوة 4: بمجرد إعادة تشغيل جهاز الكمبيوتر الخاص بك في الوضع الآمن ، افتح مجلد DDU وانقر نقرًا مزدوجًا فوق Display Driver Uninstaller.exe لتشغيله.
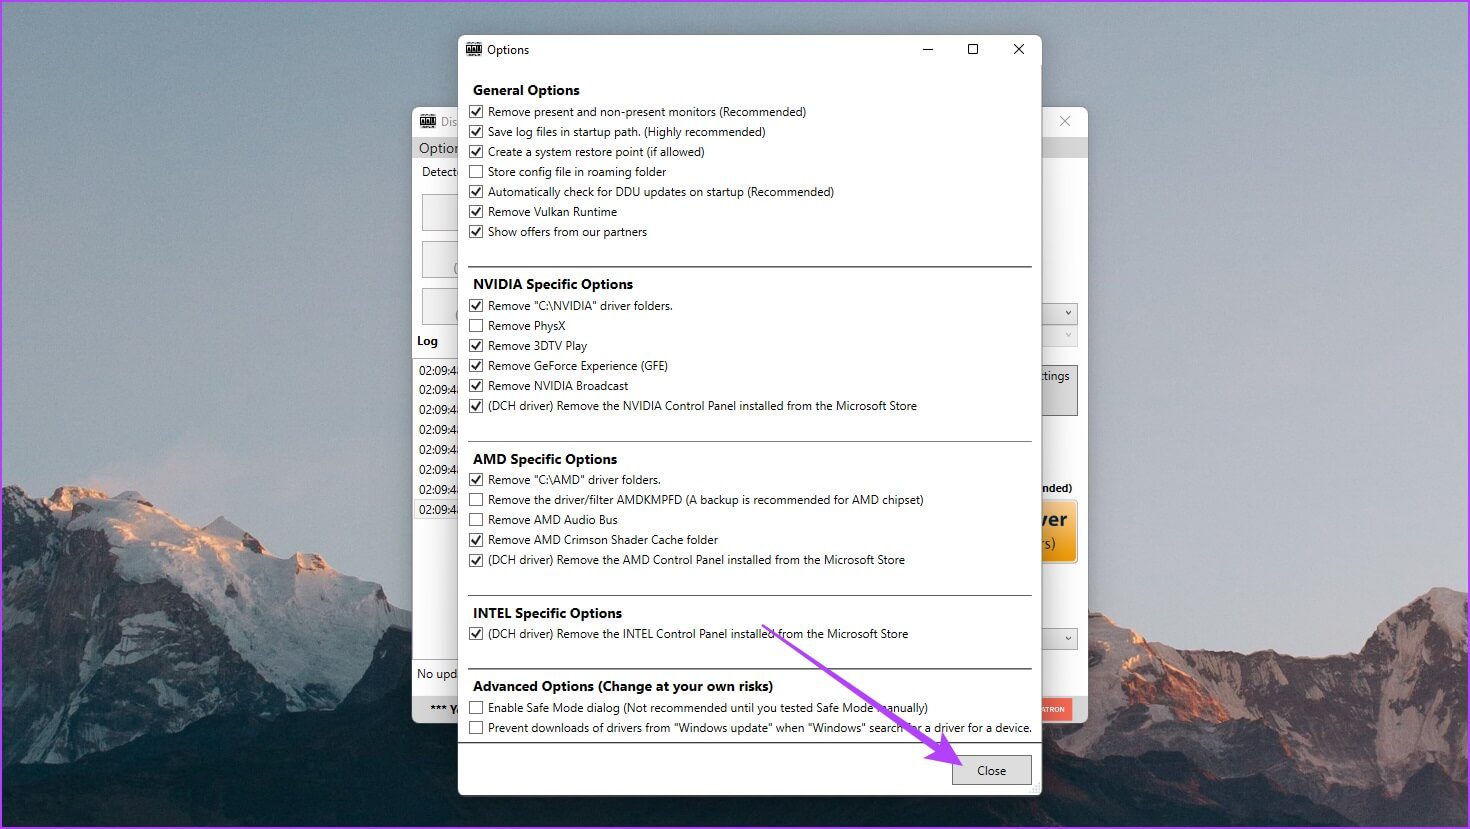
الخطوة 5: في نافذة الخيارات المنبثقة ، حدد تفضيلاتك. ومع ذلك ، إذا كنت ترغب في الاحتفاظ ببعض الملفات أو البرامج الإضافية المثبتة على نظامك ، فقم بإلغاء تحديدها من القائمة.
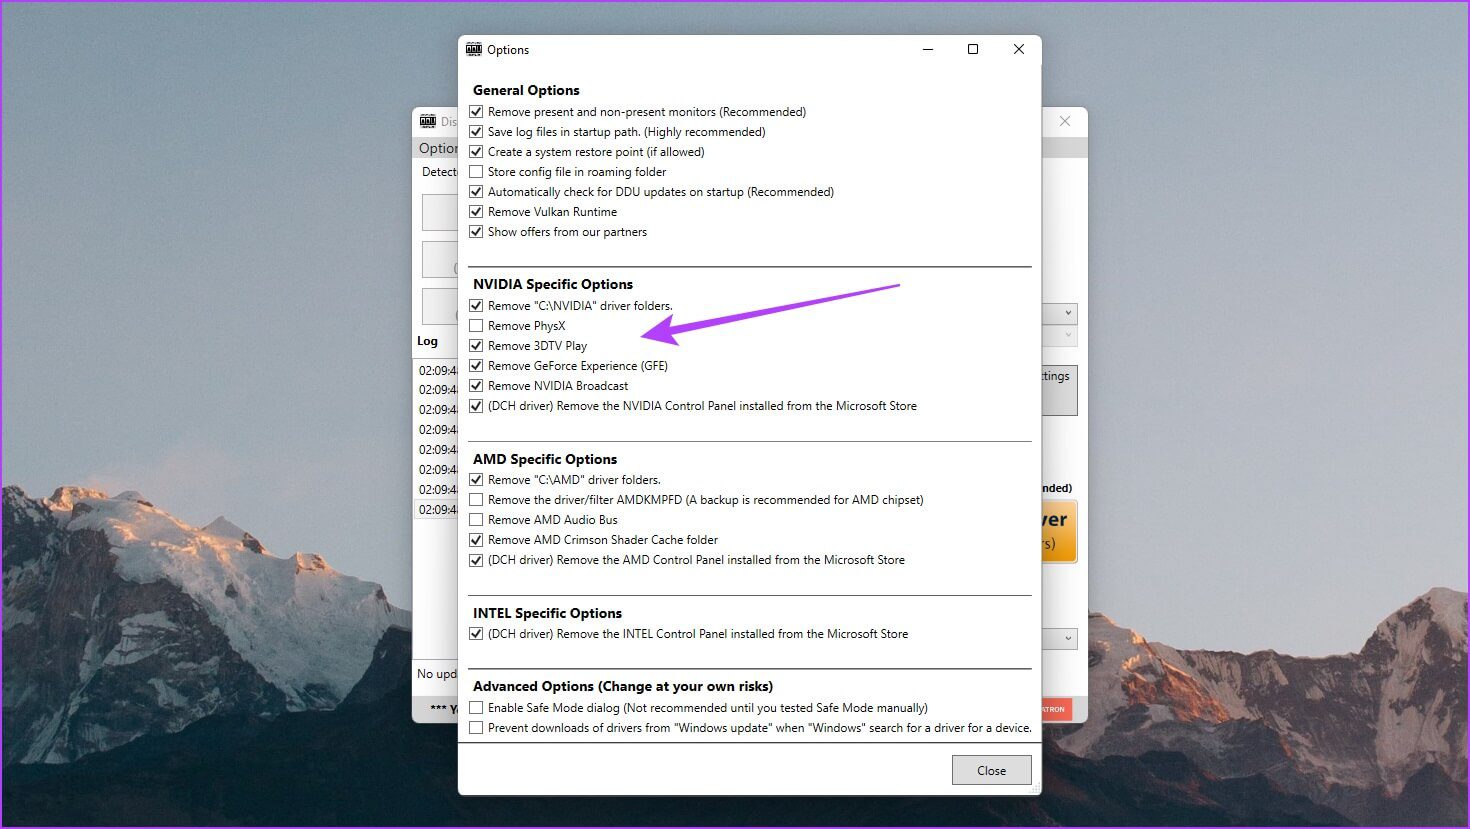
خطوة 6: بمجرد إجراء التغييرات حسب تفضيلاتك ، انقر فوق إغلاق.
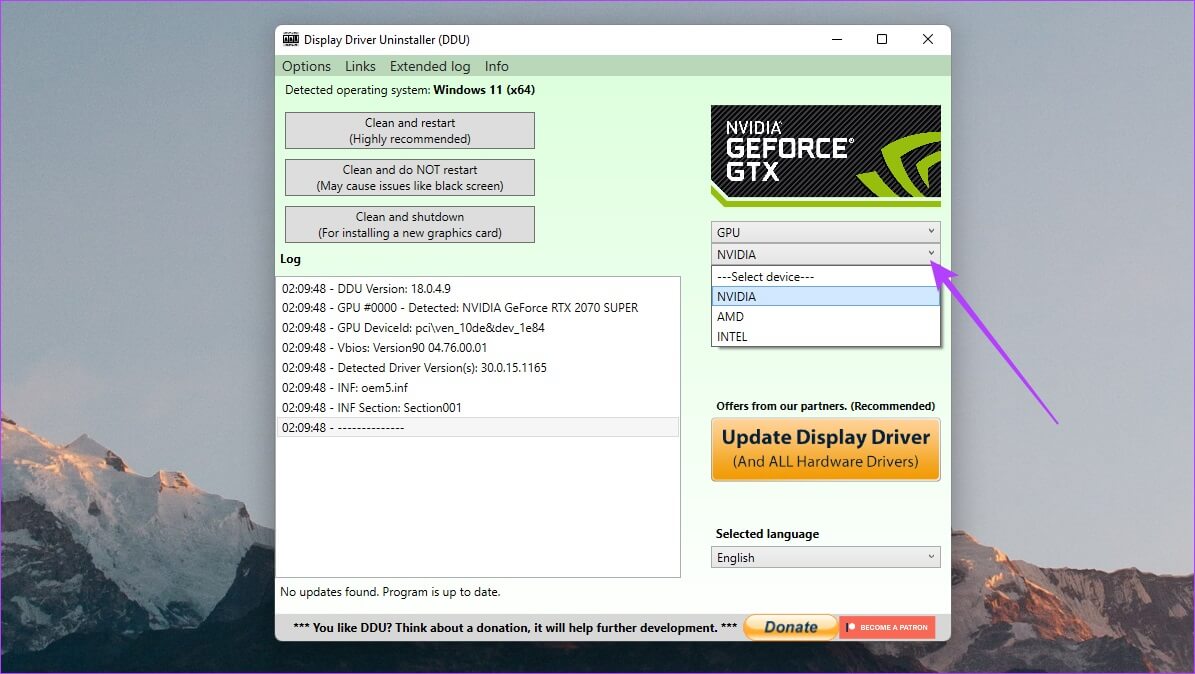
الخطوة 7: يجب أن تفتح نافذة DDU الآن. على الجانب الأيمن ، حدد نوع جهازك – GPU.
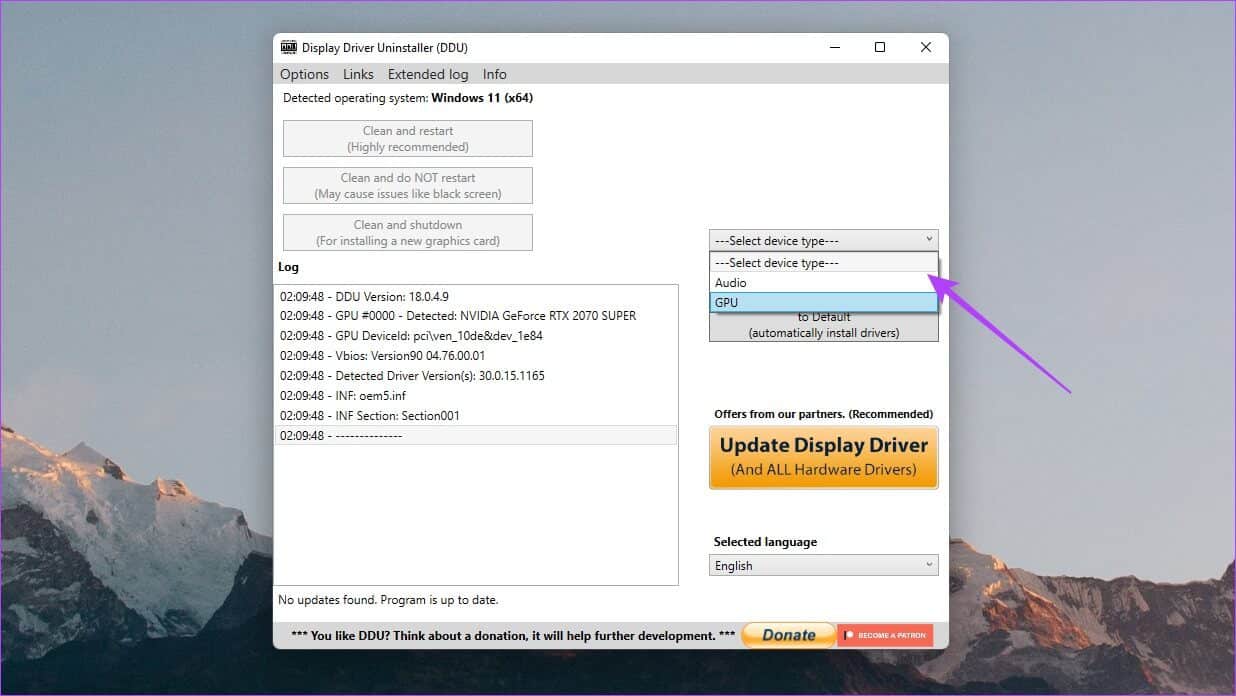
الخطوة 8: حدد الآن الشركة المصنعة لوحدة معالجة الرسومات – NVIDIA أو AMD أو Intel
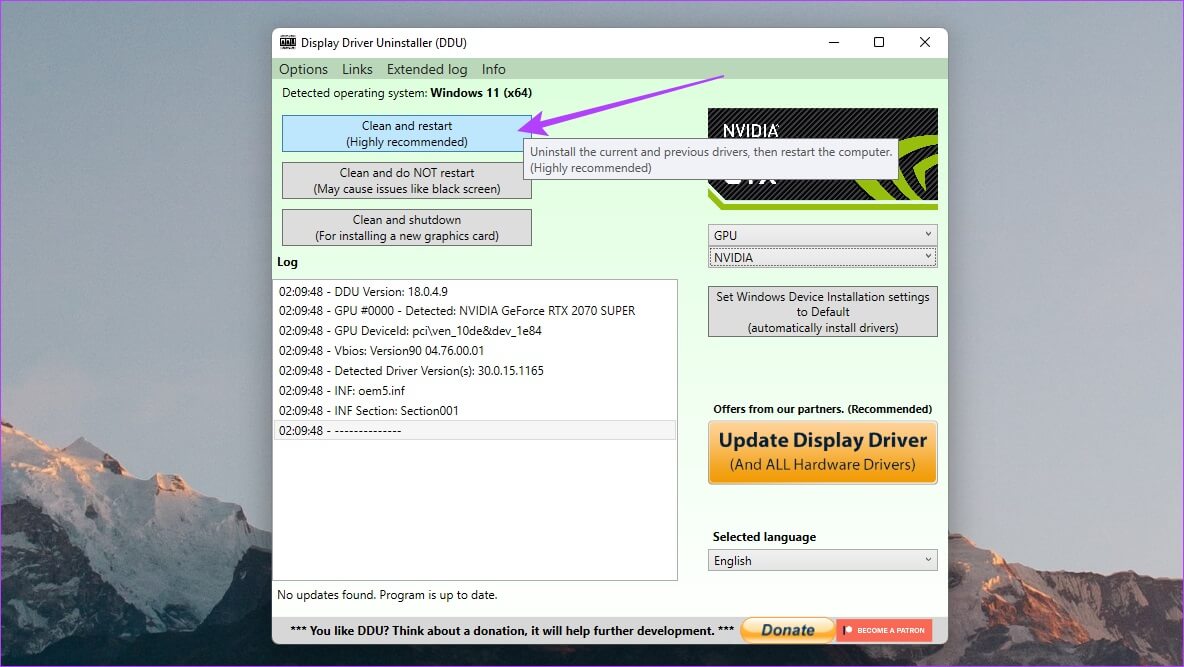
خطوة 9: أخيرًا ، انقر فوق تنظيف وإعادة التشغيل.
وهذا كل شيء. سيقوم DDU بإلغاء تثبيت برنامج تشغيل الرسومات ، وتنظيف السجل ، وإزالة أي ملفات متبقية ، ثم إعادة تشغيل نظامك. بمجرد بدء تشغيل جهاز الكمبيوتر الخاص بك ، قم بتوصيل جهاز الكمبيوتر الخاص بك بالإنترنت ، وسيقوم Windows تلقائيًا بجلب أحدث برنامج تشغيل مستقر.
إبدأ من جديد
بمجرد انتهاء Windows من تثبيت برنامج تشغيل GPU نيابة عنك ، يمكنك الاستمرار في استخدام جهاز الكمبيوتر الخاص بك كما تريد. ومع ذلك ، لاحظ أن Windows لا يقوم بتثبيت أحدث برنامج تشغيل GPU. بدلاً من ذلك ، يقوم بتثبيت الإصدار الذي يعتقد أنه الأكثر استقرارًا. قد ترغب في تحديث برنامج تشغيل GPU الخاص بك لاحقًا إلى أحدث إصدار إذا كنت متأكدًا من أنه مستقر الآن. إذا كان جهاز الكمبيوتر الخاص بك يحتوي على رسومات NVIDIA ، فيمكنك مراجعة دليلنا حول تثبيت وتحديث برامج تشغيل NVIDIA بدون GeForce Experience.