In the fast-paced world of social media, timing is everything. Have you ever found a great Facebook post but weren't sure when to share it for maximum impact? That's where the art of scheduling comes in. This article will walk you through how to schedule a Facebook post on desktop, Android, or iOS.

You may be wondering why you'd want to schedule a Facebook post? The answer is simple: convenience and efficiency. Whether you're a business owner, a content creator, or someone who enjoys sharing moments, scheduling your posts can make your life easier.
Furthermore, scheduling posts allows you to align your content with your audience's peak engagement hours, increasing the likelihood that your posts will be viewed, liked, and shared. With this understanding in mind, let's consider what you need to know about scheduling a post on Facebook.
Things to Know Before Scheduling a Facebook Post
Using Facebook to schedule a post is useful if you're planning your content. However, there are a few things you need to know beforehand, such as:

- You can only schedule posts for your Pages and Groups, not your profile.
- You can schedule posts up to six months in advance and have a maximum of 100 scheduled posts per Page or Group.
Now, let's start with different methods.
How to schedule posts on Facebook pages on desktop
Scheduling posts on Facebook pages or groups is easy, provided you know the steps involved. Let's start with desktop publishing.
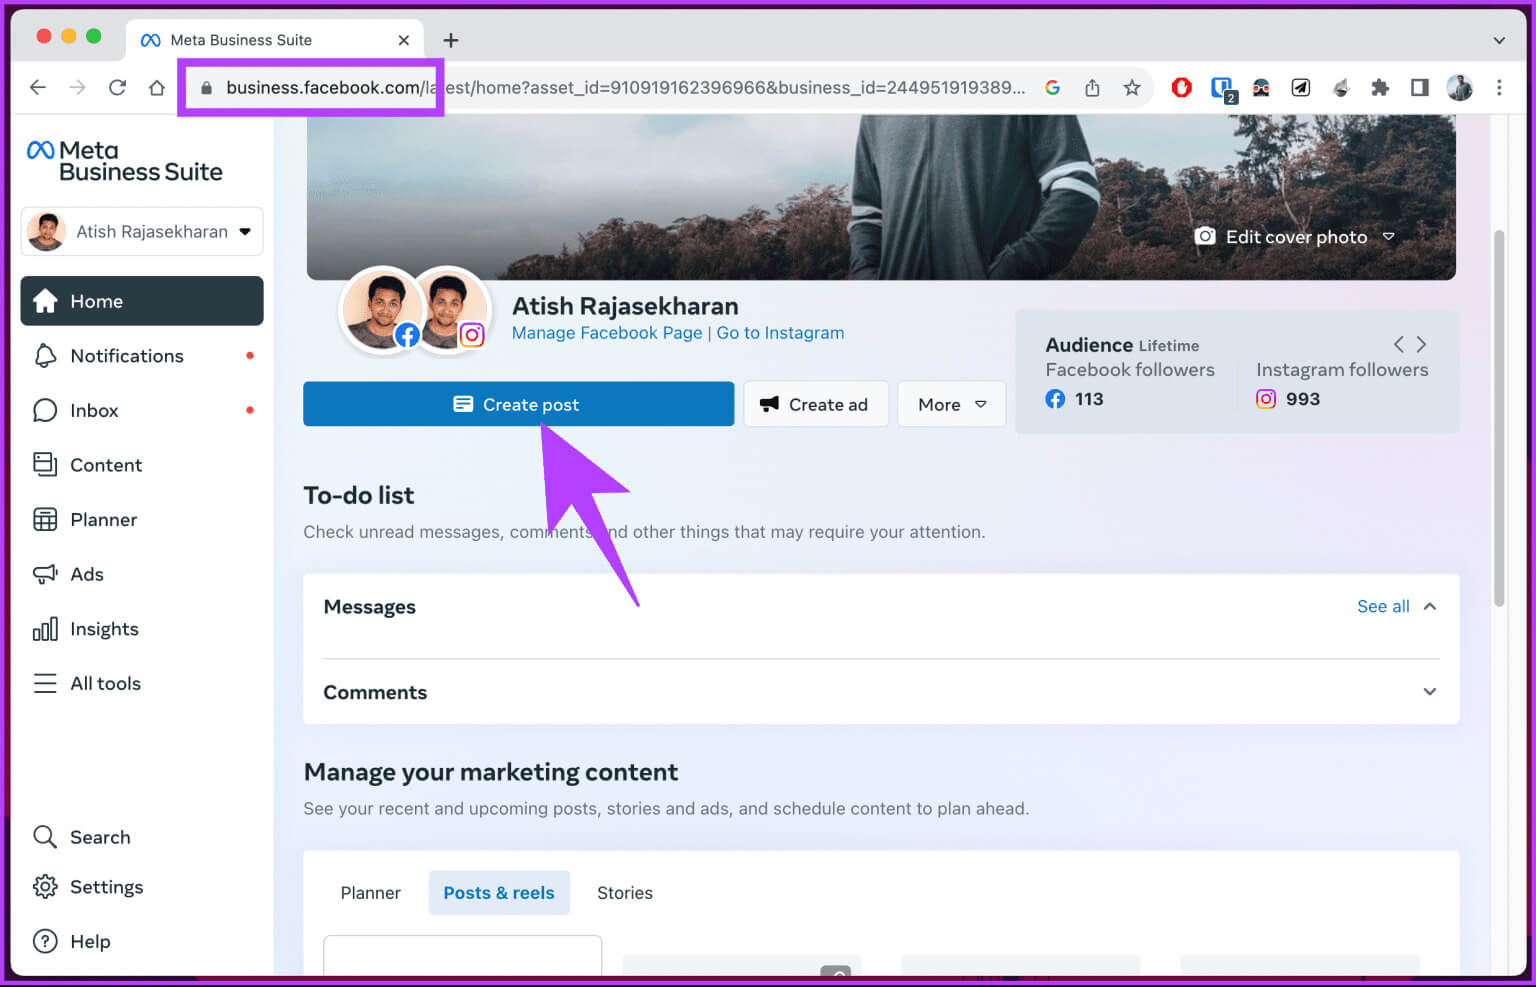
Step 1: Go to MetaBusiness Suite From your favorite browser on your Windows or Mac computer.
Step 2: You will be directed to your Facebook page. Click the button. Create a post.
Note: You can always change the page from the right pane.
Step 3: On the next page, select the type of media you want to publish and type: Caption For the post.
Note: You'll see a preview of your post on the right side. So, adjust and adapt accordingly for the best experience.
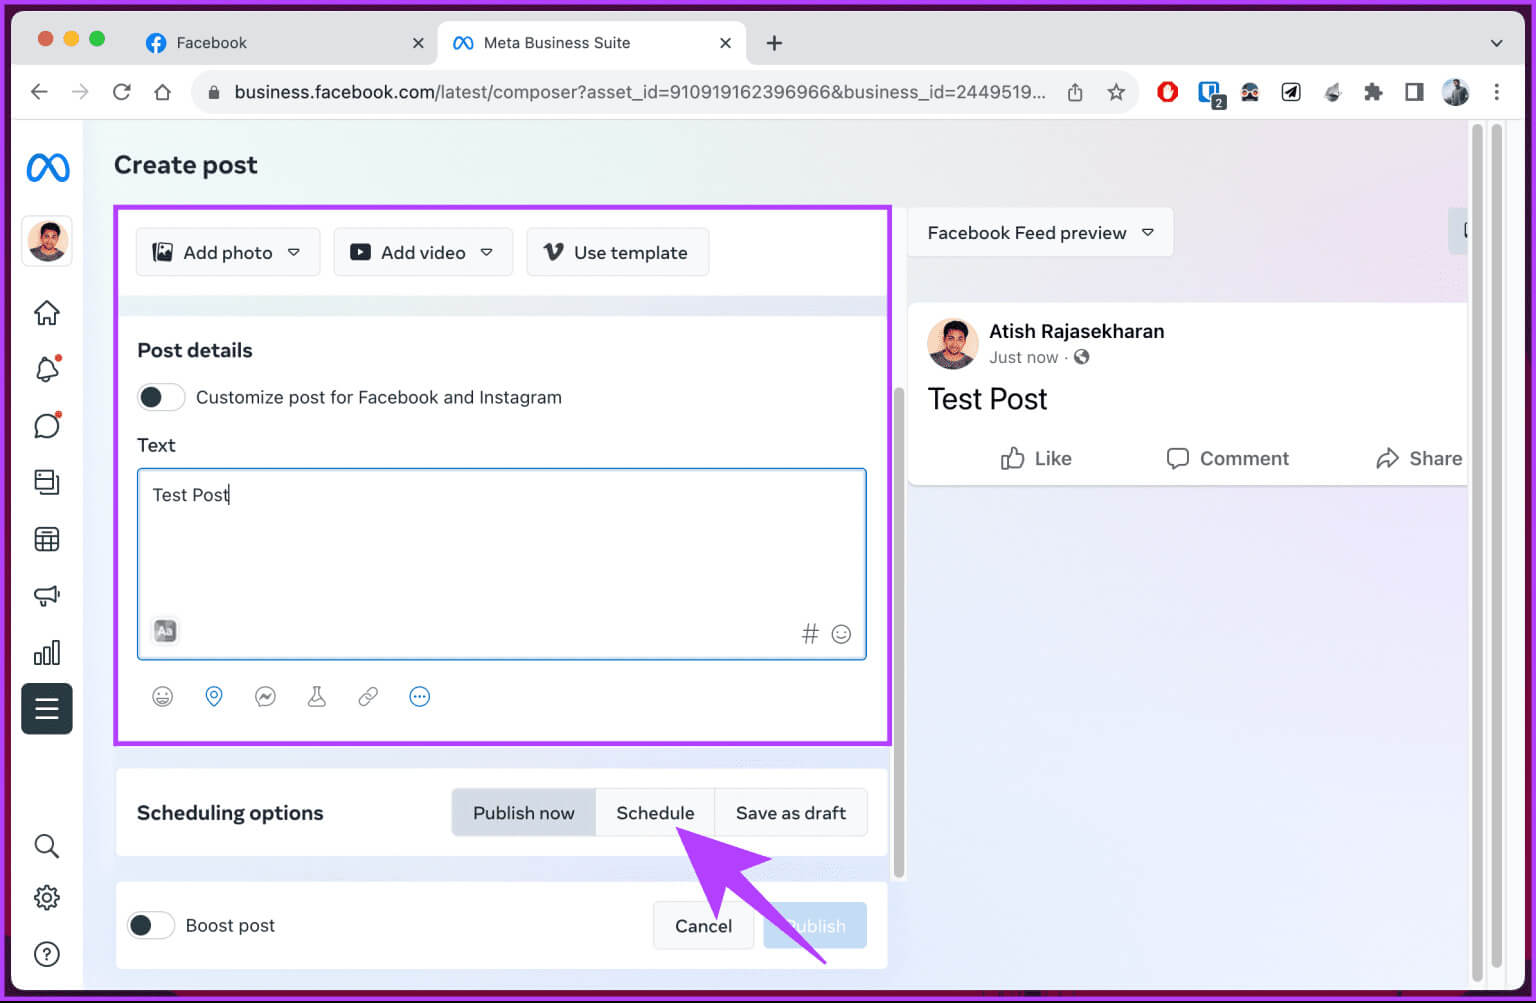
Step 4: Once your post is ready, scroll down and choose جادول Within the scheduling option.
Step 5: Now, select Date and time Post to Facebook or Instagram (only available if you link it) when you want to go live. Then save your changes by clicking the schedule button at the bottom.
Tip: If you haven't already, here's how: How to Link Instagram to a Facebook Page and Profile.
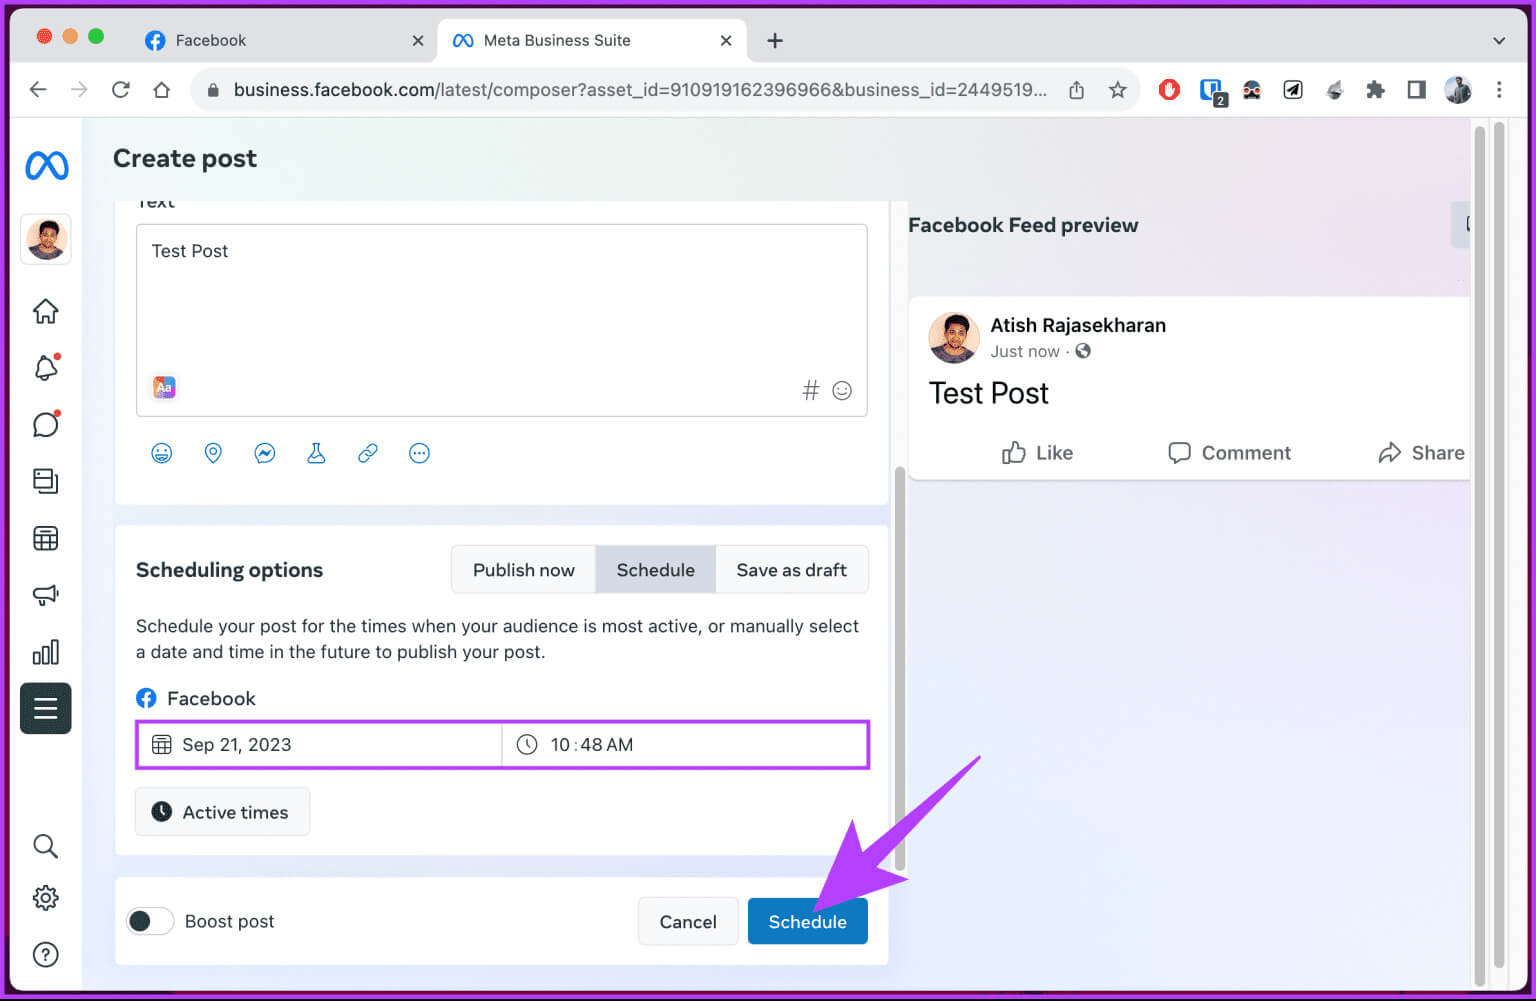
That's it. You'll be taken back to the scheduler page. Facebook will take over your scheduled post and automatically publish it to your Page at the specified date and time.
How to edit or delete your scheduled posts on Facebook
If you want to edit, reschedule, or delete your scheduled posts, follow the steps below.
Step 1: Open Facebook Click on the post to a specific date from the page. Planner.
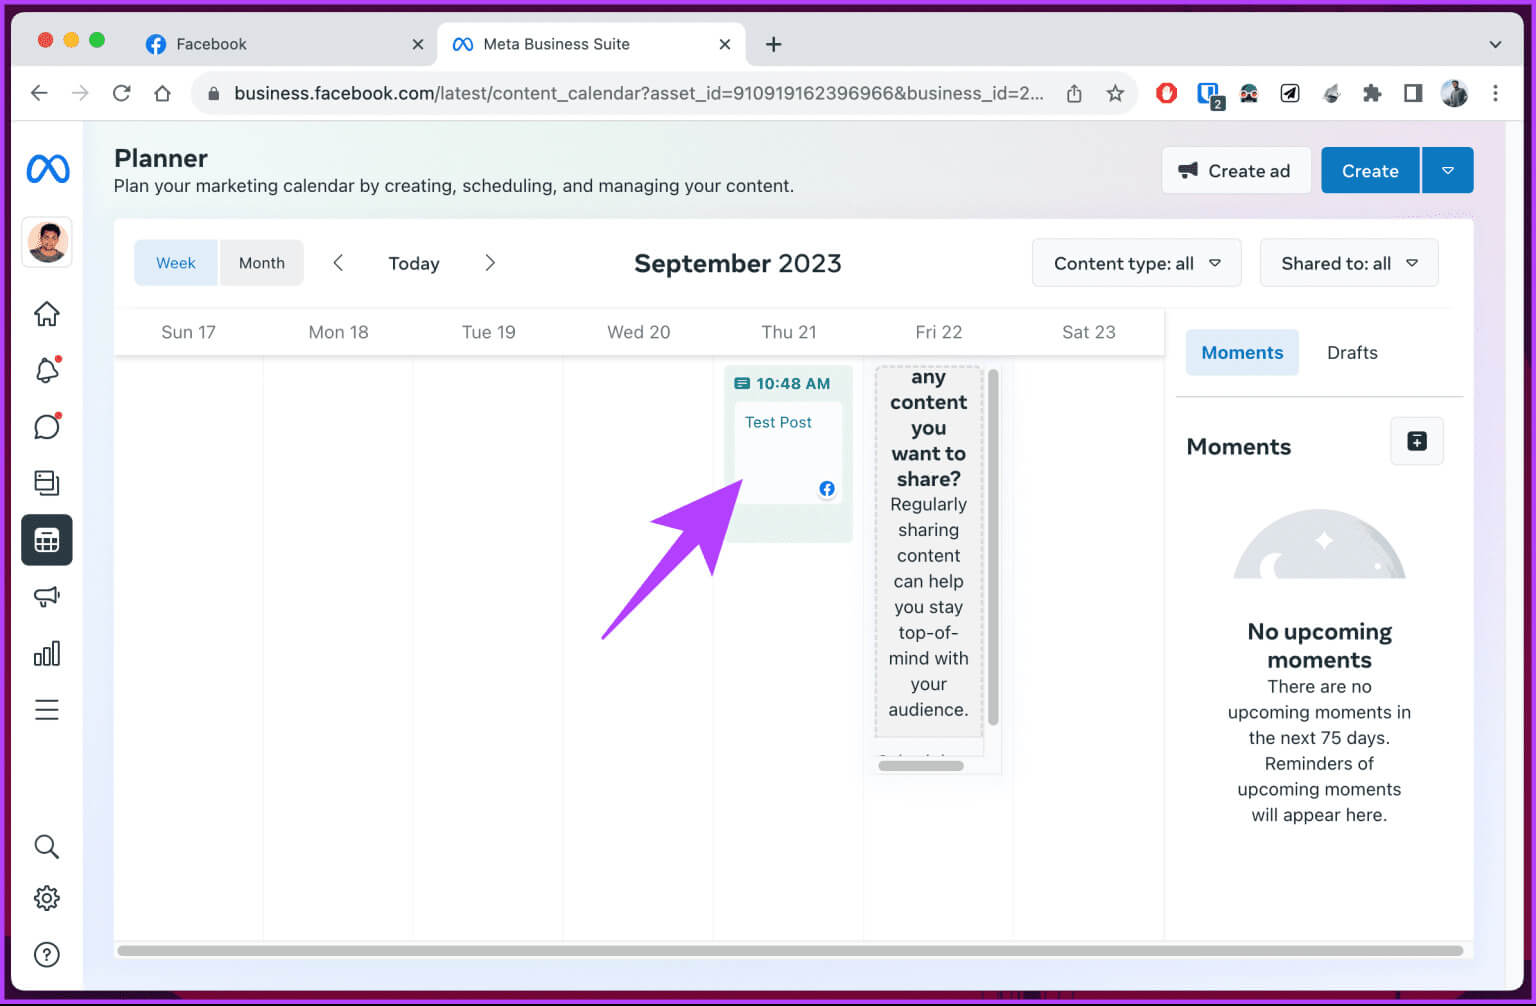
Step 2: Now, do the Necessary changes On the post or reschedule it.
Note: To delete it, click the three-dot icon on the Post Details page and select Delete Post from the drop-down menu.
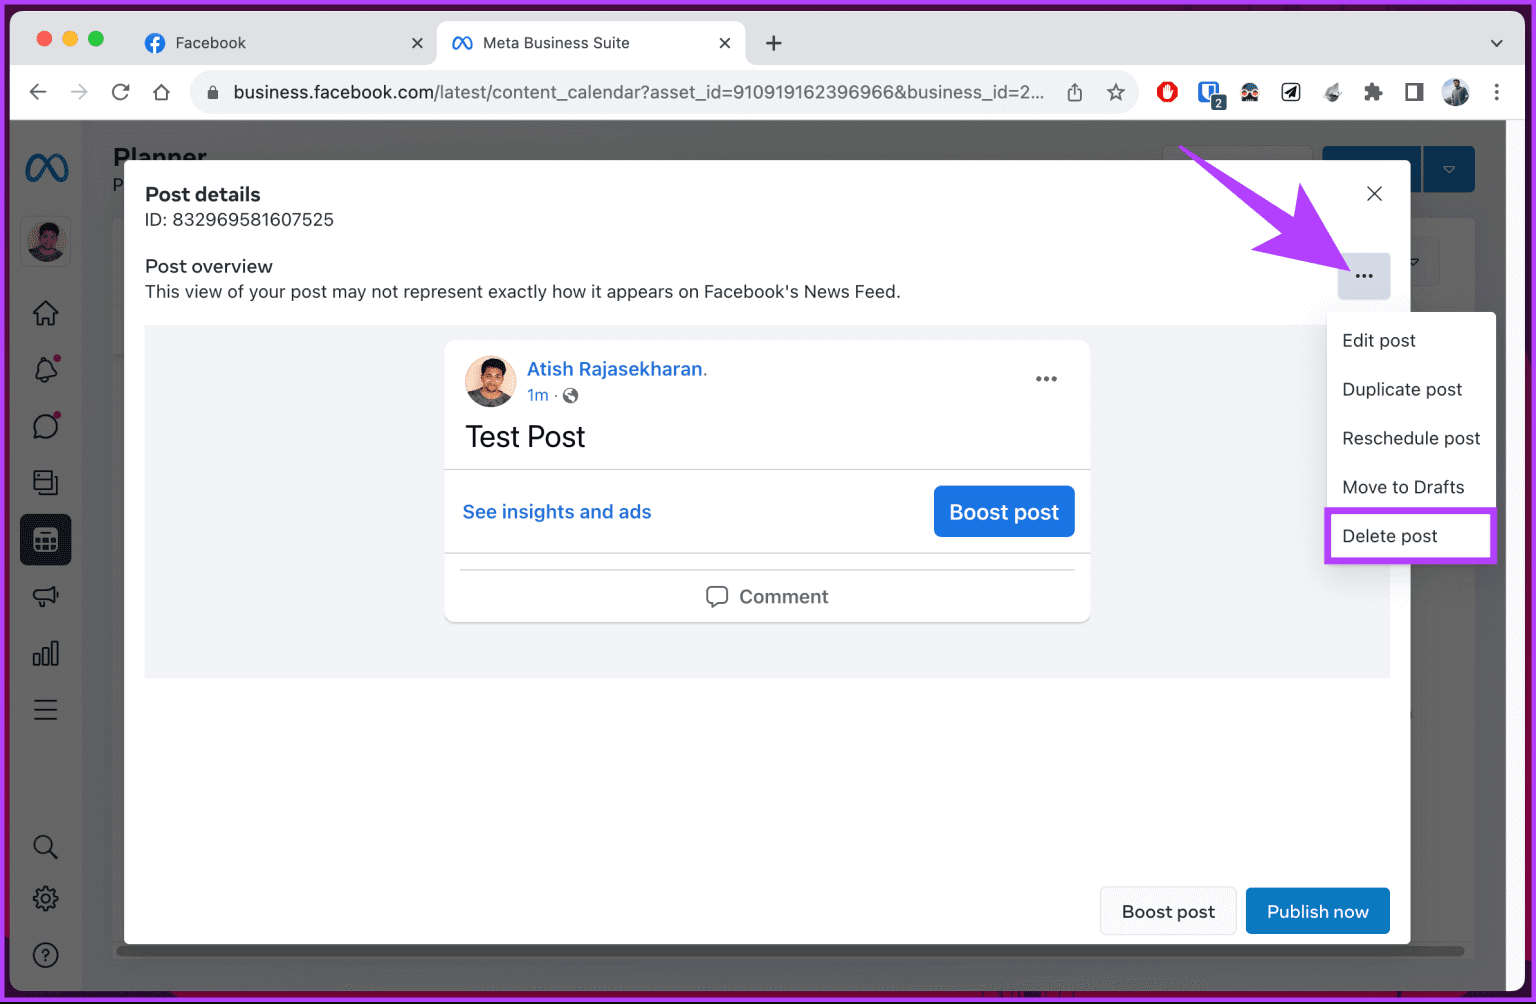
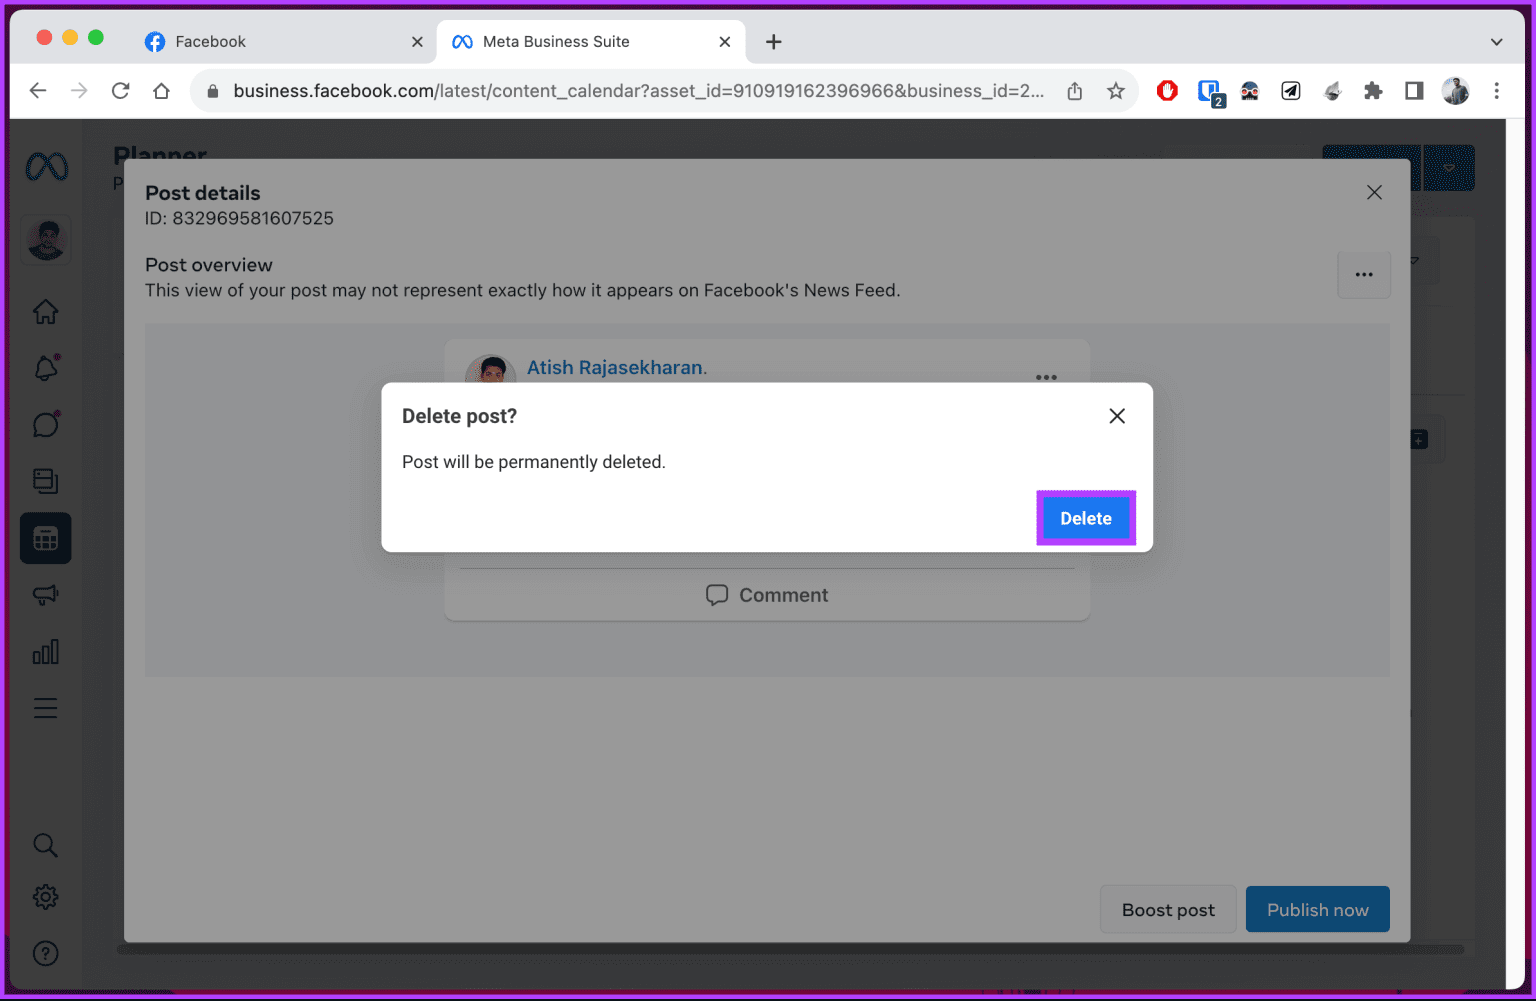
There you go. Your post will be ignored, and you'll see a confirmation message in the bottom right corner.
Scheduling posts on Facebook pages using mobile
There are multiple ways to schedule posts for your Facebook Page on mobile. We'll list all the possible methods below. Let's start with the most common and easiest method.
Method 1: Use the Facebook app
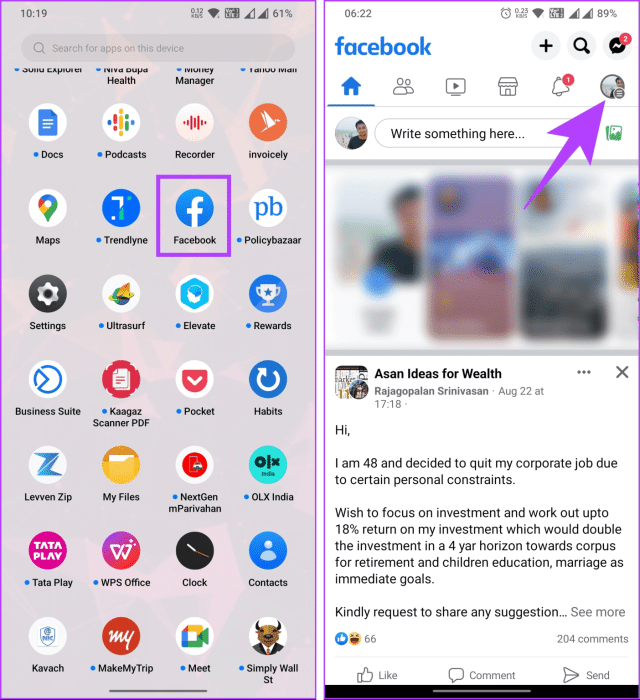
Step 1: Launch the Facebook app on your Android or iOS device. Go to the menu The three horizontal lines.
Note: On iOS, you'll see the three horizontal lines in the bottom-right corner.
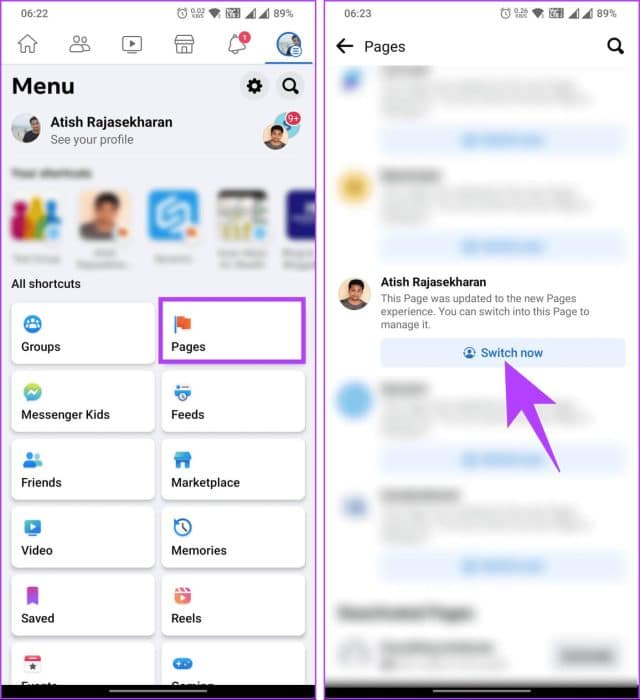
Step 2: Locate Pages. Find the Page you want to schedule a post for, and then click Switch now.
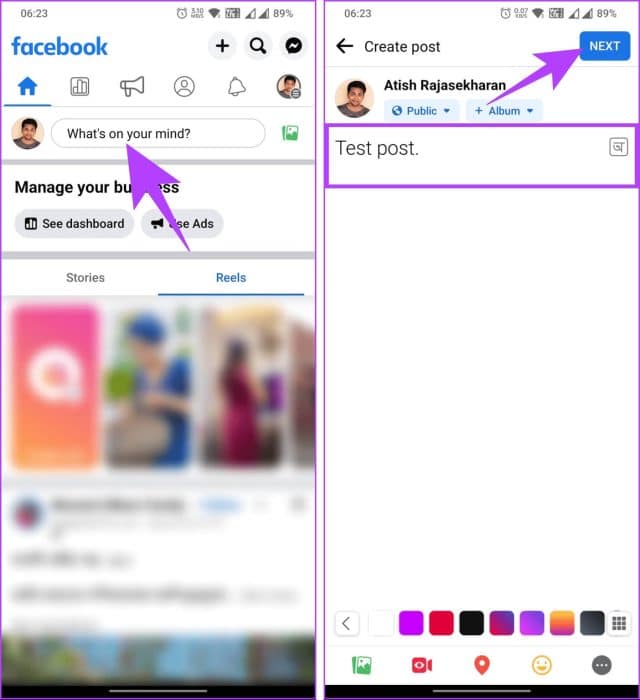
Step 3: Click on the text box "what's on your mind?" Now, write or add media for the post, and then tap next one.
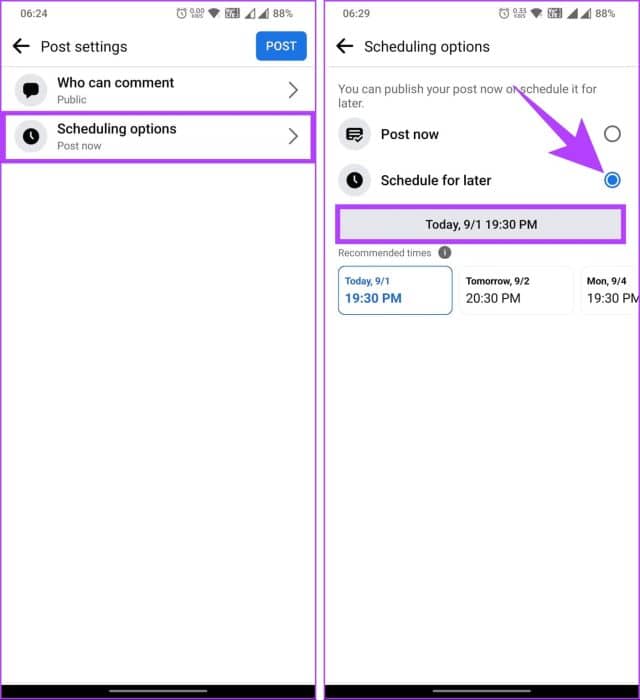
Step 4: On the Post Settings screen, tap Scheduling Options. On the next screen, choose “Schedule for later.”
Step 5: Click the gray button that displays the date and time. Now, choose the date and time you want to schedule the post, and then click "OK".
Note: You can also click on Facebook's recommended times shown below.
Step 6: Tap the back arrow icon in the upper left corner. Finally, tap "to publish" in the upper right corner.
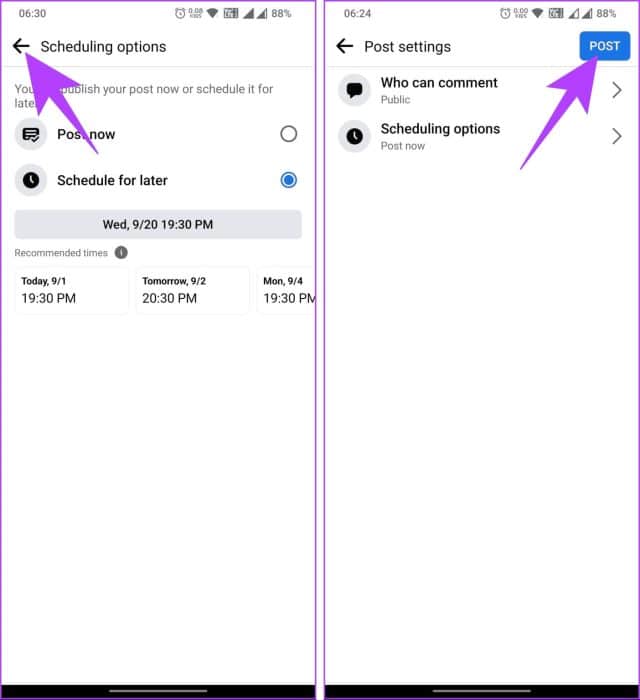
You'll be returned to your Page's home page to confirm your scheduled post. If you want to delete your scheduled post, follow the steps below.
Delete your scheduled post
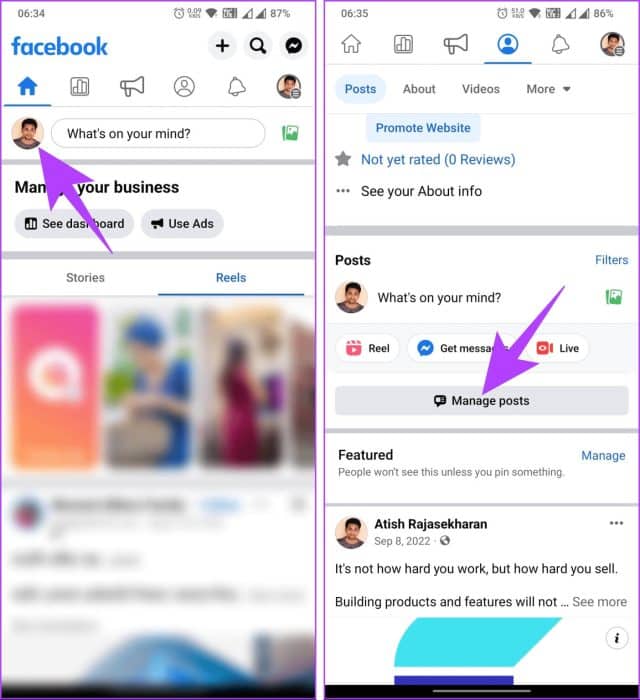
Step 1: Go to your Facebook profile by clicking on your profile picture.
Step 2: Scroll down and tap Publications Management Within the publications section.
Step 3: Find the post you want to delete and tap it. Tap Next And choose Delete posts From the bottom sheet.
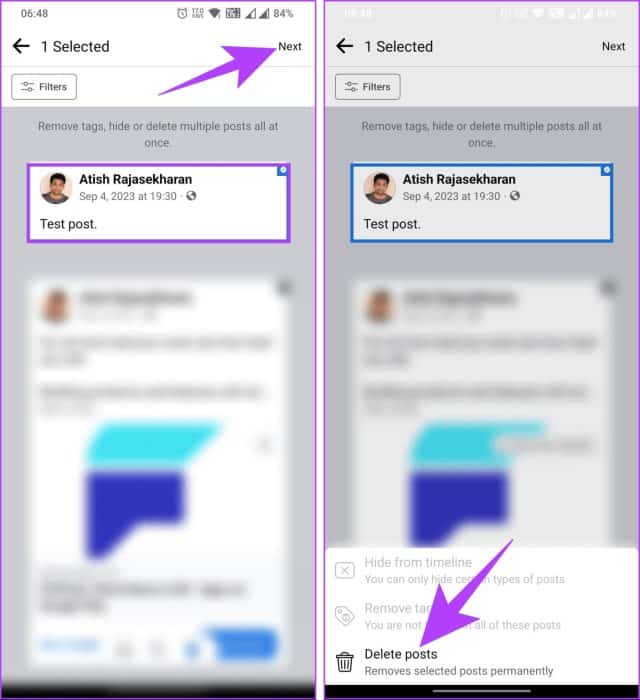
Step 4: In the pop-up confirmation window, choose Delete posts.
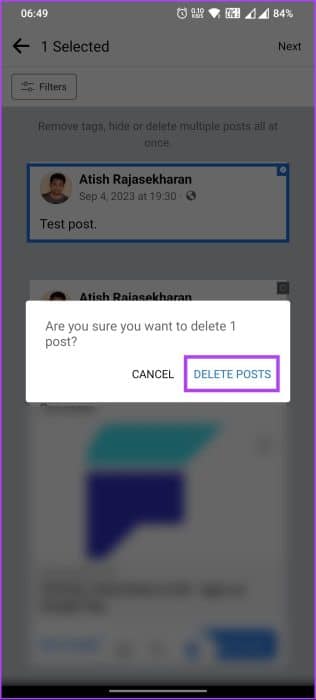
That's all there is to it. Scheduled posts will be deleted. However, there are some downsides to this method. First, once you schedule a post, you can't edit it; you must either create a new post or delete it.
Furthermore, finding scheduled posts isn't easy; you have to navigate through several options to find them. If the drawbacks mentioned above bother you, check out the next method.
Method 2: Use Meta Business Suite (and Creator Studio)
You must first download the Meta Business Suite app on your mobile device for this method to work. The app is free, and the steps are the same for Android and iOS. Follow these steps.
Step 1: Download an app MetaBusiness Suite on Android Or iOS Log in with your credentials.
Download Meta Business Suite on Android
Download Meta Business Suite on iOS
Step 2: You will be taken to your default Facebook page. Click the button Create Post Below your page name.
Note: You can change the page by clicking on the upper left corner and selecting the page from the bottom sheet.
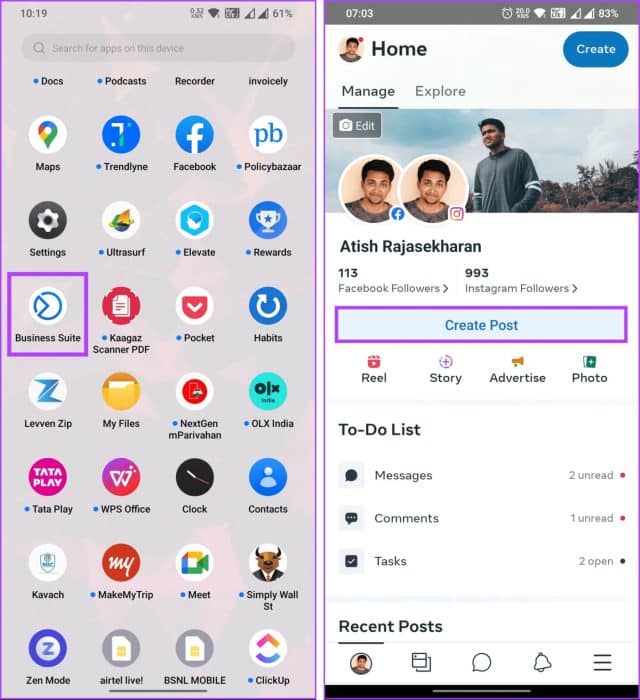
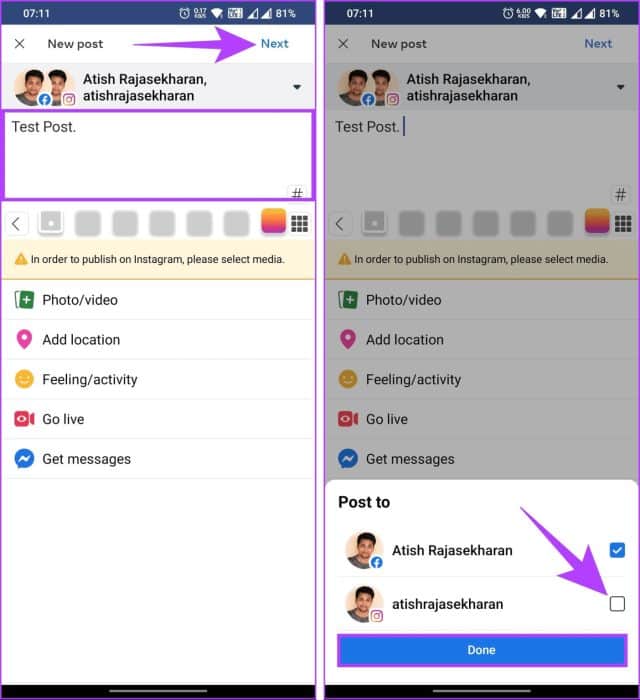
Step 3: Now, add the images or text you want to schedule for your page and click next one.
Note: If you want to add text to schedule, a warning will appear that says, “You must select media to post to Instagram.” Tap the chevron icon below the Next button in the upper right corner, deselect your Instagram account, and then tap Done at the bottom.
Step 4: On the review screen, choose “Schedule for later.” Select the date and time and click "table".
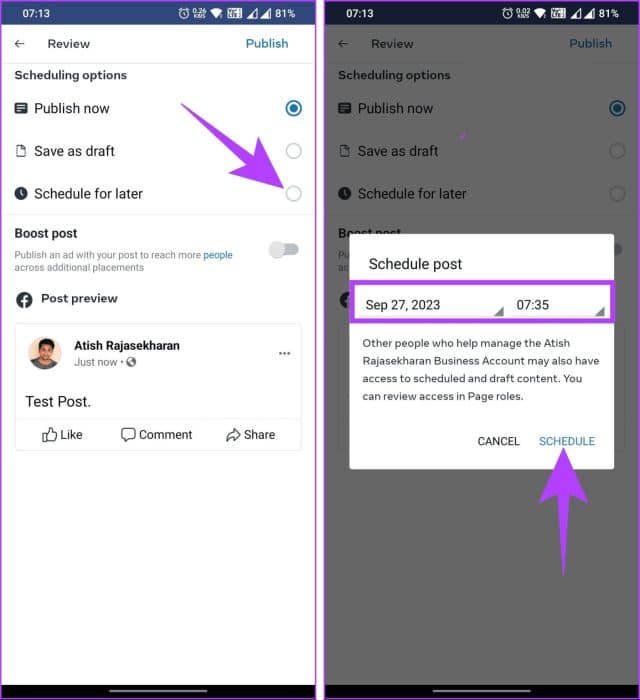
Step 5: Finally, click on timetable.
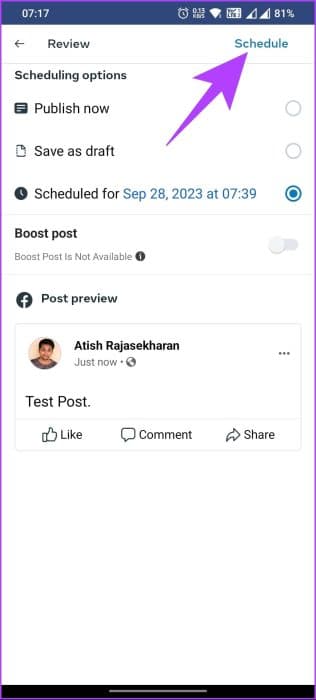
You've successfully scheduled a post for your Facebook Page. If, for some reason, you're unable to edit or delete the post, continue.
Edit or delete a Facebook post
Step 1: Go to tab Content From the bottom navigation bar.
Step 2: Under Posts, click Filters View the scheduled post from the bottom screen.
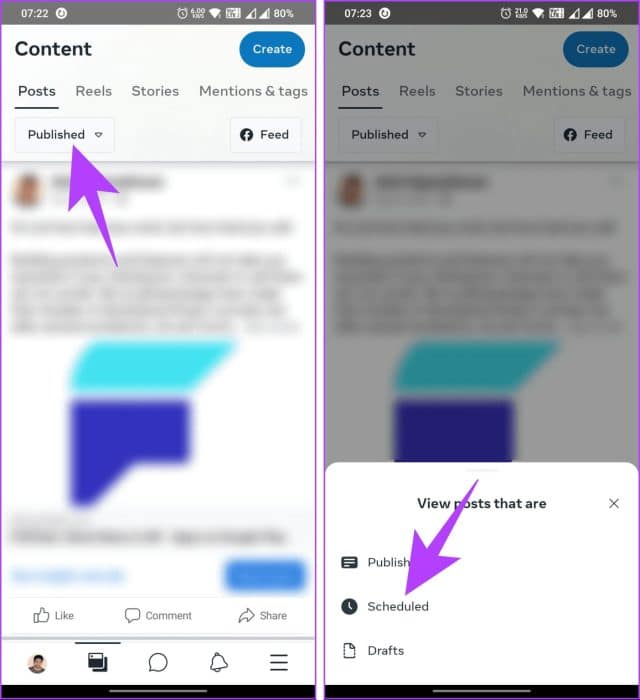
Step 3: Tap the three-dot icon next to the timeline post. Choose Edit or Delete Post. To illustrate, we'll start withDelete post.
Step 4: In the pop-up confirmation window, choose Delete post.
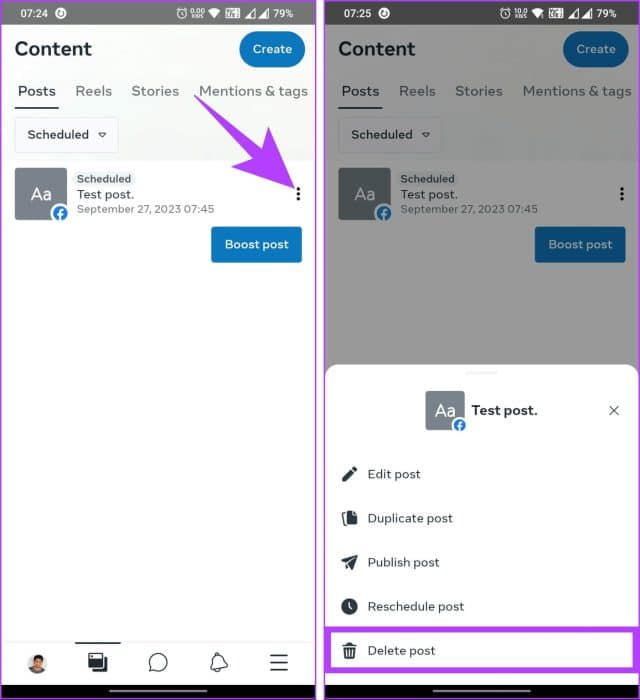
That's all. You've deleted your scheduled post. What if you have a group you want to schedule a post for? Read on.
How to schedule posts for Facebook groups
You can schedule posts for your Facebook groups just like you schedule posts for your Facebook Page.
The steps are essentially the same, but the options may vary depending on the process. As with Pages, you need an administrator or owner to schedule publishing. Let's start with the desktop publishing steps.
on the desktop
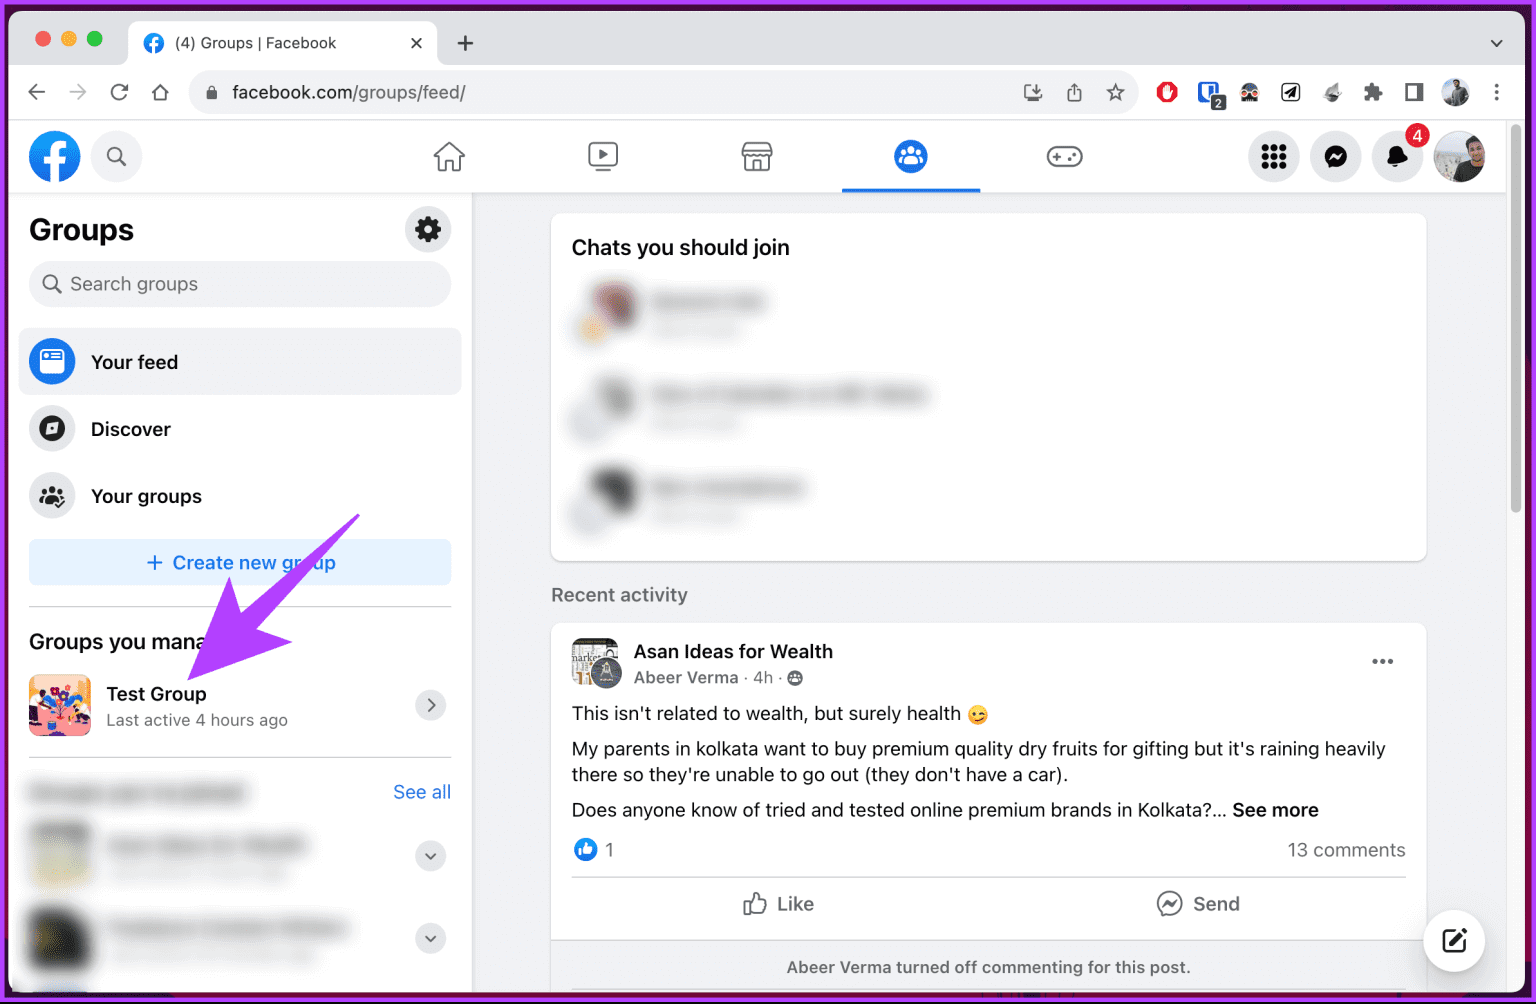
Step 1: Open Facebook In your favorite browser on your Windows or Mac computer, go to Groups from the right part.
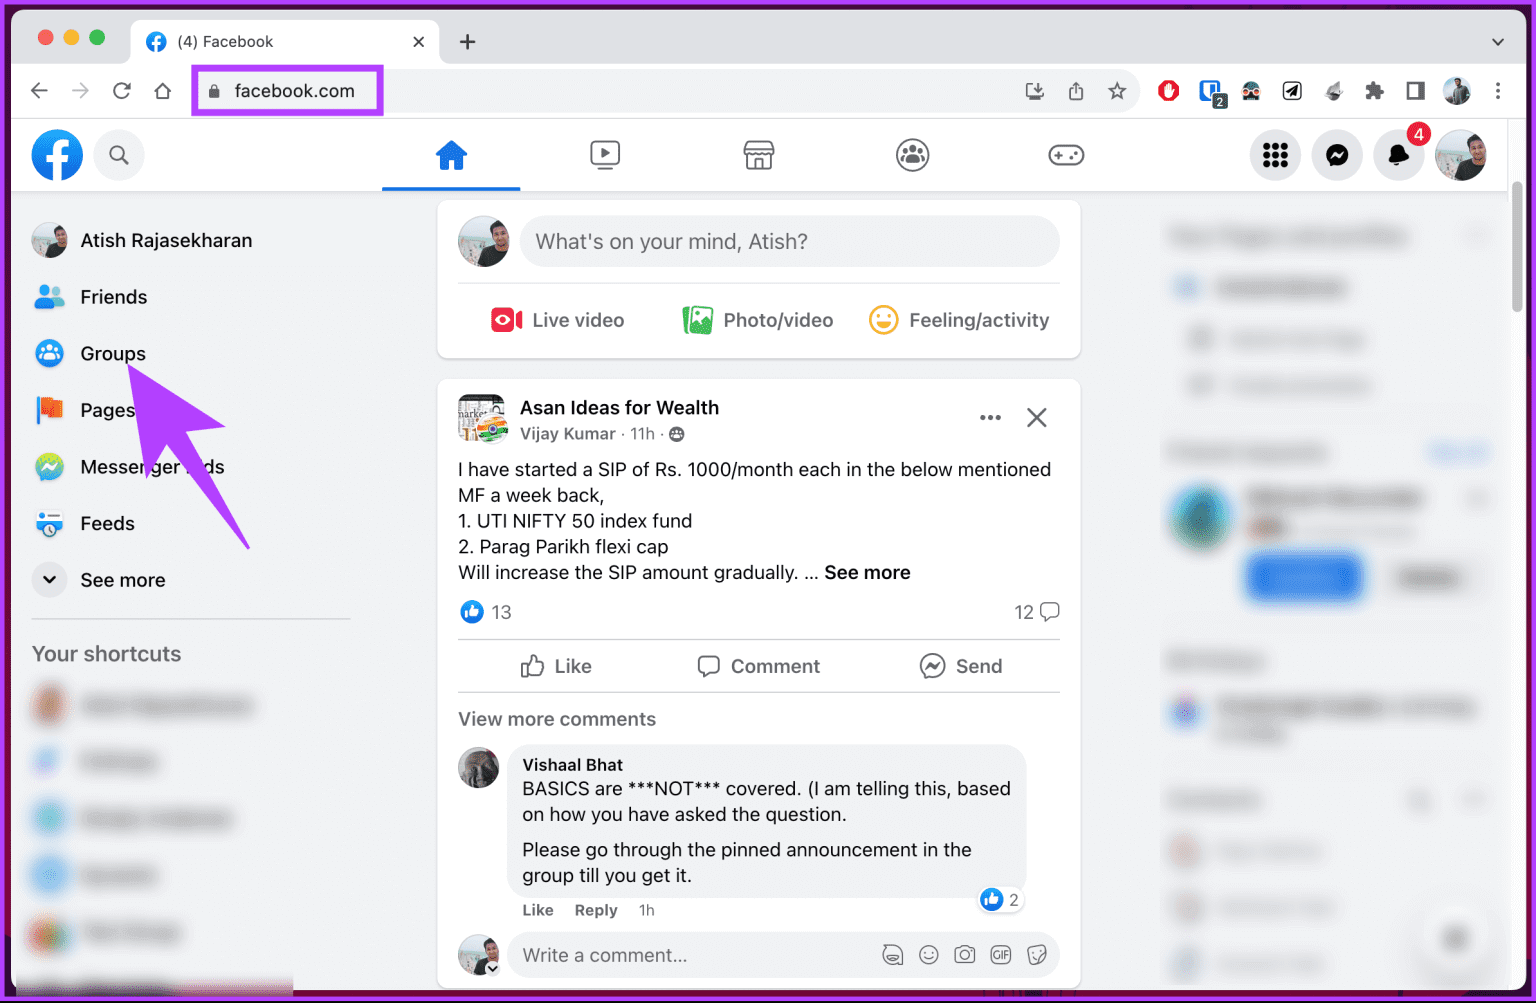
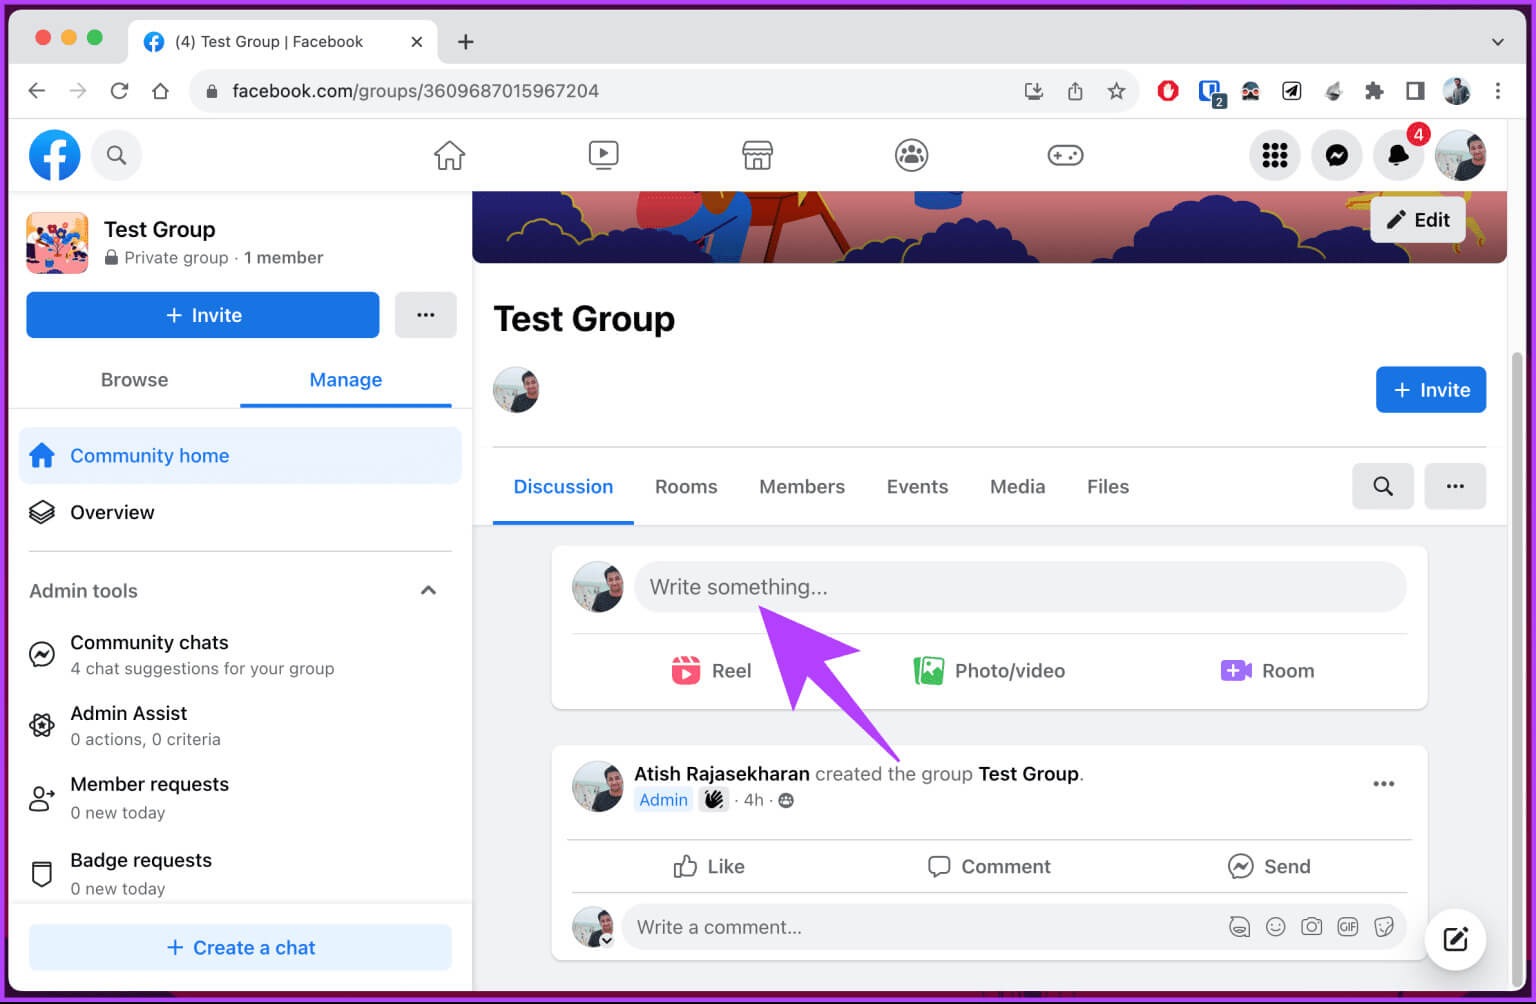
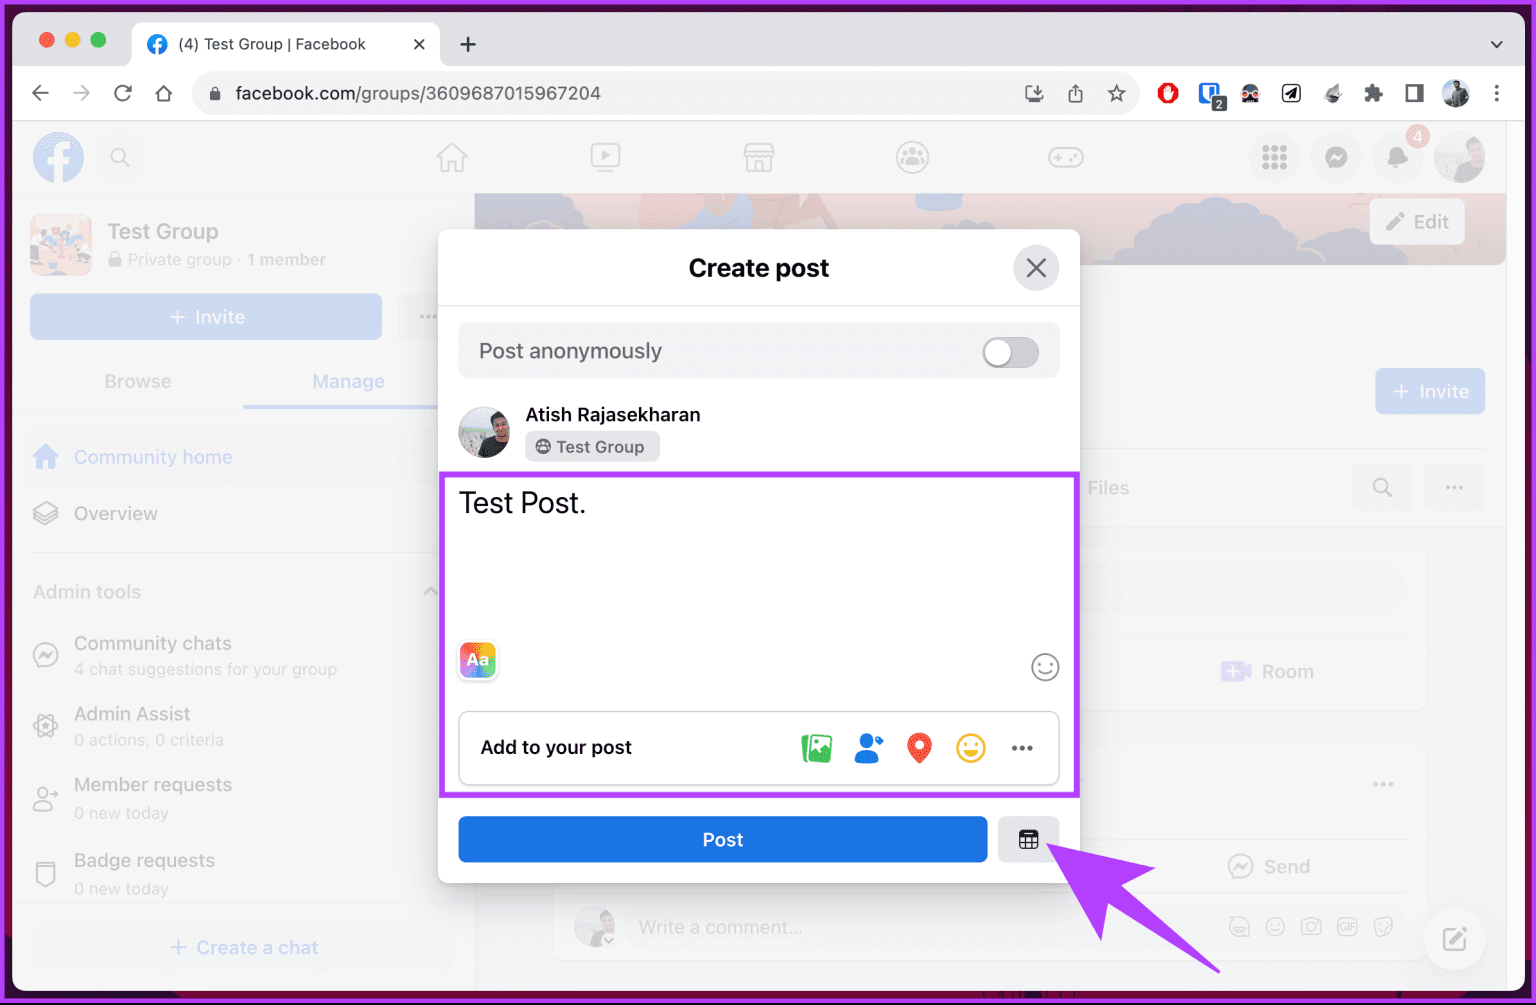
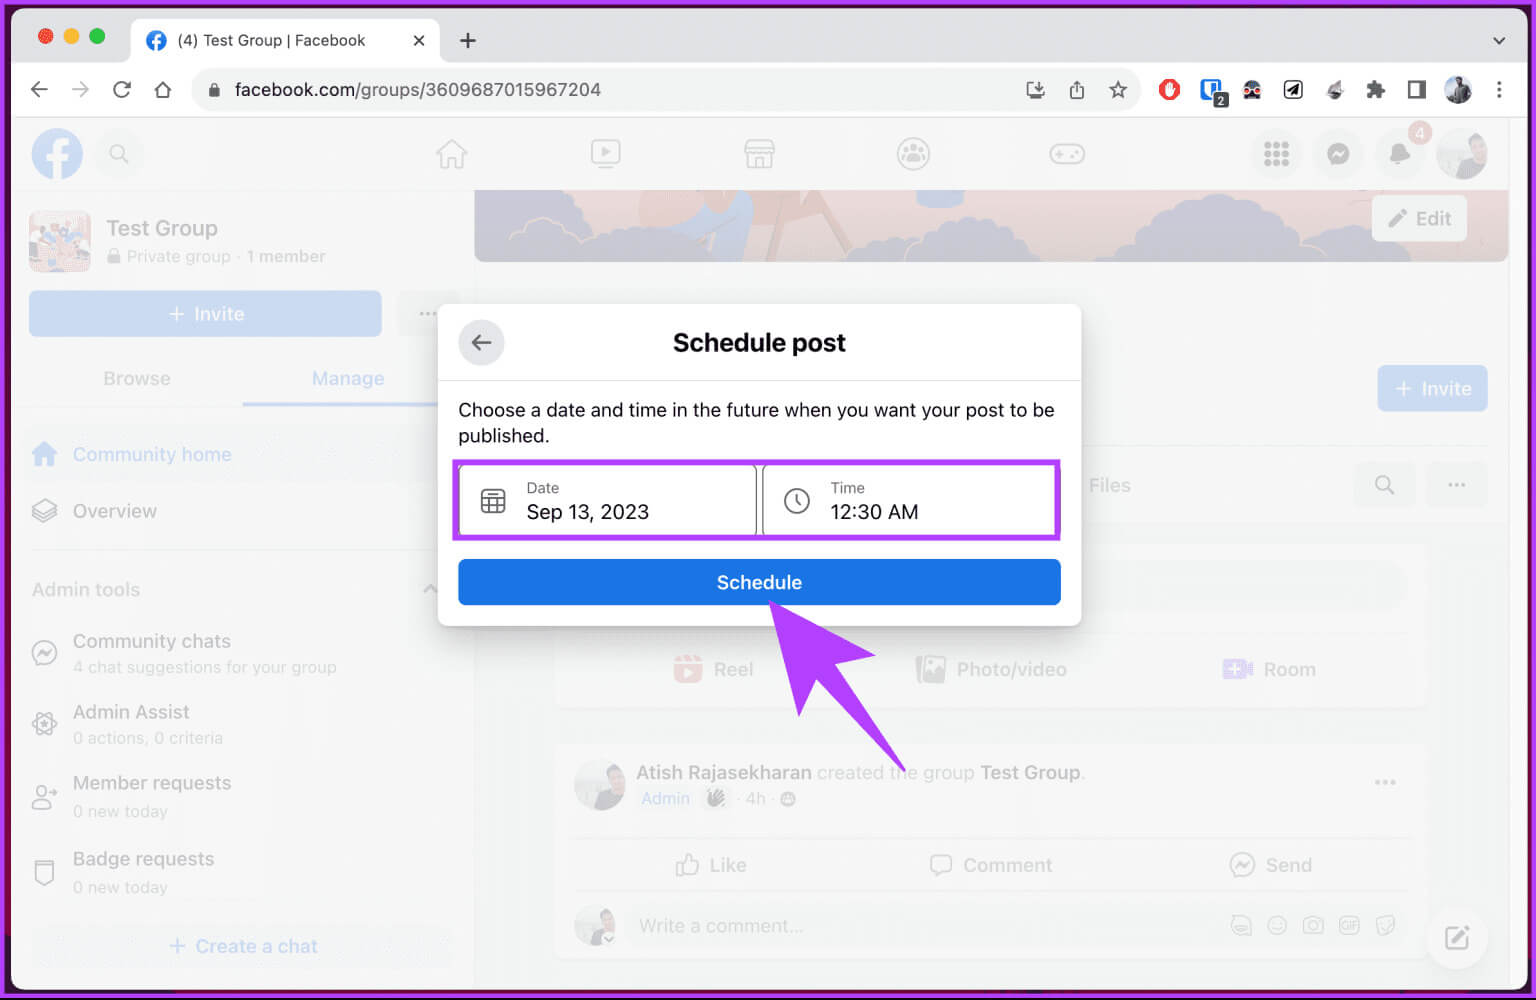
Step 2: Choose from the list of groups you manage where you want to go. Schedule a post.
Cancel or delete a posting schedule
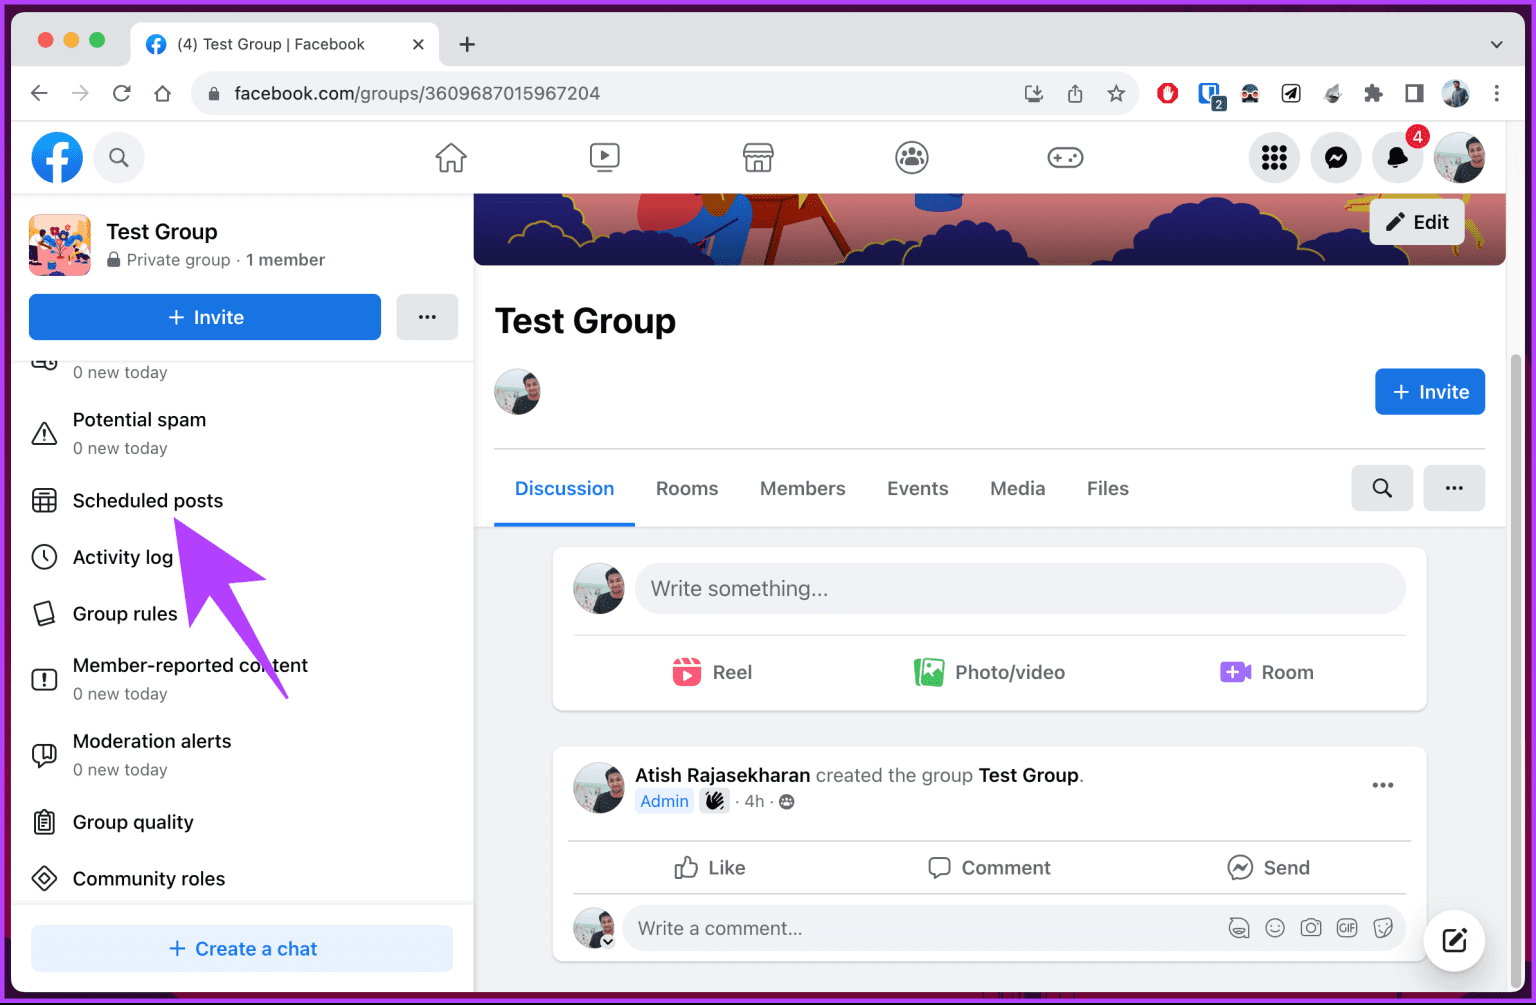
Step 1: From the side panel, in the tab "administration", Under Management Tools, find and click Scheduled Posts.
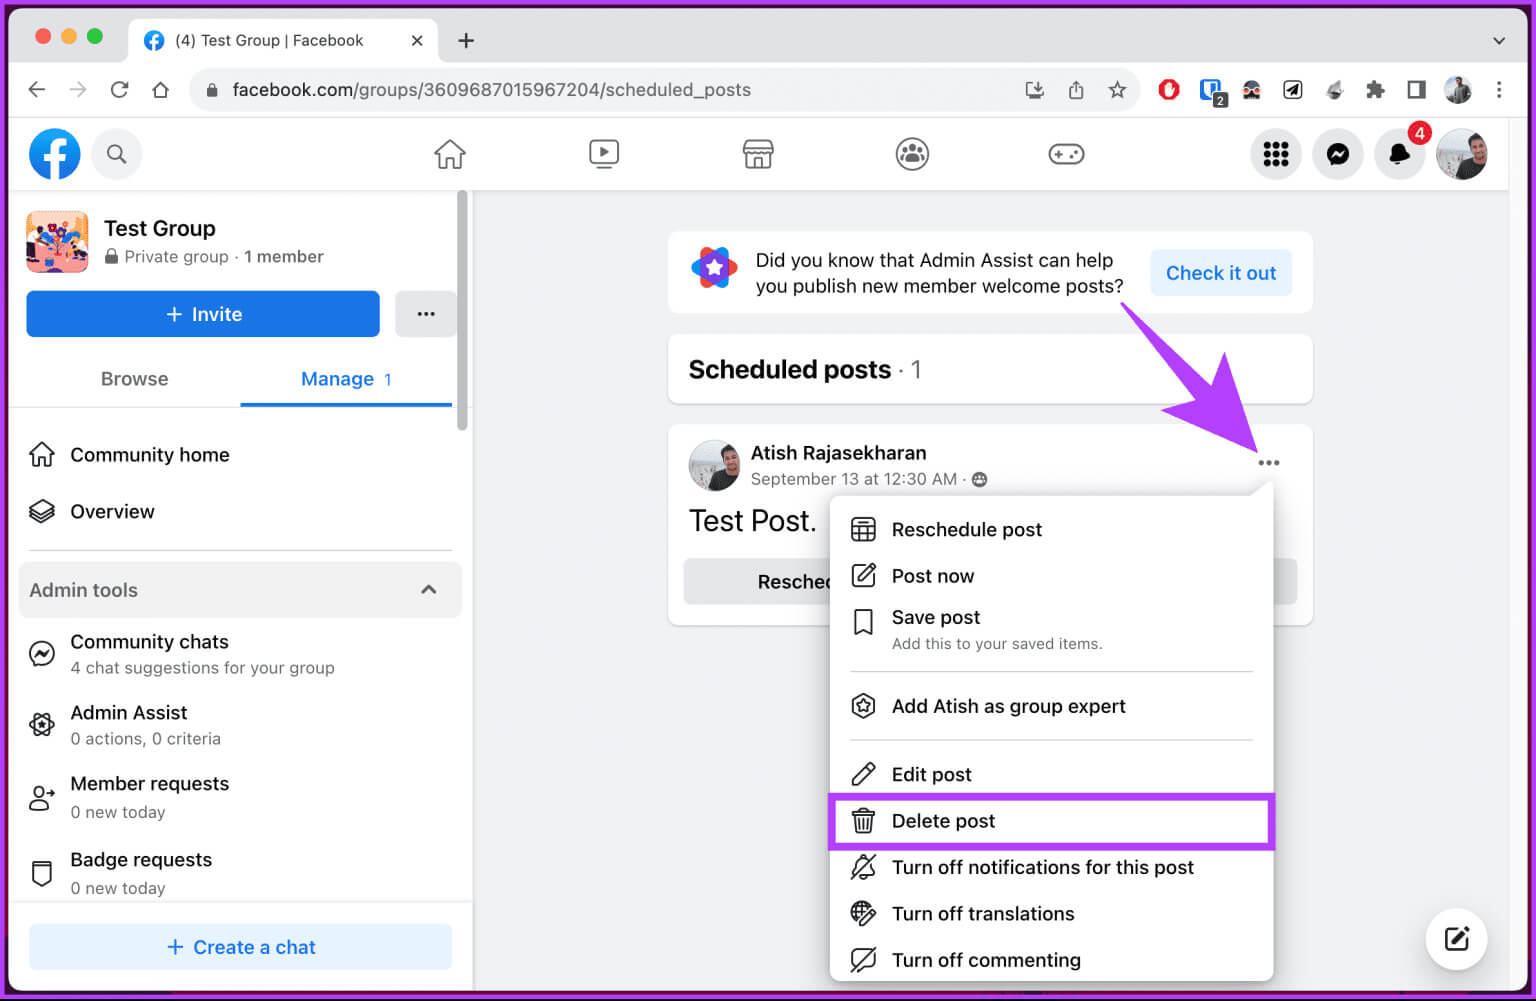
Step 3: From the drop-down menu, choose Delete post.
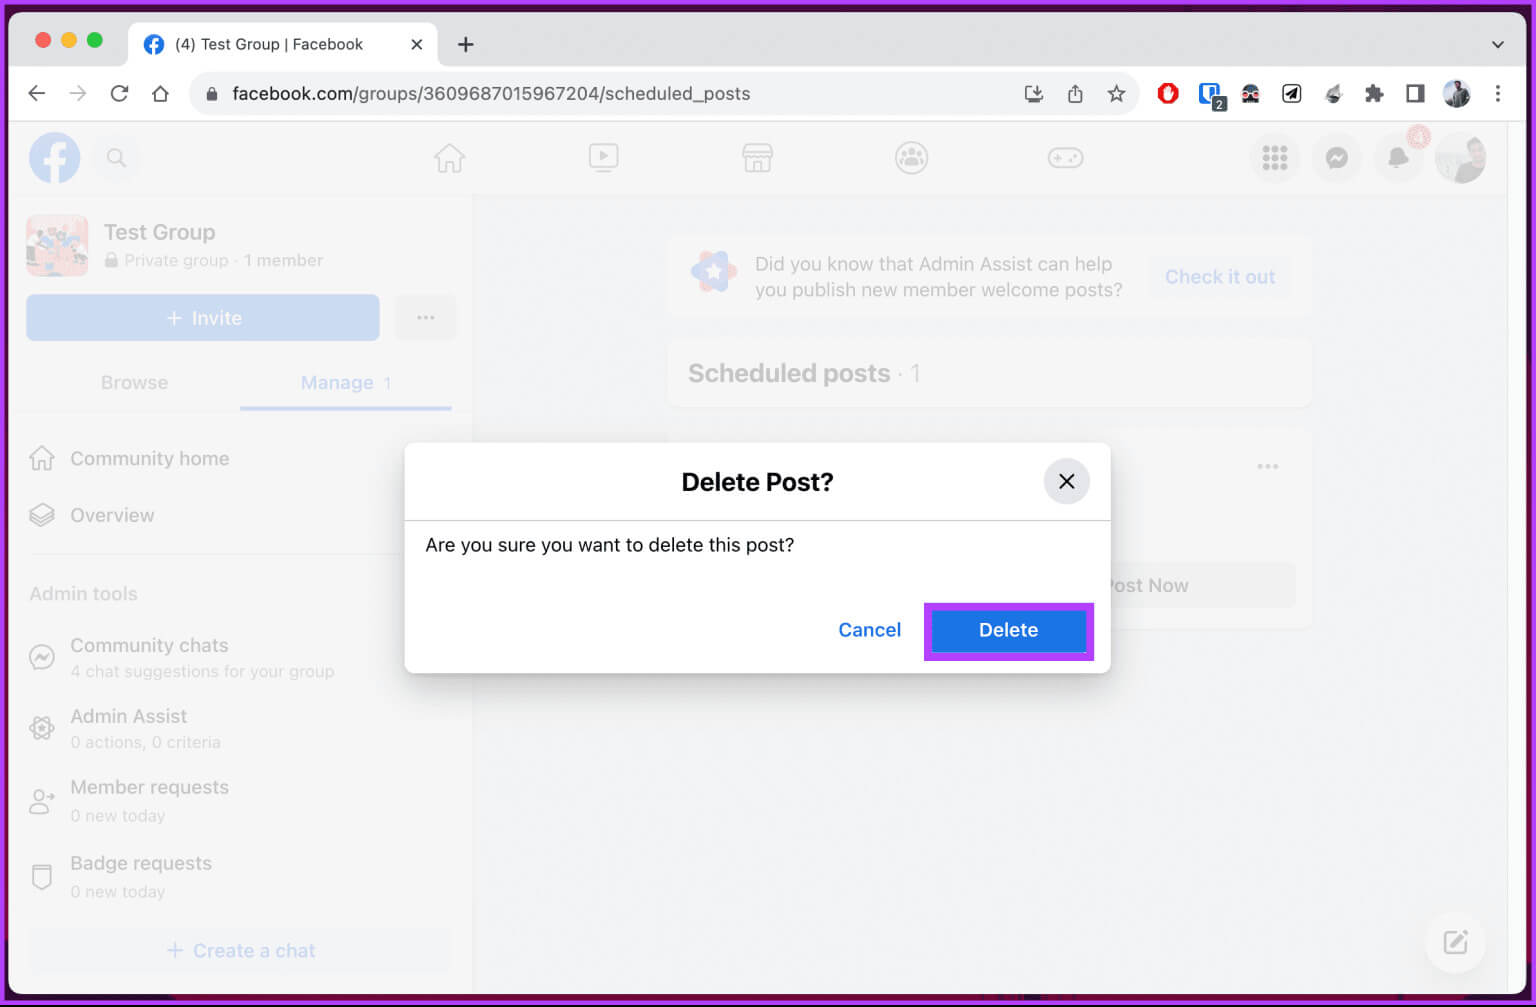
This removes the selected scheduled post from the queue.
on mobile
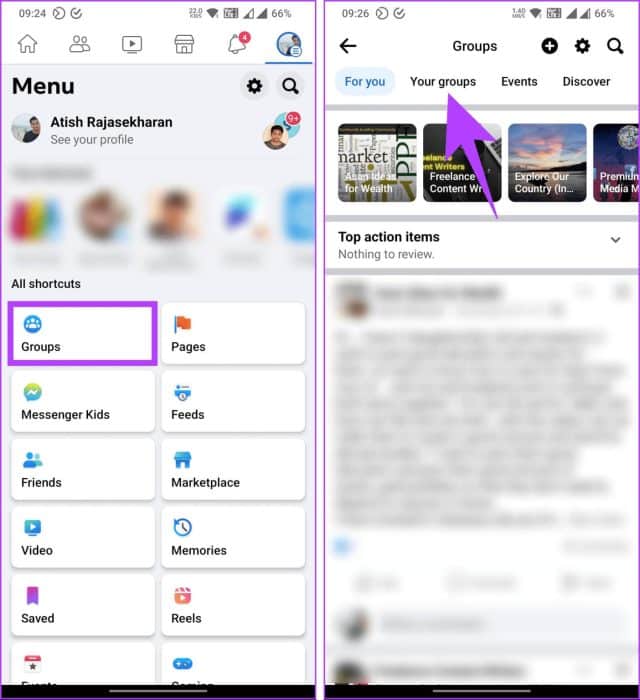
Step 1: Launch an app Facebook On your Android or iOS device, go to the menu. The three horizontal lines.

Step 2: Locate Groups. You'll see a list of groups you own or manage. Go to the Your Groups tab in the top navigation bar.
Step 3: within the section Groups you manageTap the group you want to schedule a post to.
Step 4: Tap the text box Type something to open the screen Create a post.
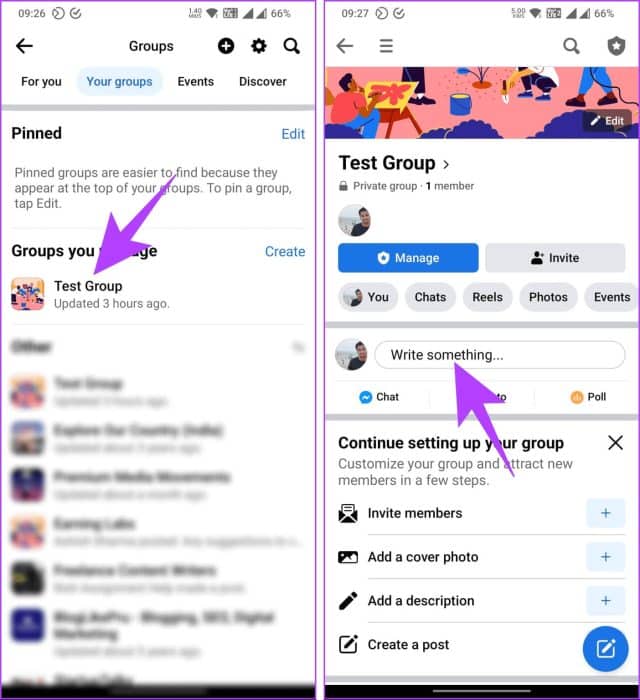
Step 5: Now, add the photos or text you want to schedule for your Page as a post, then tap Switch schedule.
Step 6: Toggle the Schedule Post option from the bottom sheet and add Date and time.
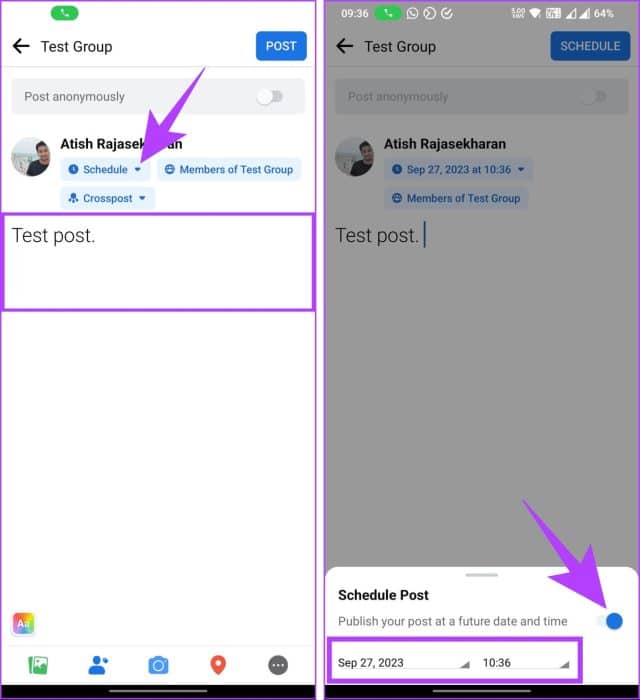
Step 7: Finally, click on The table in the upper right corner.
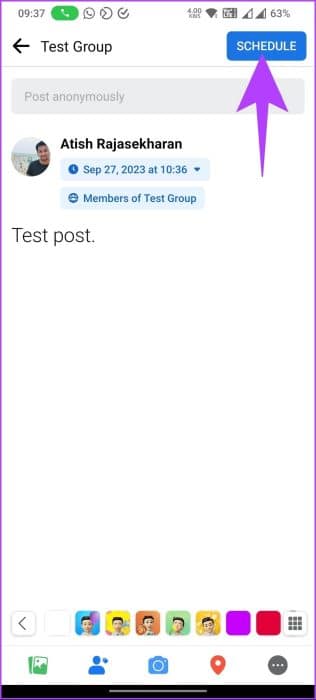
There you go. You've successfully scheduled a post for your Facebook group. Follow the steps to view, edit, or cancel your post.
View, edit, or delete your post
Step 1: In the group, tap the tab. You. Scroll down, and under Group Posts, you'll see all the posts you've posted or scheduled.
Step 2: Select the post you want to delete and tap Three dots icon.
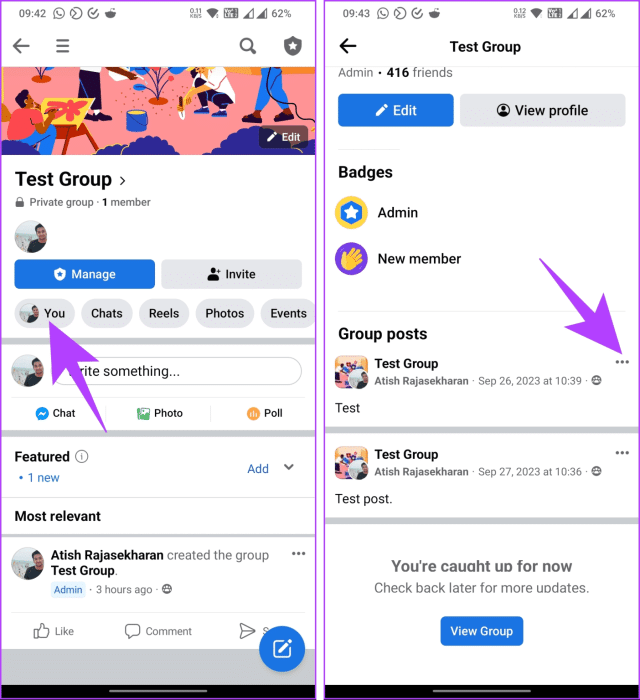
Step 3: From the bottom sheet, choose delete. Finally, in the pop-up confirmation window, choose Delete.
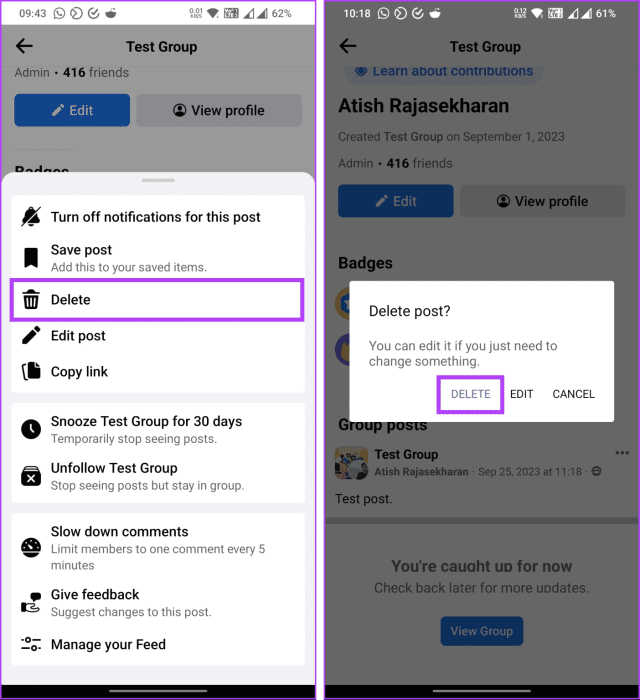
Simply put. Your scheduled post has now been easily deleted. If, for some reason, you are unable to schedule a post on Facebook using the method above, contact Facebook Support.
common questions:
Q1. What types of posts can I schedule?
The answer: You can schedule a variety of posts, including text updates, photos, videos, and links. Remember that the content and media you schedule must align with Facebook policies.
Q2. Can I schedule multiple posts at once?
The answer: Yes, you can schedule multiple posts at once. You can create a queue for scheduled posts to ensure a consistent posting schedule.
Q3. Do scheduled posts have the same reach and visibility as manually published posts?
The answer: Yes, scheduled posts have the same reach and visibility as manually posted posts. Facebook's algorithm treats scheduled and manual posts equally.
Schedule your future posts
By following the steps in this guide, you can quickly schedule a Facebook post. So, the next time you find a great idea, a captivating photo, or a touching story to share, remember the tools available to you. You may also want to read How to change your profile picture on Facebook Without anyone knowing.


