With each passing day, computer technology advances, and more advanced tasks can be performed today than yesterday. While this list of tasks continues to expand, it's easy to forget that your computer is also capable of performing a large number of mundane tasks. One such task is setting an alarm or reminder. Many Windows users, like you, may not be familiar with the application. Alarms and Clocks It's native to the operating system. We've provided a perfect guide that teaches you how to set alarms in Windows 10 and how to enable timers. So, read on!
How to set alarms in Windows 10
The application has been launched Alarms & Clock Originally introduced with Windows 8 and absent in previous versions. Shocking, isn't it? People use their computers to set alarms for their daily activities. In Windows 10, along with the alarm, there's the added feature of a stopwatch and timer. In this article, we'll show you how to set alarms and wake-up timers in Windows 10.
Why use alarms in Windows 10?
While we use clocks to set alarms, the Windows Alarm feature helps you organize your tasks and work life. Its notable features include:
- Your meetings won't be delayed or forgotten.
- You will not forget or miss Any events.
- You will be able to Track your work Or your projects.
- Moreover, you will be able to keep up with deadlines.
What is the use of Wake Timers?
- It automatically enables or disables Windows operating system. To wake your computer from sleep mode On a timer for scheduled tasks.
- Even if your computer is in sleep mode Then he will wake up To perform the task you scheduled in advanceFor example, if you set a wake-up timer for your Windows update to occur, it will ensure that your computer wakes up and performs the scheduled task.
If you're one of those users who gets lost in web browsing, gaming, or other PC activities and completely forgets about meetings or appointments, setting an alarm can bring you back to reality. Read the following section to learn how to set alarms in Windows 10.
Method 1: Through the Windows application
Alarms in Windows 10 work just like they do on your mobile devices. To set an alarm on your PC, set a time, choose the alarm tone, and the days you want it to repeat, and you're all set. As you can see, alarm notifications will only appear when your system is awake, so rely on them for quick reminders, not to wake you up in the morning. Below is a detailed guide on how to set an alarm in Windows 10:
1. Click START YOUR , And type Alarms and Clocks , then tap to open.
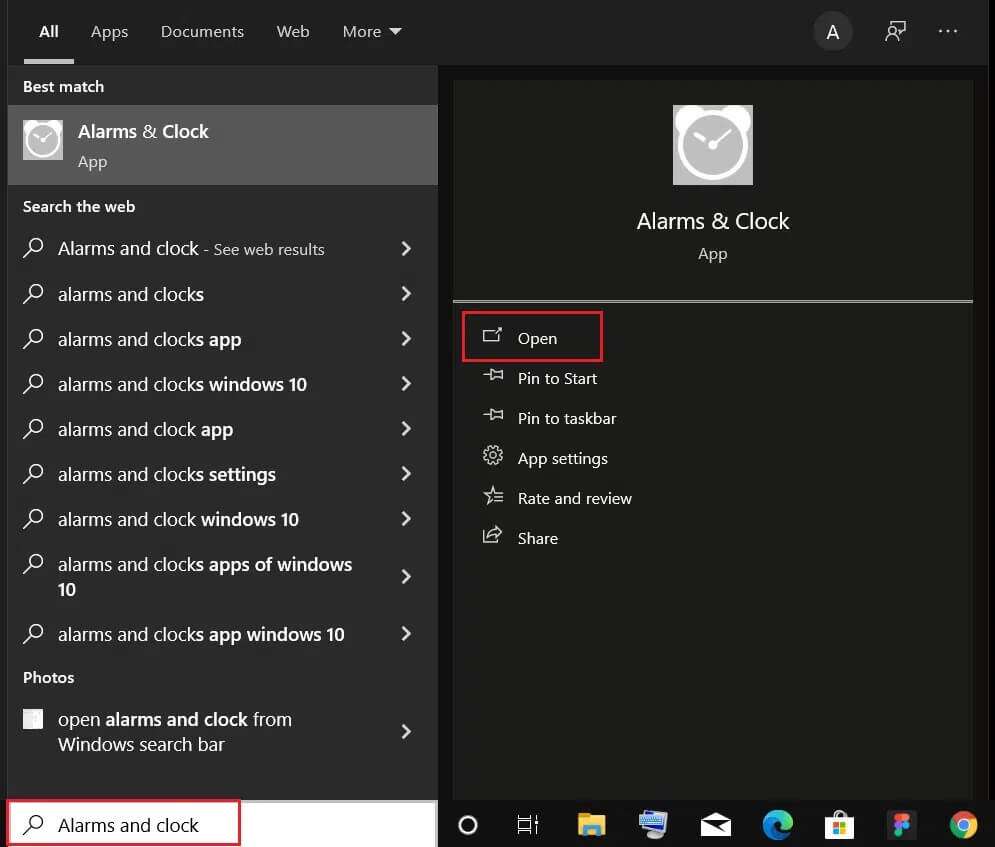
Note: The application keeps its previous state and displays the last active tab.
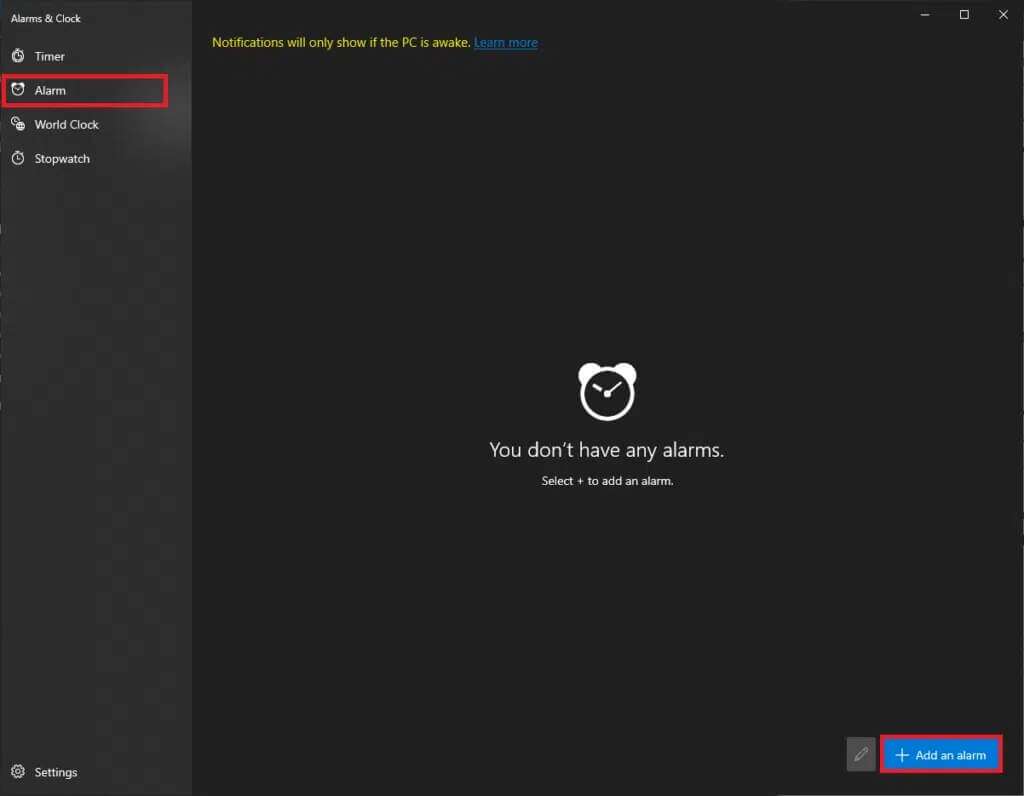
2. If this is the first time you are running Alarms and clocks , go from the tab "temporary" to tab "Alarm clock".
3. Now, click on + . button Add alarm in the lower right corner.
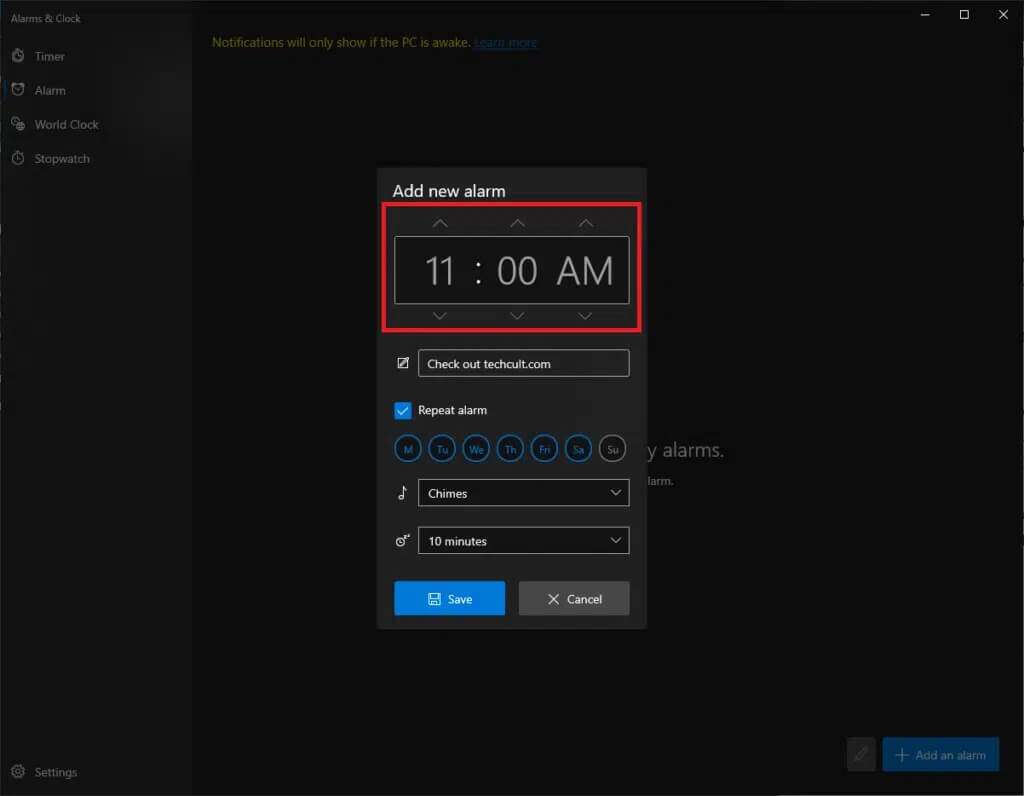
4. Use the arrow keys to select the desired alarm time. Choose carefully between AM and PM.
Note: You can modify the alarm name, time, sound, and repeat.
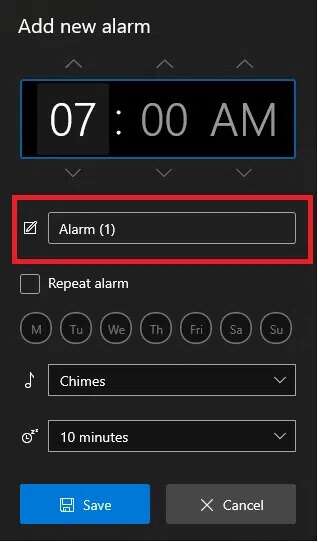
5. Write the name Alarm clock In the text box next to the icon resembles a pen.
Note: The name will be displayed on your alarm notification. If you're setting an alarm to remind yourself of something, type the full reminder text as the alarm name.
6. Check the box Repeat alert And click Symbol of the day To repeat the alert on specific days or all days as needed.
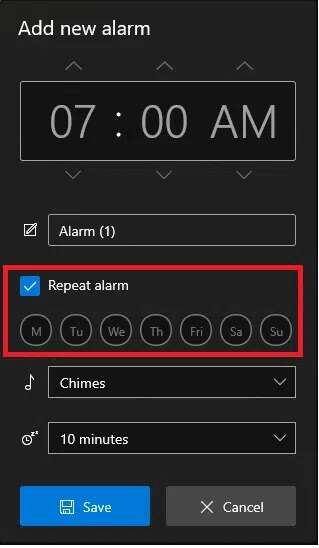
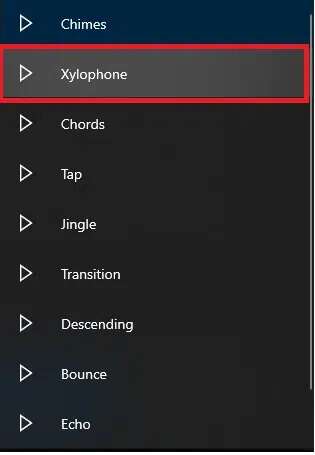
7. Click the drop-down menu next to the music icon and choose your preferred alarm tone from the list.
Note: Unfortunately, Windows doesn't allow users to set a custom ringtone. So, choose one from the existing list, as shown.
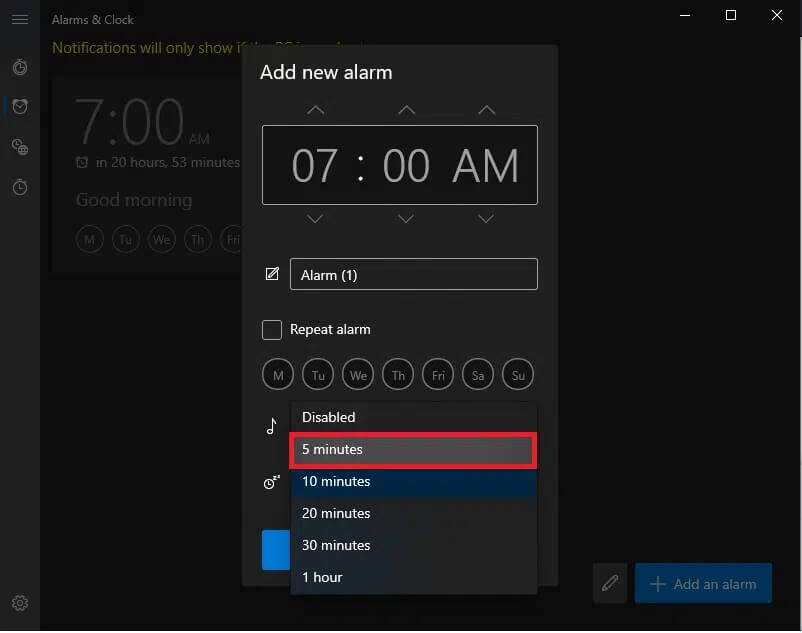
8. Finally, choose nap time From the dropdown menu next to snooze icon.
Noticeable: If you're a major procrastinator like us, we recommend choosing the smallest snooze time, i.e. 5 minutes.
9. Click the button "save" To save the custom alarm, as shown.
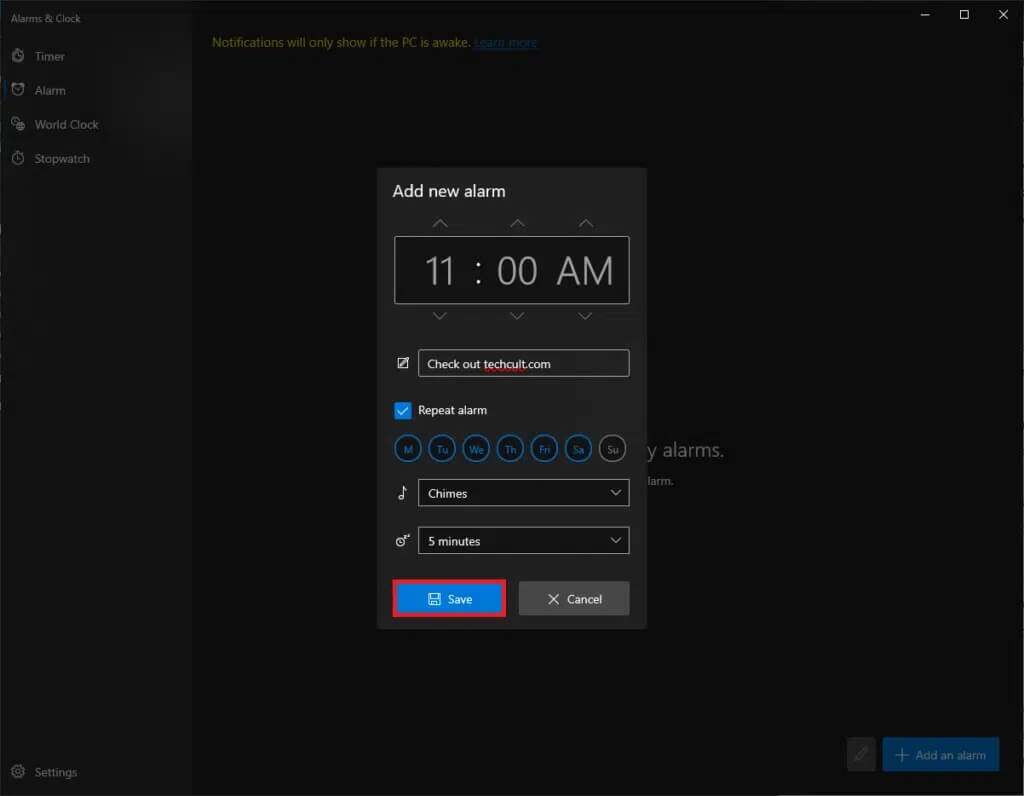
You have successfully created a new alarm and it will be listed in the Alarm tab in the app.
You'll receive a notification card at the bottom right of the screen when the alarm rings with snooze and dismiss options. You can also set the snooze time from the notification card.
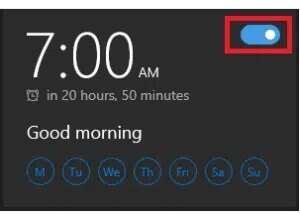
Note: The toggle switch allows you to quickly enable or disable the alarm.
Method 2: Despite Cortana
A faster way to set an alarm in Windows 10 is to use the built-in assistant, Cortana.
1. Press the keys Windows + C At the same time to run cortana
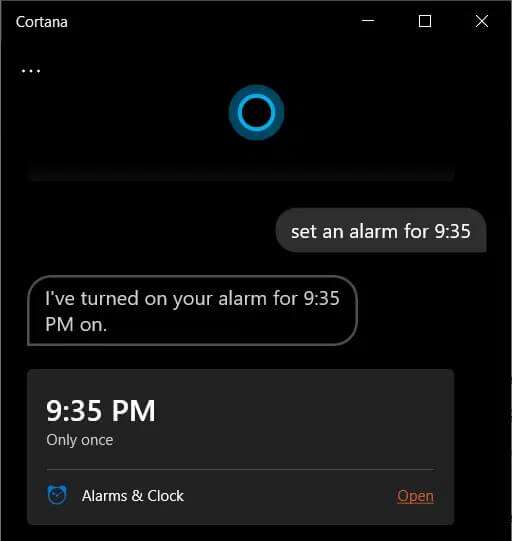
2. Set alarm for 9:35 PM for cortana
3. Cortana will automatically set an alarm for you and display that I set the alarm at 9:35 PM as shown below.
Pro Tip: How to Delete an Alert in Windows 10
Follow the steps below to delete an existing alert:
1. Set alarms and clock as we did before.

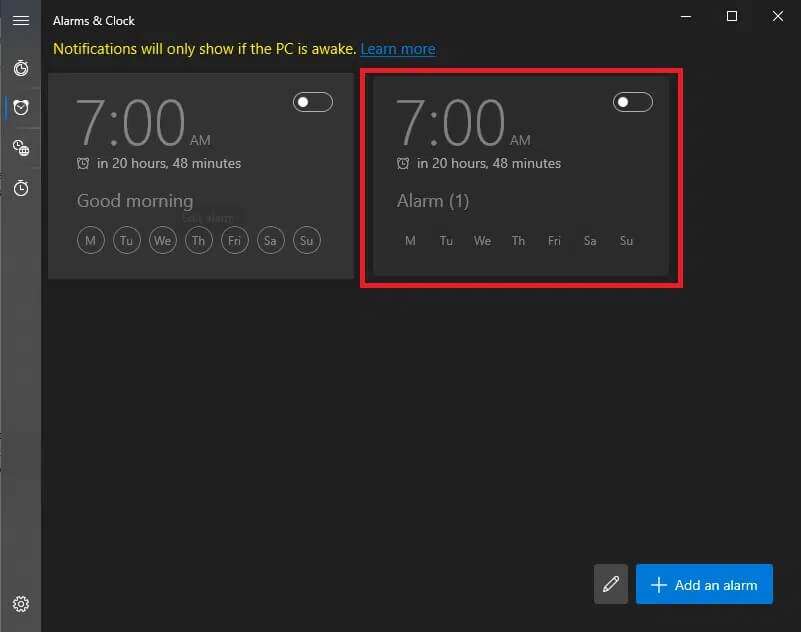
2. Click Saved alert card , distinctively illustrated.
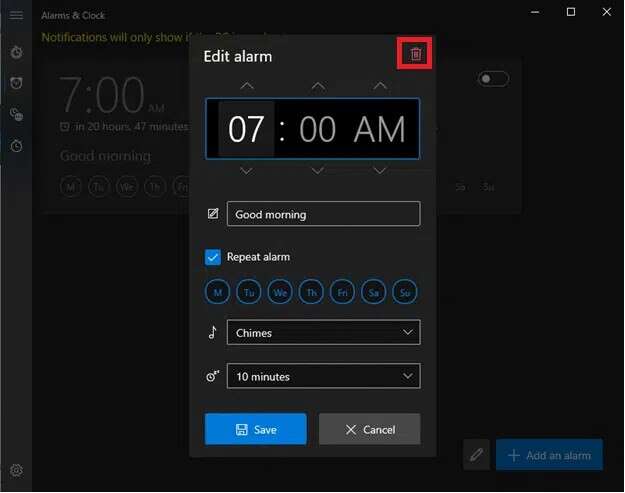
3. Then click trash icon From the upper right corner ofDelete alarm.
Apart from setting the alarm, the app can also be used to Alarms & Clocks To set a timer and stopwatch, read the next section to set and allow alarm times in Windows 10.
How to create a task to wake up your computer/computer
As mentioned earlier, wake-up notifications only appear when your computer is awake. To automatically wake the system from sleep at a specific time, you can create a new task in the Task Scheduler And allocate it.
Step 1: Create a task in Task Scheduler
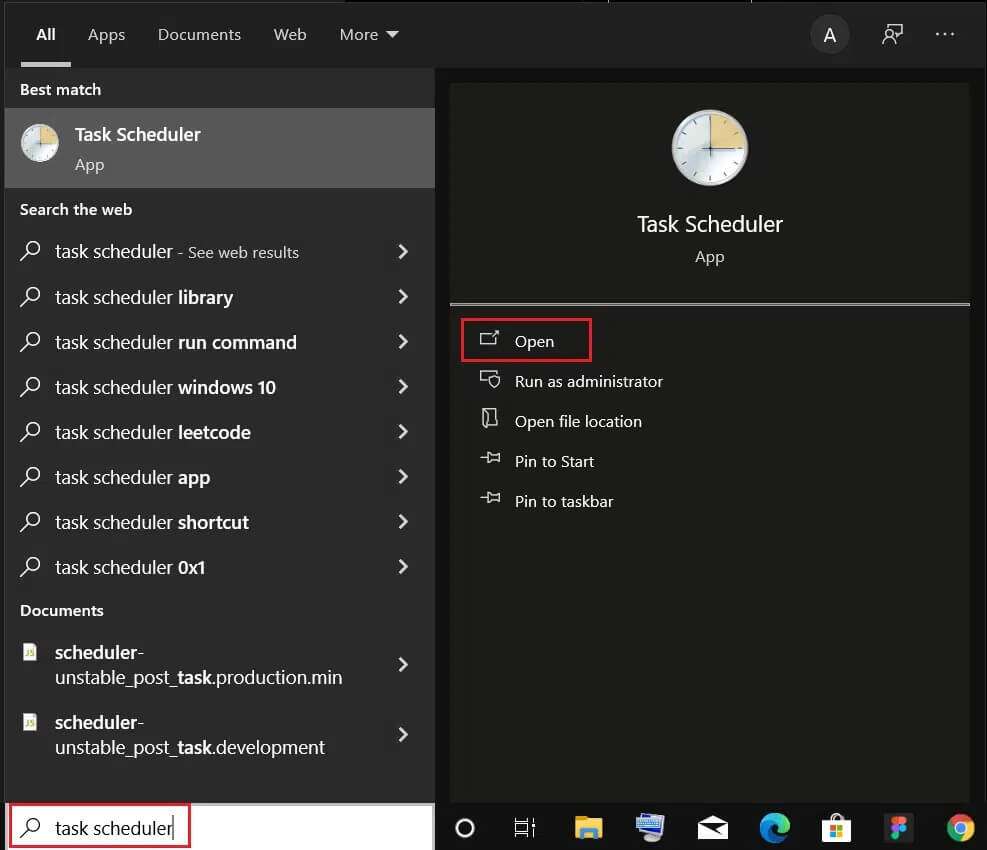
1. Press Windows key , And type Task Scheduler , and click Open.
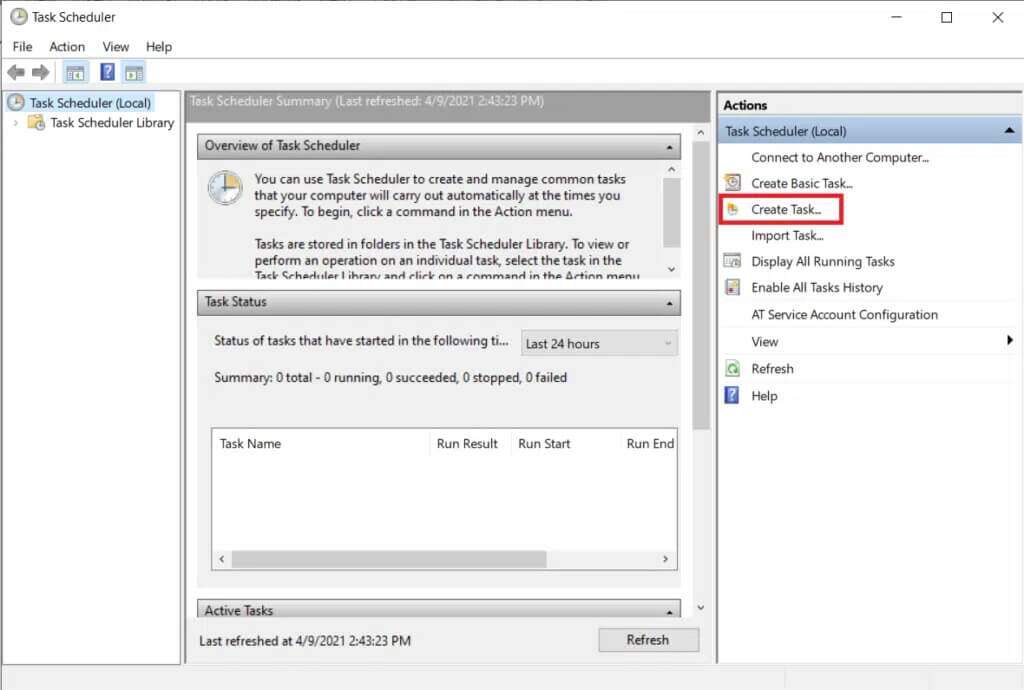
2. In the left part within procedures , click Option Create a task ...as shown.
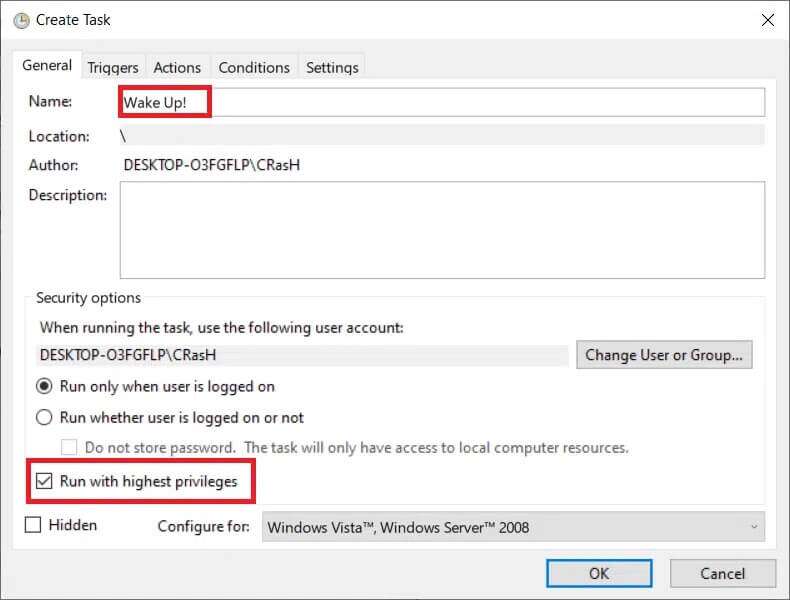
3. In a window Create a task Enter a task name (for example, Wake Up!) in the Name: field and check the box. “Running with the highest privileges” , as shown in the figure.
4. Switch to the tab Triggers and click the . button New….
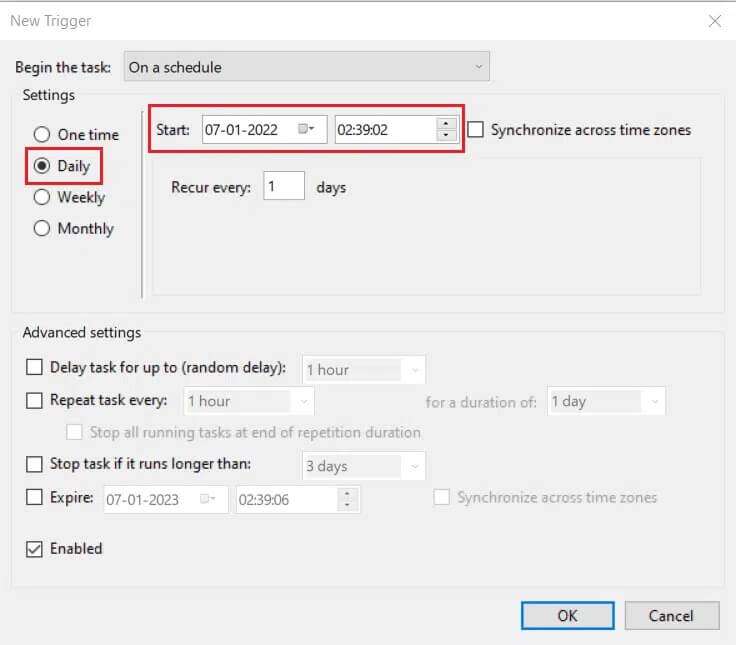
5. Select the start date and time from the drop-down menu. Click OK To save this the changes.
Note: If you want your computer to be activated regularly, select Daily in the right pane.
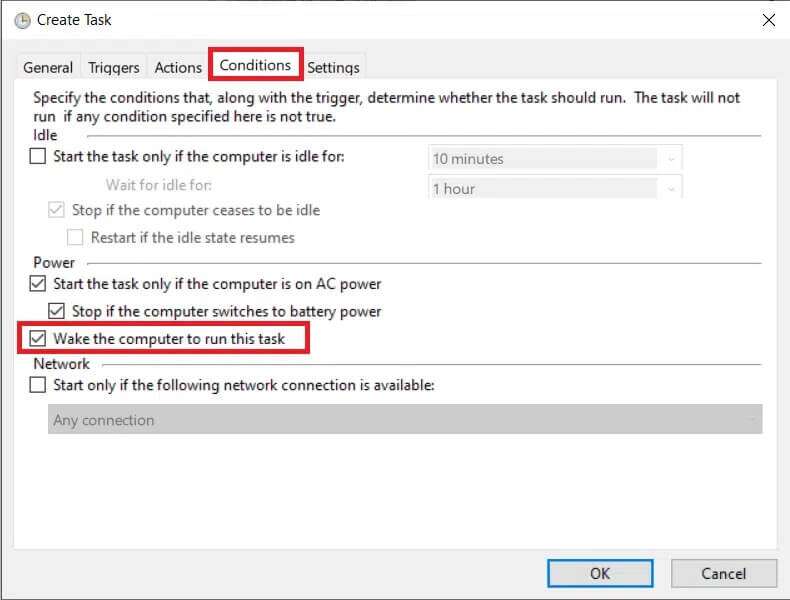
6. Go to the tab Terms , and check the box labeled Wake the computer To run this task, as described below.
Step 2: Set the action in the Create Task window
Finally, set at least one action, such as playing some music or a video, that you would like the computer to perform at boot time.
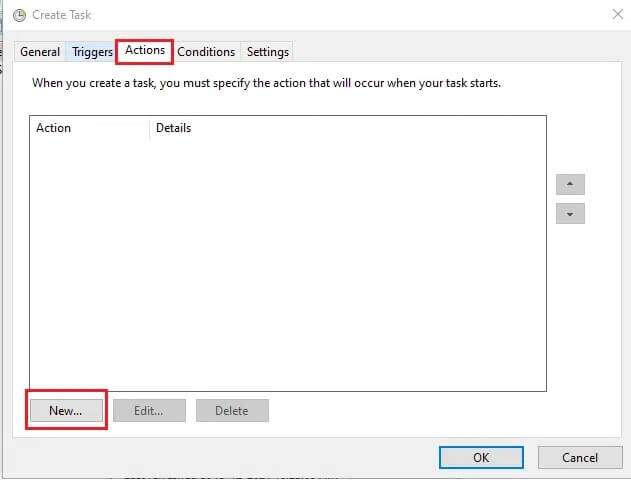
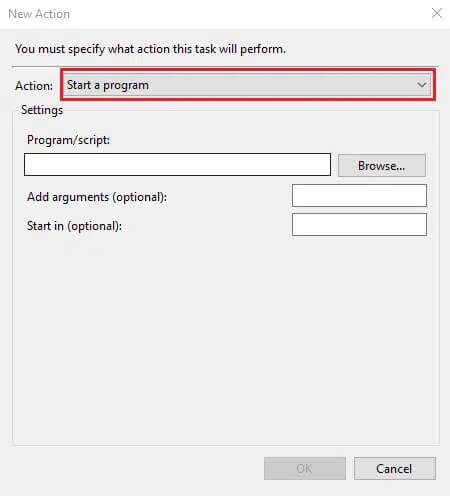
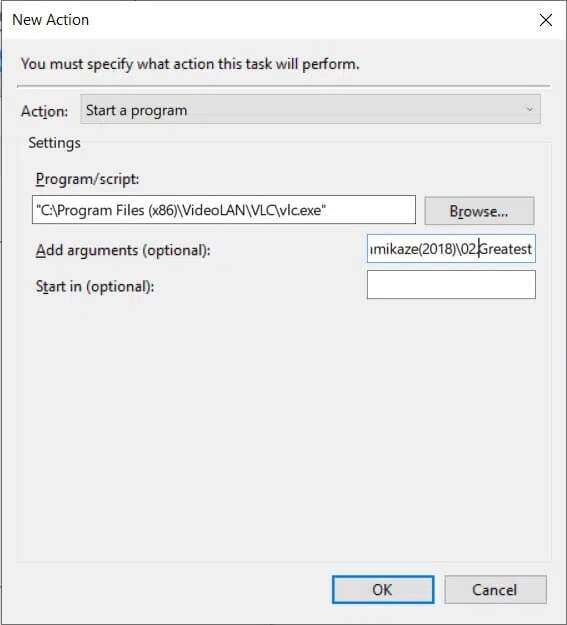
7. Go to the tab "procedures" and click the . button new… , as shown.

8. Next to Action: Choose Start Program from the drop-down menu.
9. Click the button "browse" To select the location of the application (music/video player) to open.
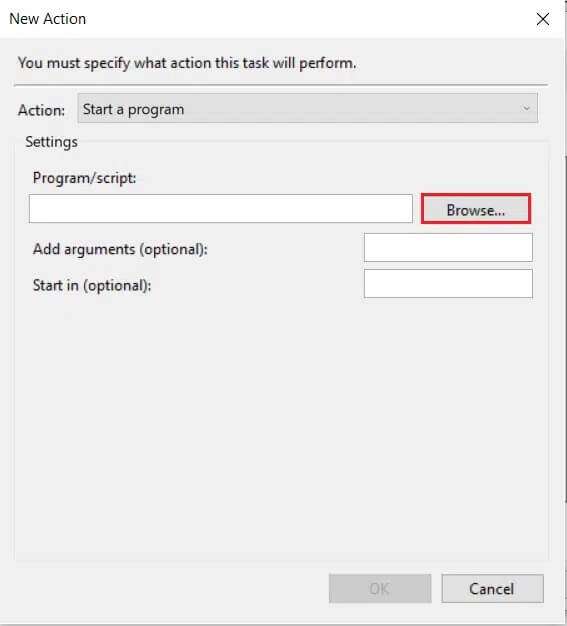
10. Adding arguments (optional): Text box, type the address of the file to be played at runtime.
Note: To avoid errors, make sure there are no spaces in the file location path.
Step 3: Allow alarm timers
Furthermore, you will need to enable Wake Timers For tasks, as follows:
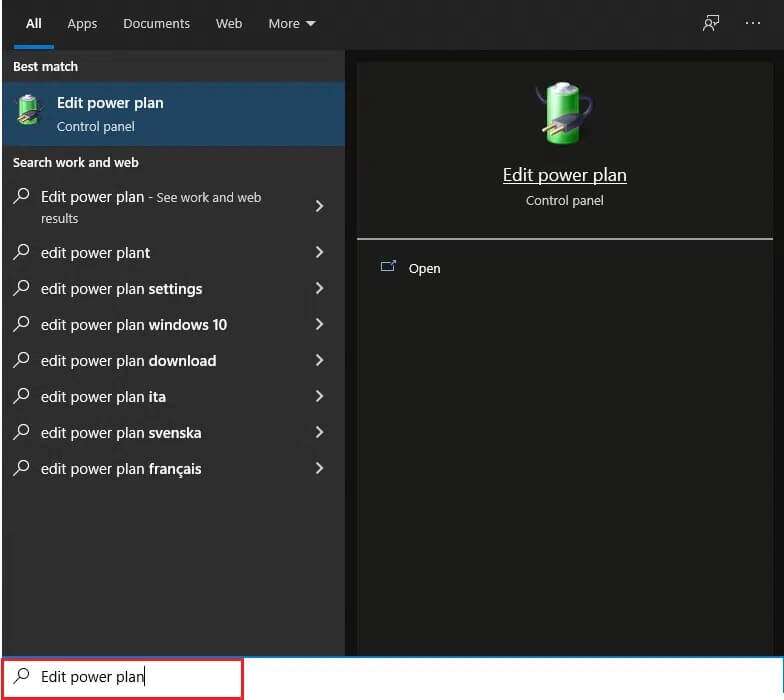
1. Click START YOUR , and write edit power plan , and press the . key Enter , as shown.
2. Here, click Change. Advanced power settings.
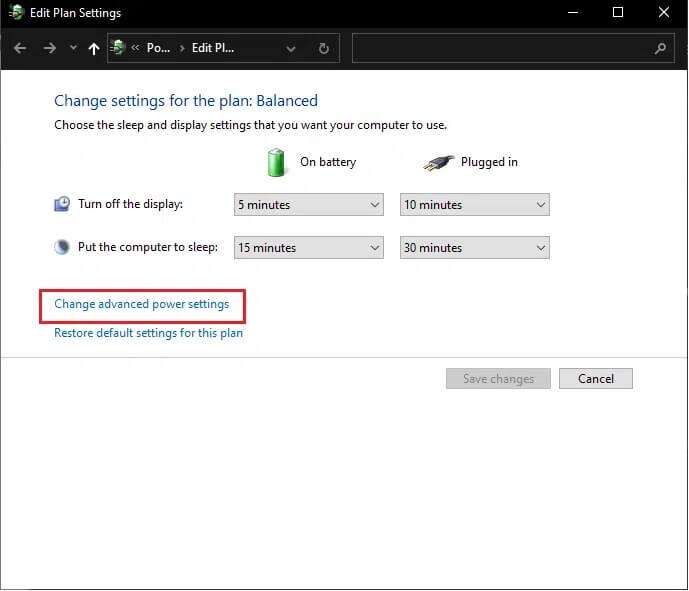
3. Double-click the option. "Stillness" ثم Allow alarm timers.
4. Click "Enable" From the drop-down list of both options: battery operation و "connected" , As shown below.
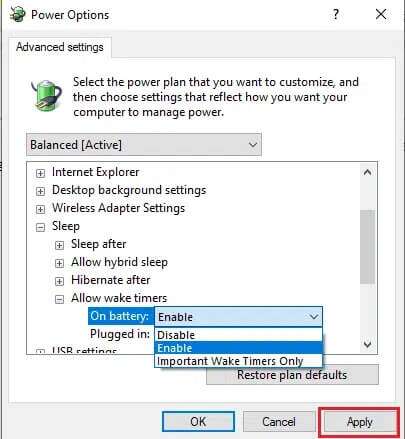
5. Click Apply > OK To save these changes.
That's it. Your computer will now automatically wake up at the specified time, and hopefully, you'll be able to wake up by launching the desired application.
Frequently asked questions (FAQs)
Q1. Is there a way to set an alarm on my computer?
answer. You can set an alarm from within the Alarms & Clock app or simply command Cortana to set one for you.
Q2. How do I set multiple alarms in Windows 10?
answer. To set multiple alarms, open the Alarms & Clock app and tap the + Add Alarm button. Set an alarm for the desired time and repeat the same process to set as many alarms as possible.
Q3. Can I set an alarm on my computer to wake me up?
answer. Unfortunately, alarms set in the Alarms and Clock apps only go off when the system is active. If you want your computer to wake up at a specific time, use the Task Scheduler app to allow alarm timers instead.
We hope the above methods helped you set alarms in Windows 10 and allow timers. If you have any questions or suggestions regarding this article, feel free to leave them in the comments section. Also, don't forget to share this article with others.


