Janna Theme License is not validated, go to the theme options page to validate the license, you need a single license for each domain name.
How to Replace Chromebook BIOS with SeaBIOS
Do you have a Chromebook? Want to erase ChromeOS and install something else? Good news! All you need to do is replace your Chromebook BIOS with SeaBIOS. Many Chromebooks are supported by this tweak—so many, in fact, that it would take too long to list them all. In this article, we'll walk you through how to replace your Chromebook BIOS with SeaBIOS.
Go to This page Scroll down to see if your device is supported. If you don't see a chart like the one below, check out one of these two archived pages: Scheme Release 1And the release of the plan 2. Keep in mind that even if your device isn't listed, it may still work.
If your device is supported and capable of running a custom BIOS, you'll need to do a few things before you can install it. Specifically, you'll need to disable read-only mode and enable developer mode, as well as remove any read-only hardware keys that may be present on your Chrome device.
Before you do anything, back up your Chromebook BIOS. If something goes wrong, you'll need a backup.
Before enabling Developer Mode, you should be aware that this can void your warranty in some cases. It also leaves your system without built-in security protections, so do so at your own risk.
Turn off your Chromebook.
Restart your Chromebook while holding down Esc, Refresh, and Power buttons At the same time.
When a warning appears (not on all Chromebooks), tap Ctrl + D.
If you see a message about verifying the operating system, press Enter to follow.
Wait for the device to restart Chromebook in Developer Mode.
If you ever want to turn off developer mode and reset your Chromebook:
Turn off and restart your Chromebook.
Click on spacebar When the operating system verification message appears.
will be done Reset your Chromebook And restart it as usual.
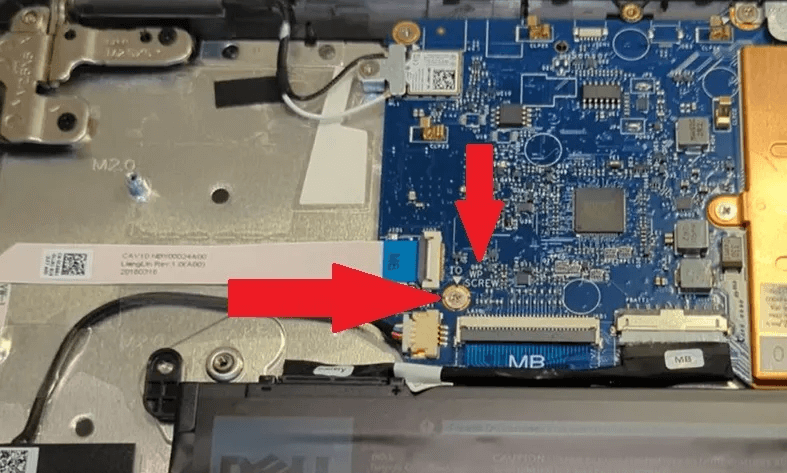
Note: Most Chromebooks also have a hardware read/write switch or screw. You'll need to know where this is and remove it as well. This requires opening the Chromebook and physically removing the screw. It should be labeled "WP Screw" or something similar, as pictured below.
Install custom BIOS
Installing a custom BIOS is very easy. In fact, it's the easiest part of the process.
Click on Ctrl + Alt + T Open a terminal window and enter the following command:
Note: If you need to install older versions of Sea BIOS, check here.
After your Chromebook restarts, you'll see a black screen indicating Sea BIOS instead of the Chrome logo. This means the installation was successful. If you want to return to the normal BIOS, simply reload ChromeOS, run the command above, and select the rollback option. It will do the rest.
From here, your Chromebook is effectively "jailbroken." Of course, this also means you can install alternative operating systems. Just install it on a USB flash drive and plug it in to boot it. By default, SeaBIOS will boot the USB drive first. Enjoy!
New BIOS vs. Dual Boot
Originally, you couldn't dual-boot on Chromebooks, which is the main reason you'd need to change your Chromebook BIOS to SeaBIOS. However, some newer Chromebooks now allow dual-booting. This works best with Chromebooks equipped with an SSD versus an eMMC, as Windows BIOS doesn't work with an eMMC. If you want to dual-boot Windows and ChromeOS, you'll need a solid-state drive.
For older Chromebooks running Intel Sandy/Ivy Bridge or Pineview, supporting Legacy Boot capability along with using SeaBIOS is the only way to dual-boot.
If you prefer not to change your Chromebook BIOS and replace it with SeaBIOS, there are several other supported methods available on certain Chromebook models. Additionally, if SeaBIOS is incompatible, the following method may work for you.
The first is chrxIt is designed to allow you to install Linux alongside ChromeOS. Full specifications and steps are posted on the tool's website.
Open the file and follow the prompts to create USB installation media.
Enter flash drive On your Chromebook, restart it. If your device doesn't turn on, Chromebook Directly from the drive, reboot and press ESC Once you run it and select your drive.
Follow the instructions to install Windows. When prompted for a product key, choose “I don't have a product key”Also, select Custom: Install Windows only.
Ignore any warnings that appear and continue the process. If all goes well, your Chromebook should boot into Windows.
If you don't like the changes or things don't go as planned, you can factory reset Chrome BIOS to its original settings. You'll need a Windows computer, a Linux distribution, and a flash drive. If you used the SeaBIOS method, you can run the same command you used to install it and the Revert option to return to Chrome BIOS. Otherwise, do the following:
Make sure the write-protect screw is still out. If it isn't, you'll need to remove it Before proceeding.
On a Windows computer, download Ubuntu ISO و Rufus. You need these to create a drive. Ubuntu Bootable for use on a Chromebook.
Open Rufus and select The following options:
– USB drive
– GPT partition scheme for UEFI
– Fat32
– Select your Ubuntu ISO next to Create a bootable disk using.
Click "Start" To create a bootable USB drive.
Once finished, remove the drive and connect it to your Chromebook.
Restart your Chromebook and boot from the USB drive. If it doesn't boot from the USB drive automatically, press ESC to enter the boot menu during the boot process.
Choose "Ubuntu" To start with.
Locate Try Ubuntu.
Wait for it to start Ubuntu Connect to the network Wi-Fi When finished, you will need internet for the next steps.
Open a terminal window. Ctrl + Alt + T this too.
Enter the following command:
cd ~; curl -L -O http://mrchromebox.tech/firmware-util.sh; sudo bash firmware-util.sh
If you get an error, enter this command followed by the command above:
sudo apt install curl
Type "9" to pick “Restore stock firmware (full)”.
Type "Y" For confirmation.
If you have a backup of your Chromebook BIOS, insert a flash drive with it and type "Y" When prompted for a backup file. If you don't have a backup, type "N" The script will try to find the right file for you online.
Once everything is installed, you'll need to restore Chrome OS. Download Chromebook Recovery UtilityUsing a Windows computer.
You'll need a USB drive for the next step. You can use just your Ubuntu drive if you like, or another empty drive.
Launch the Chromebook Recovery Utility and enter your model number. If you're not sure what it is, you'll find it in the bottom center of the screen during the boot process.
Once the recovery drive is ready, turn off your Chromebook and insert the drive.
Turn on your Chromebook and wait for the verification process.
Once finished, log in as usual.
Finally, reset the boot flags by opening a terminal window and entering the following, pressing Enter After each one:
shell cd ~ curl -L -O http://mrchromebox.tech/firmware-util.sh; sudo bash firmware-util.sh,
Locate "4" ثم "5" And press Enter to complete the process.
Q1. Can this process brick my Chromebook? answer. Yes. Fiddle with the BIOS and try to turn your Chromebook into something new isn't risk-free. That's why it voids your warranty. Ideally, you should only do this on an older Chromebook that you don't mind tinkering with.
Q2. Is it better to dual boot or install a different operating system on a Chromebook or just buy it as a different device? answer. It's easier and safer to buy another machine. If you want a Windows PC, buy a cheap Windows machine. If you want to use Linux, format a Windows PC and install Linux, set up a dual-boot environment, or use VirtualBox to use Linux inside Windows. In fact, you can even use a stripped-down version of ChromeOS in VirtualBox if you want to run Windows, Linux, and ChromeOS together.
Q3. Will SeaBIOS help speed up my Chromebook? answer. Not likely. If your Chromebook is running slow,Try these tips To speed it up.
We hope this article has made it easier for you to learn how to replace Chromebook BIOS with SeaBIOS.