File extensions on Windows help you identify the type of file andSet its default programWindows 10 does not show file extensions andHiding file extensions is a security risk. It's easy to mistake an executable file with a hidden extension for malicious code. To prevent attackers from taking advantage of this, you can choose to show file extensions in File Explorer. In this article, we'll walk you through the top 4 ways to show or hide file extensions on Windows 10.

Well, all of this can be avoided simply by enabling your Windows to show file extensions. We'll go over some ways to quickly show or hide file extensions on Windows 10. Let's get started.
1. File Explorer
Perhaps the easiest way to show or hide file extensions on Windows is to use the File Explorer ribbon interface. Read on to learn how.
Press Windows key + E to launch File Explorer and switch to the View tab to view file extensions. Now, under Show/hide, select the checkbox that reads File name extensions.
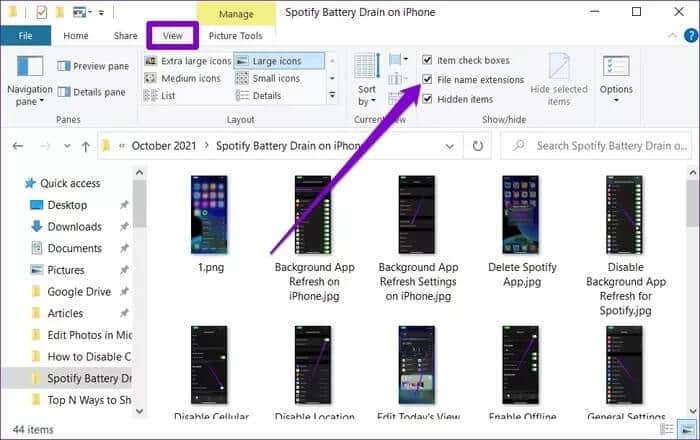
When checked, you will be able to see file extensions at the end of file names and vice versa.
2. TWEAK Folder Options
Alternatively, you can take the old-school route of using the Control Panel to show or hide file extensions on Windows 10. Here's how.
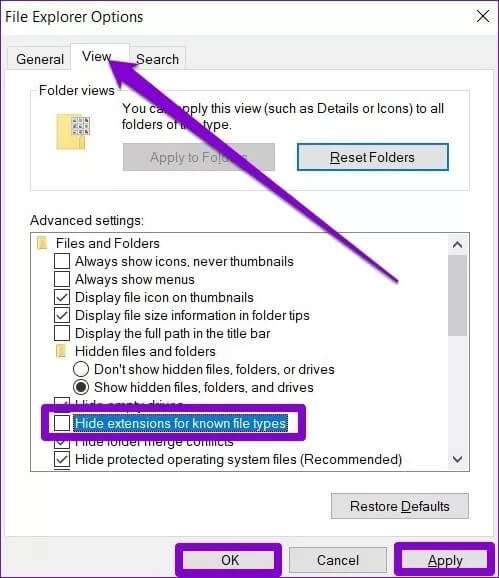
Step 1: Open the Start menu, type File Explorer Options, and press Enter.
Step 2: On the View tab, under Advanced settings, uncheck "Hide extensions for known file types" to display extensions. Finally, click "Apply" followed by "OK."
3. Use Command Prompt
While the above methods are simple, they only change the file extension preference of the current user. Using Command Prompt You can change file extension settings for each user on your computer if you're logged in with an administrator account. Read on to learn how.
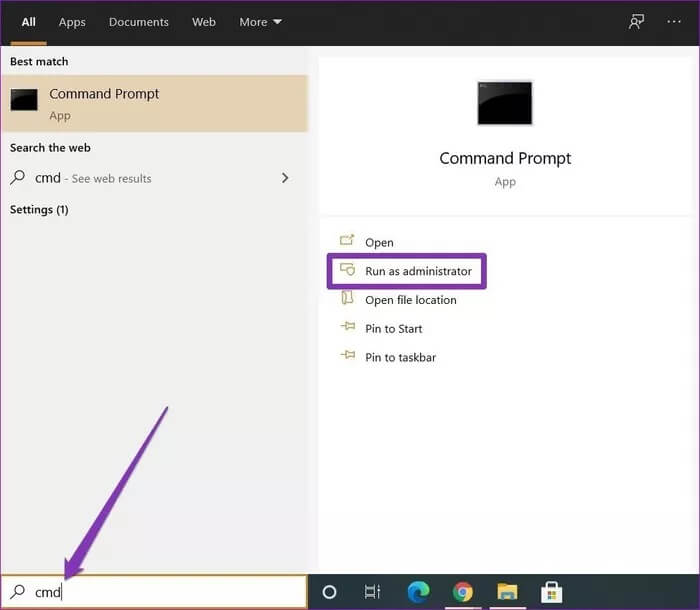
Step 1: Open the Start menu, type Command Prompt, and click Run as administrator on your right to open it with administrator rights.
Step 2: In the console, type the command below and press Enter to view files with their extensions.
reg add HKCU\Software\Microsoft\Windows\CurrentVersion\Explorer\Advanced /v HideFileExt /t REG_DWORD /d 0 /f
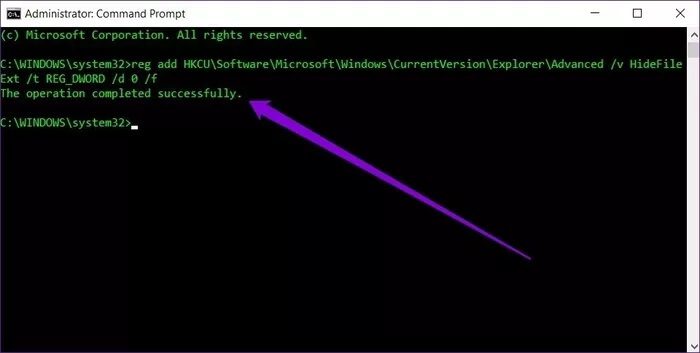
Similarly, to hide extensions, use the following command.
reg add HKCU\Software\Microsoft\Windows\CurrentVersion\Explorer\Advanced /v HideFileExt /t REG_DWORD /d 1 /f
That's all there is to it. You can use the commands above to easily display or hide file extensions for each user on your computer.
4. Try the Registry Editor
Apart from the above methods, you can also show or hide extensions in Windows by Making changes to the Windows registry.
Before proceeding, it's important to note that the Windows Registry is an integral part of Windows. Unknowingly modifying it can have serious consequences. Therefore, be sure to follow the instructions carefully.
Step 1: Press Windows key + R to launch the Run command. Type regedit in the box and press Enter.

Step 2: Use the address bar at the top to move to the next key.
HKEY_CURRENT_USER \ Software \ Microsoft \ Windows \ CurrentVersion \ Explorer \ Advanced
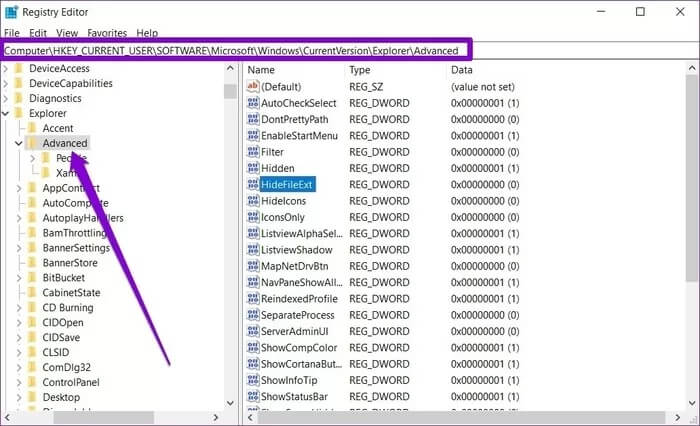
Step 3: Now double-click HideFileExt on your right. Under Value data, enter 0 if you want to show file extensions or 1 to hide them.
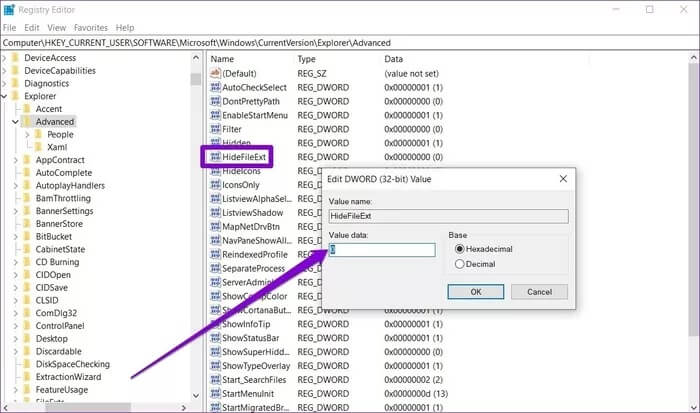
Once done, restart your computer for the changes to take effect, and file extensions will be shown or hidden.
Bonus: How to Change File Extension in Windows 10
Aside from viewing file extensions, did you know that you can also change file extensions in Windows? Well, it's very easy to do. Here's how.
Step 1: Right-click the file whose extension you want to change and click Rename. Alternatively, you can also press F12 on your keyboard to rename the file.
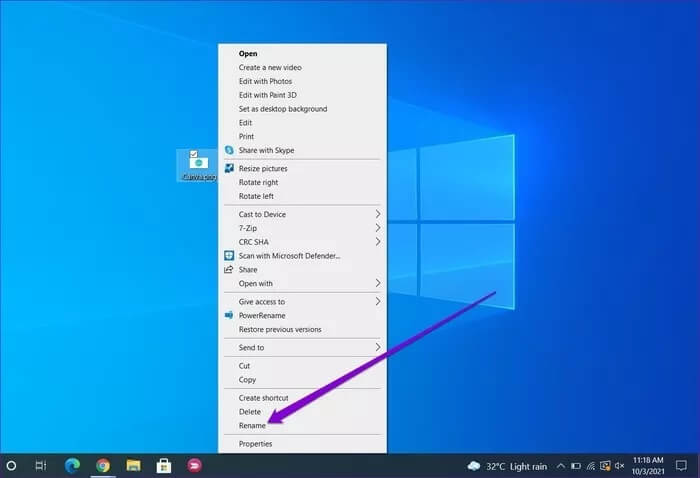
For example, to change an image extension from .PNG to .JPG, rename the file from FileName.png to FileName.jpg.
Step 3: Windows will warn you that changing the file extension could break the file. Click Yes to confirm.
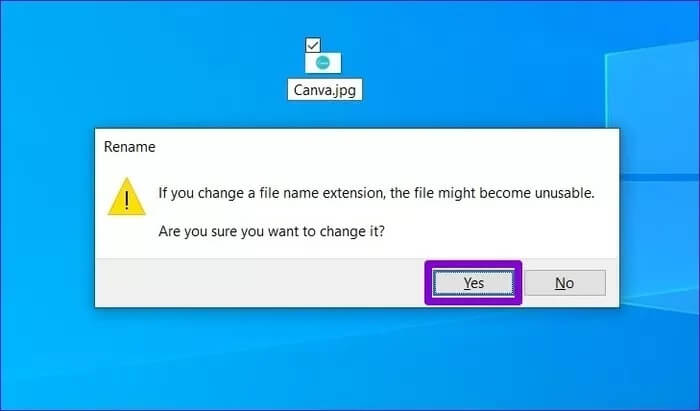
That's it. You've successfully changed the file type of your image. Now, there are a few things to keep in mind. You can only change extensions for certain file types. For example, renaming a Word file to .mp4 won't help it open in VLC media player.
See the difference
Enabling Windows to show file extensions is a good way to avoid malware and viruses. Until Microsoft decides to show file extensions by default, you can use any of the methods above to easily show or hide file extensions on Windows 10.


