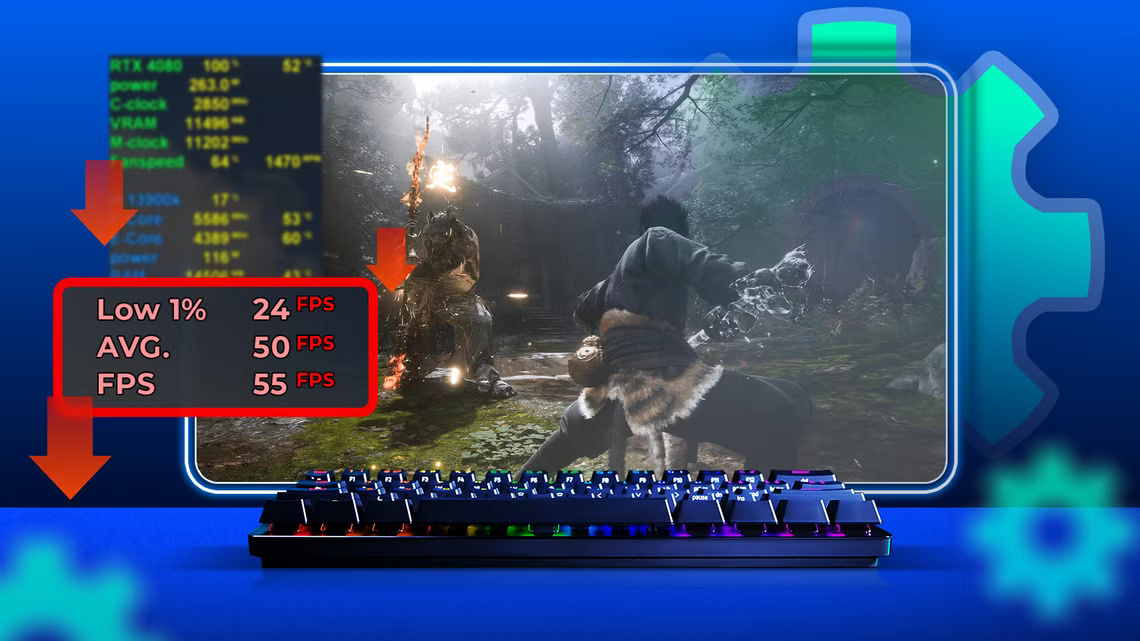
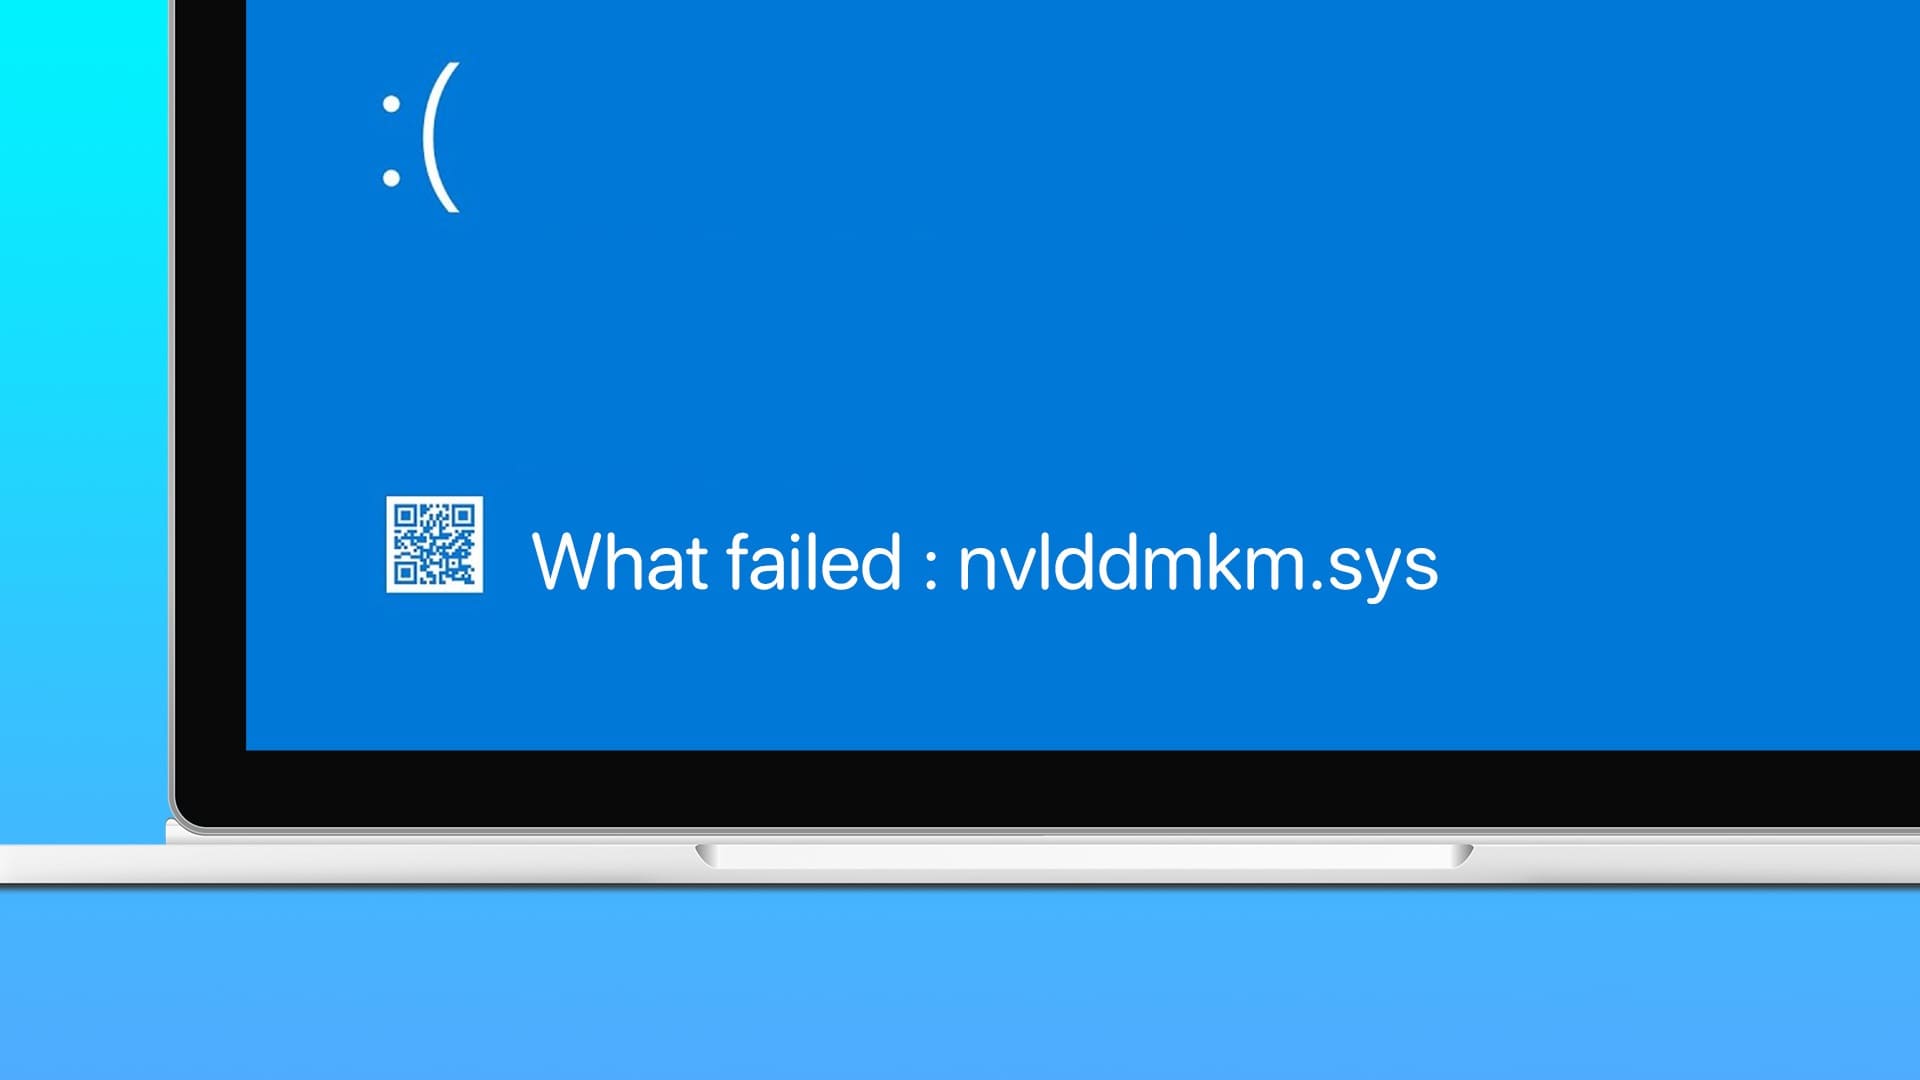
It's common knowledge that Windows slows down over time. Therefore, it came as a surprise when some users raised concerns about their Windows 11 running slow. There could be a long list of reasons behind this, but fortunately, in every scenario, a few simple tweaks can significantly boost system speed. A slow computer is less efficient. However, contrary to popular belief, Windows computers are not designed to slow down over time. If you notice your system performing poorly or apps taking longer to launch, it could be due to a lack of system storage space or an excessive number of apps or services running in the background. Today, we'll guide you through the best ways to speed up your Windows 11 PC. So, let's get started!
How to Speed Up a Windows 11 PC
Many factors can affect the performance of your Windows 11 system. Therefore, checking its performance using the Performance Monitor is the first step to diagnosing the problem.
Diagnose your system by monitoring performance.
Performance Monitor comes as a built-in tool in Windows. It monitors and identifies applications and processes that slow down your computer. Follow the steps below to launch the Performance Monitor:
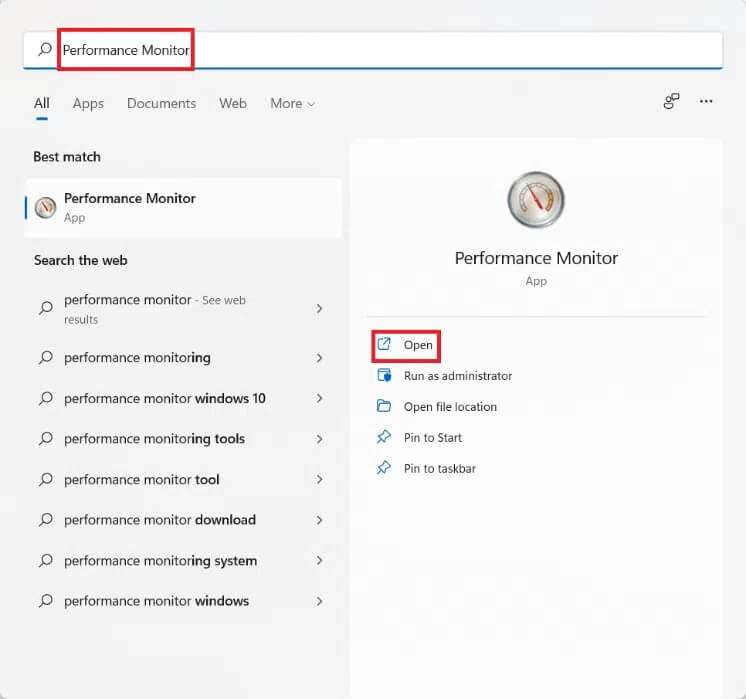
1. Click on the icon Search And type Performance monitoring. Click open , as shown.
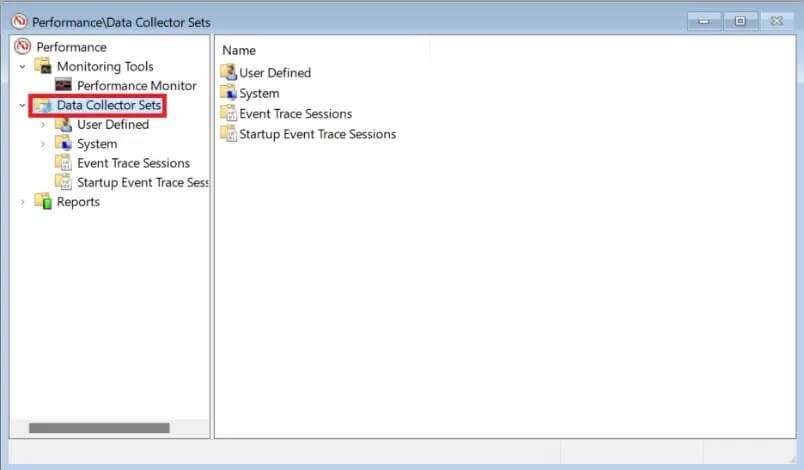
2. From the right pane, click Data collector groups.
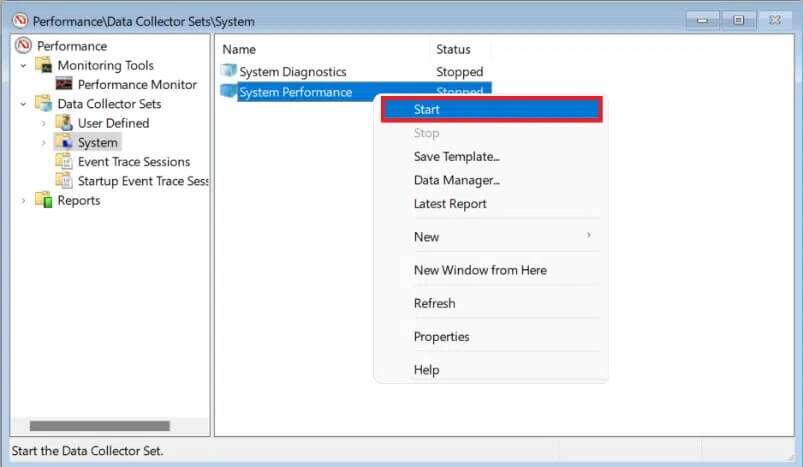
3. Then, double-click on System group.
4. Right click on “System performanceand select "Start" From the context menu, as shown.
The scan will run and data will be collected for 60 seconds.
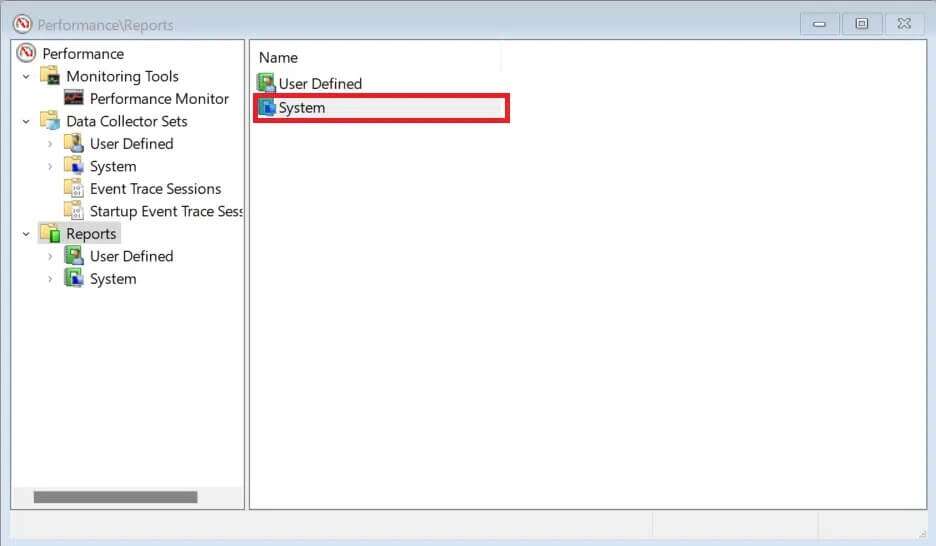
5. After the test is complete, click Reports In the right pane. Then, click the system On the right side, as shown.
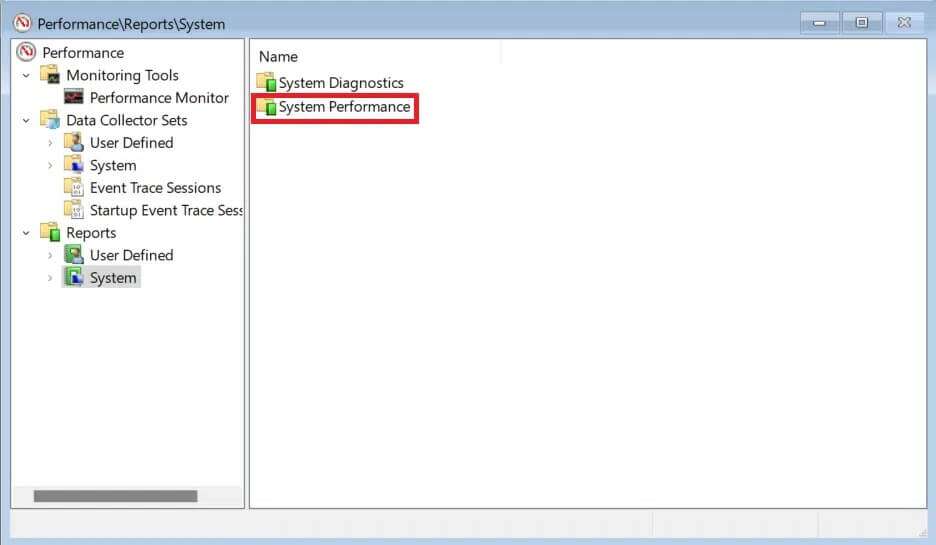
6. Now, click on System performance.
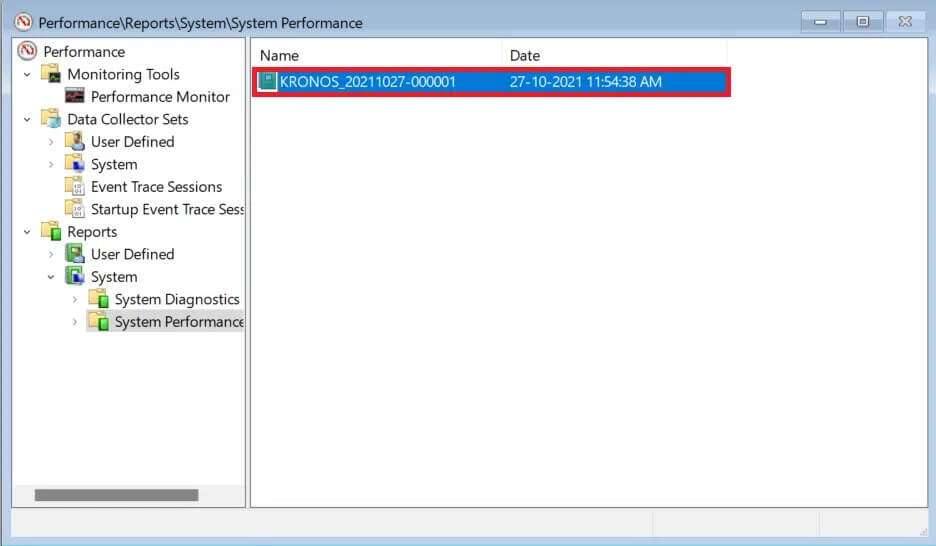
7. Among List of reports Find the latest report for the test you took previously.
8. In section Summary You can find the processes that consume system resources named “Higher Operations Group".
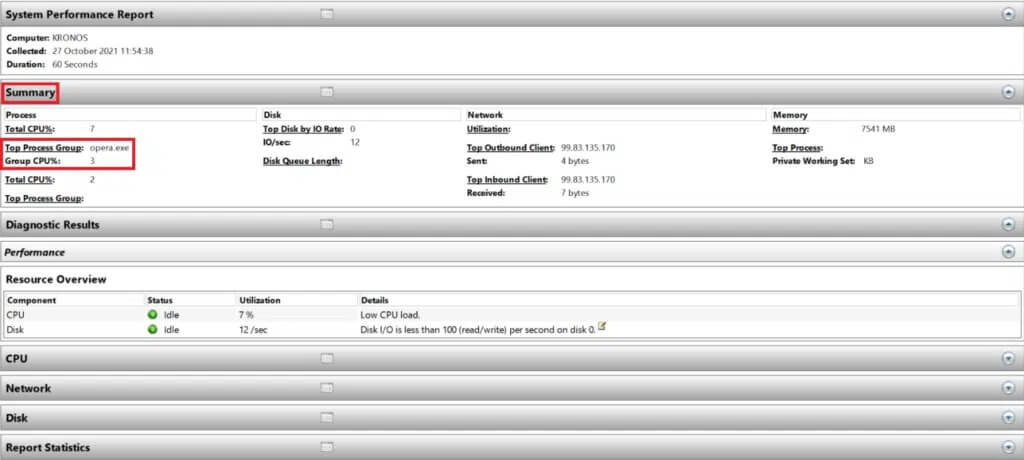
Note: You can read other sections of the report to understand your computer's performance comprehensively.
Method 1: Restart your computer
Restarting your computer may seem like a simple task, but it can actually help resolve the issue. It's helpful in reducing slow performance, as your computer's performance improves dramatically once it's restarted.
Method 2: Terminate unwanted processes
Task Manager is your go-to tool for monitoring and controlling memory consumption.
1. Press the keys Windows + X Together to open Quick Link Menu.
2. Select Task Management from the list.
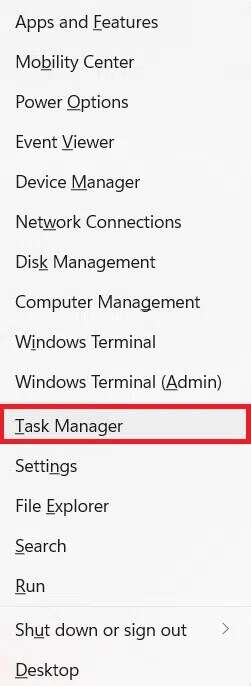
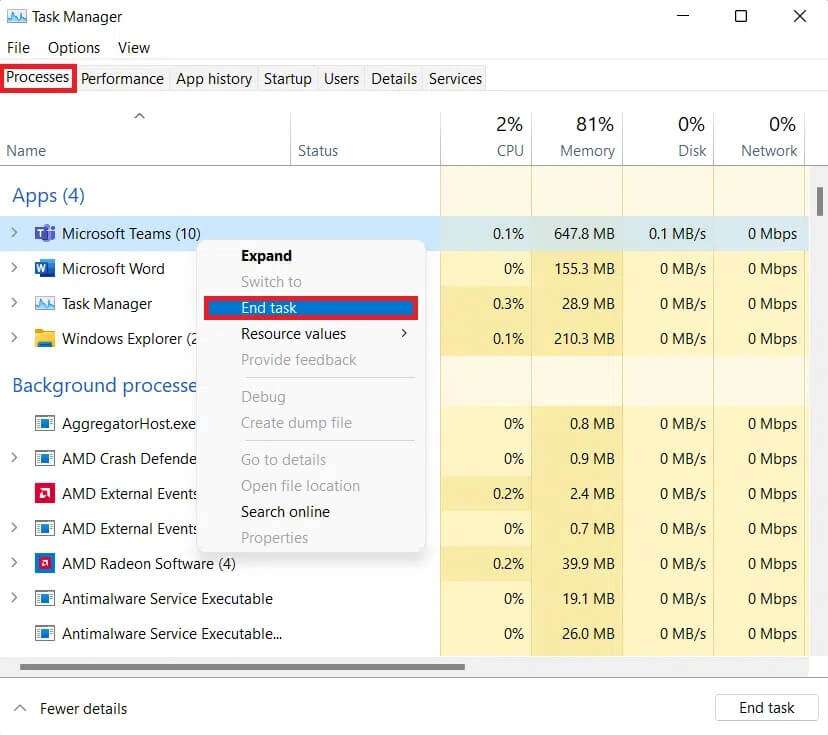
3. In the tab Operations You can see which applications and processes are consuming a lot of memory resources.
4. Right-click on the process. Presentation (Such as Microsoft Teams) that you don't need now.
5. Click “finish the job” from the right-click menu, as shown below.
Method 3: Disable startup applications
Many applications that start at boot time can hog RAM and slow down Windows. Disabling them will speed up Windows 11. Read our exclusive guide on how to do this. How to disable startup programs in Windows 11 here.
Method 4: Change the power plan
Power options may not be necessary in a desktop setup, but they can make a big difference when set up correctly on a laptop. To change power settings, follow these steps:
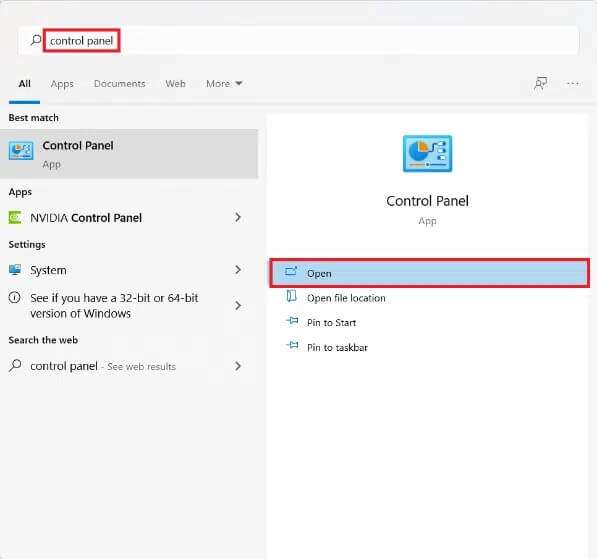
1. Click the icon Search Type Control Panel. Click on to open.
2. Click Power Options.
Note: Set View by > Large icons from the top right corner, if you can't see this option.
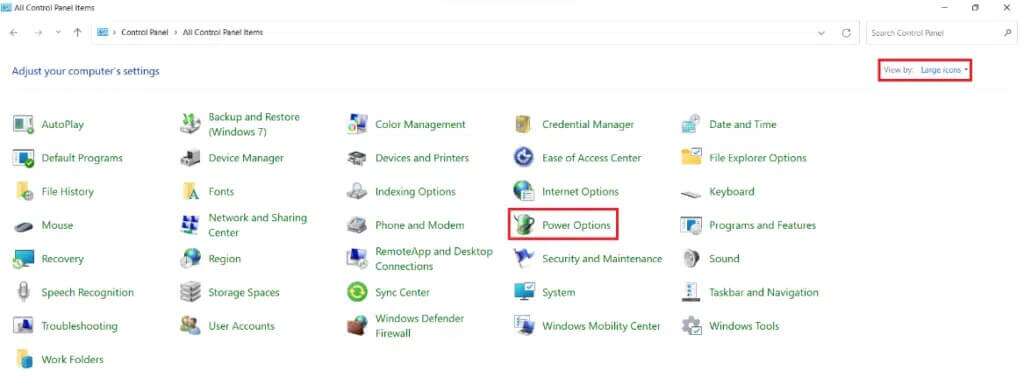
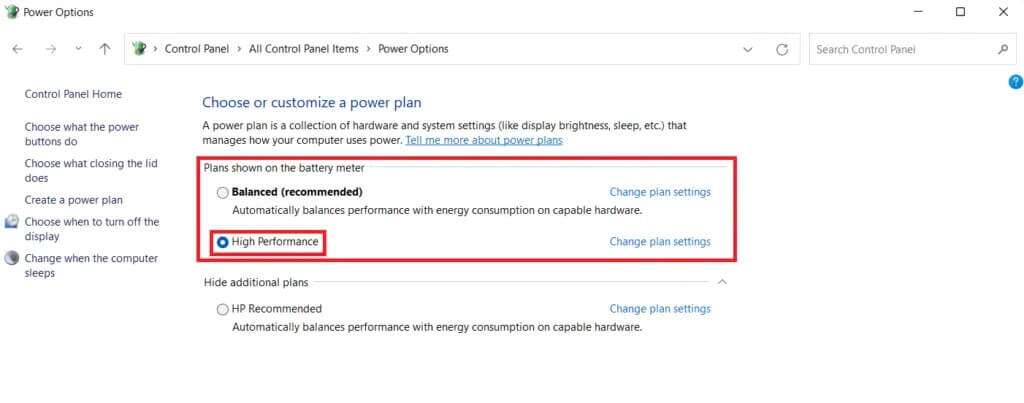
3. You will see Three power plans Default provided by Windows:
- Energy saver: This option gives you the longest battery life from your laptop while sacrificing performance. This is an option that should never be selected by desktop users, as it will only degrade performance while saving very little power.
- balanced: When your laptop isn't connected to a power source, this is the best alternative. As the name suggests, it offers a decent combination of performance and battery life.
- High performance: When connecting to a power supply, you need high performance to accomplish CPU-intensive tasks, and this should be the first choice.
4. Select a power plan. High performance , as shown.
Method 5: Delete temporary files
Lack of hard drive space can hinder your computer's performance. To clean up junk files:
1. Press the keys Windows + I Together to open the application Settings.
2. In the tab the system , Click Storage , as shown.
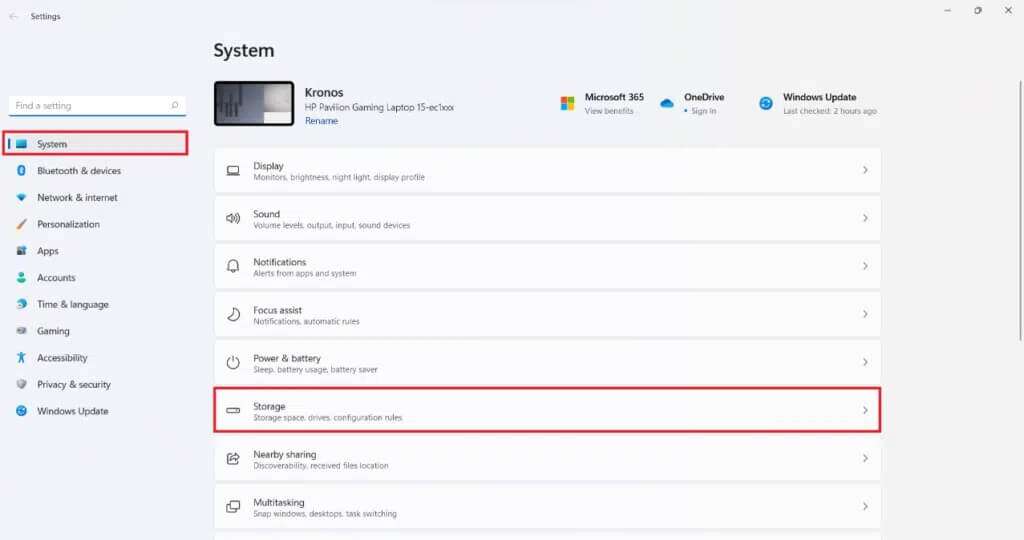
3. Wait while Windows scans your drives for temporary files and junk files. Then, click Temporary files.

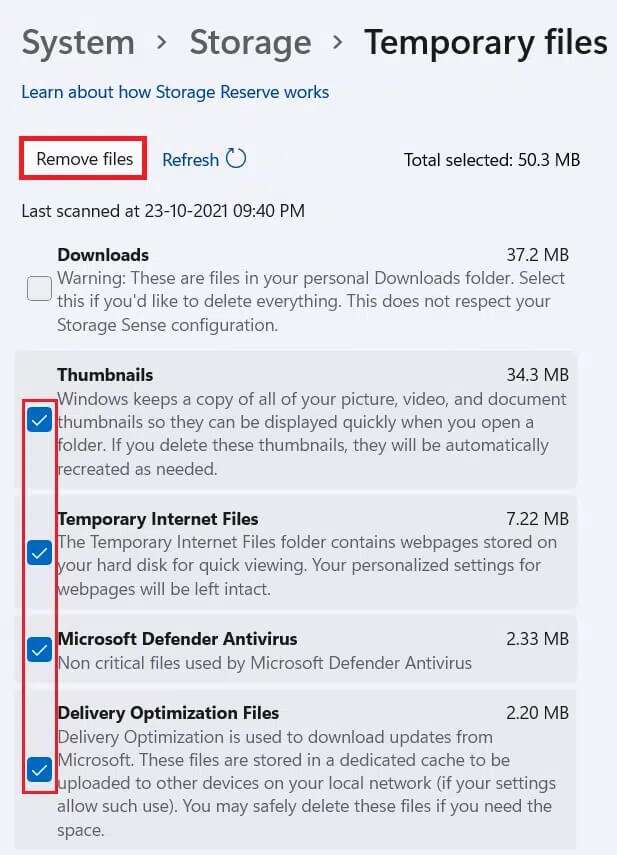
4. Select the check box for file and data types that you no longer need, for example thumbnails, temporary Internet files, and Microsoft Defender Antivirus & Delivery Optimization.
Note: Make sure to read the description of each file type to avoid deleting important data.
5. Now, click on remove files Featured illustration.
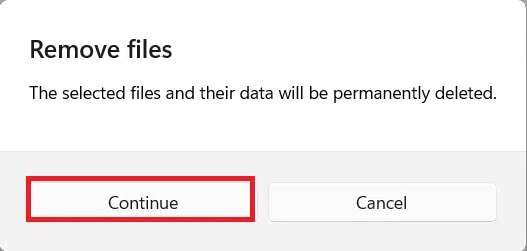
6. Finally, tap "Continue" In the prompt to confirm file removal.
Method 6: Uninstall unused programs
Unused apps can hog RAM resources in the background. It's recommended to uninstall an app that's no longer in use to free up storage and memory resources.
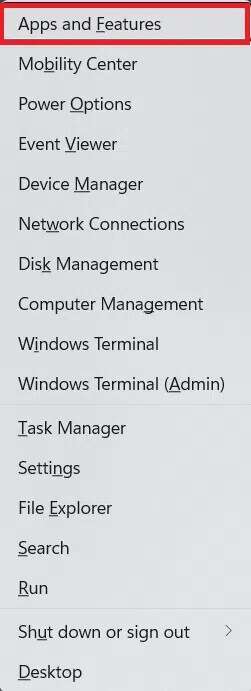
1. Press the keys Windows + X At the same time to open Quick Link Menu.
2. Click Applications and Features from the list.
3. Scroll through the list of installed apps and tap on The three points For the app you want to uninstall. For example, Transparent TB.
4. Click uninstall.

5. Click Uninstall in the prompt. For confirmation.

6. Repeat the process for all Applications Unwanted.
Method 7: Disable visual effects
Disabling visual effects can serve you well in the long run while reducing RAM consumption. This will also help speed up your Windows 11 computer.
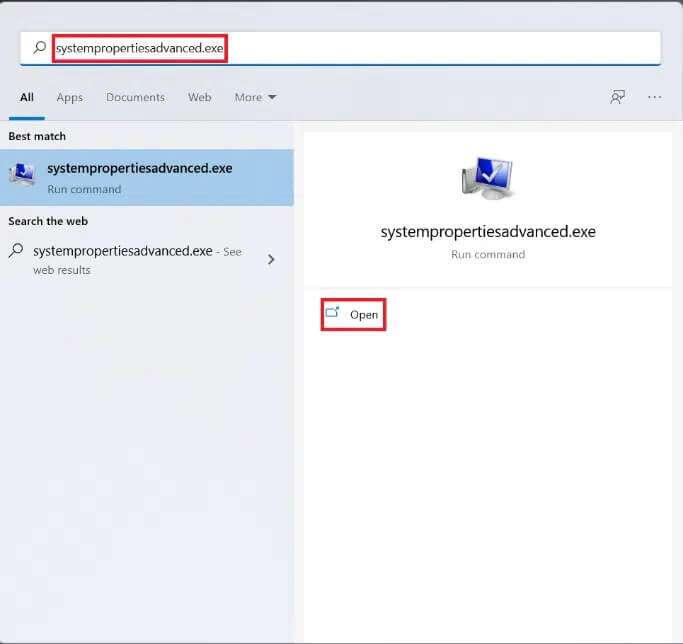
1. Click the search icon and type systempropertiesadvanced.exe.
2. Then click "to open" , as shown.
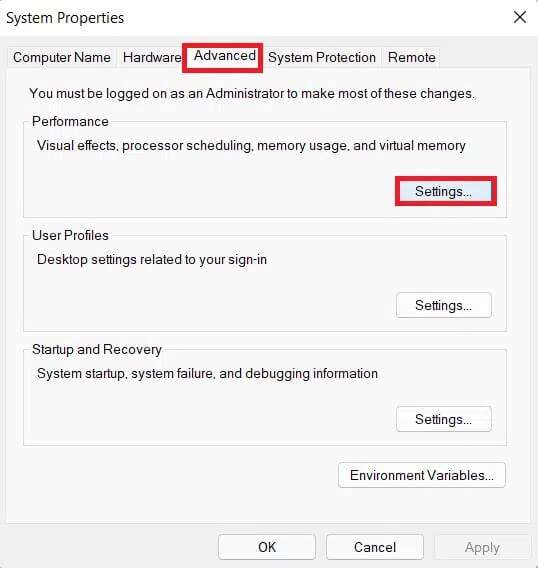
3. Under the “Tab”Advanced Options" , Click “Settings” In section "performance".
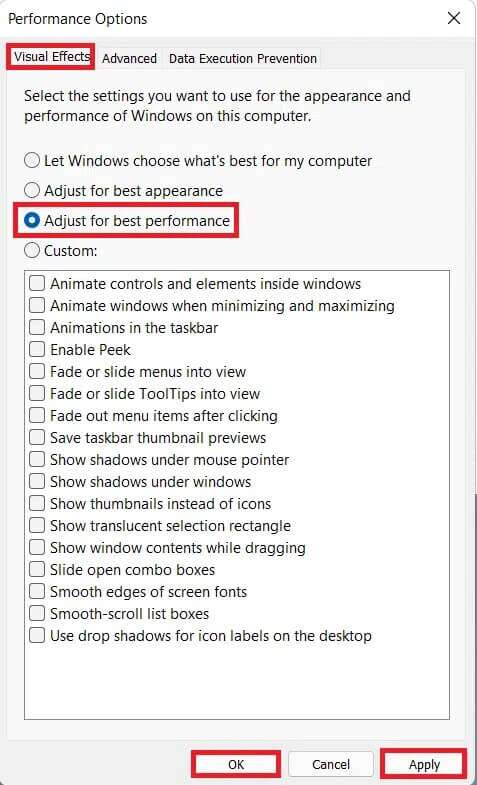
4. On the Visual Effects tab, click "adjust" For best performance.
5. Then select Apply > OK to save the changes.
Method 8: Increase virtual memory
Virtual memory allows data in RAM to be offloaded to disk storage, eliminating the physical memory shortage on your system. It's a practical solution to high memory usage and will definitely speed up Windows 11.
1. Launch the window System properties As you did in the previous method.
2. Switch to the “ tabAdvanced Optionsand select "Settings" within the section "performance".
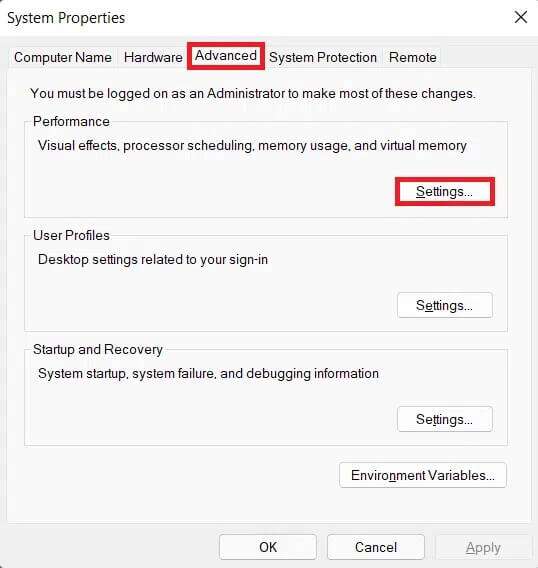
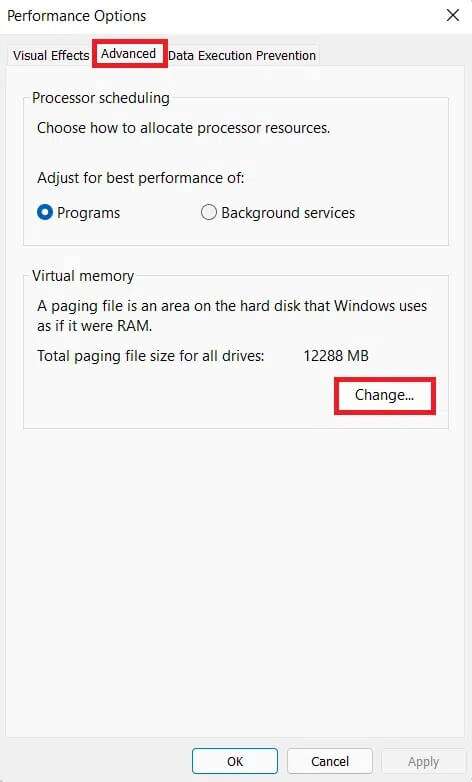
3. In a window Performance Options (Performance Options), click the tab Advanced (Advanced options).
4. Then click "changing ...” within the section “virtual memory".
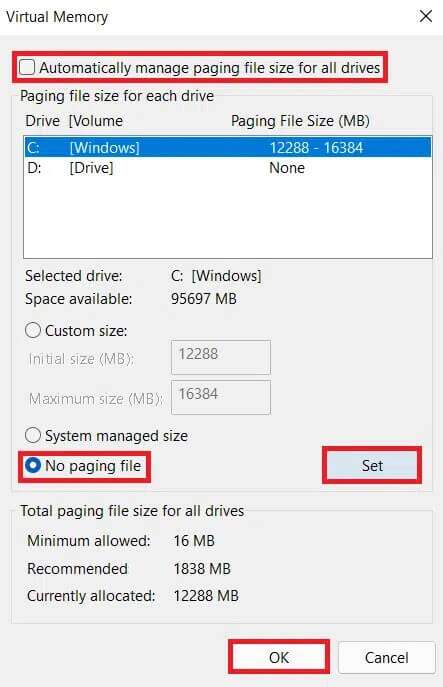
5. Get up deselect Select the box to automatically manage paging file size for all drives.
6. Select your primary drive (eg C:) from the list and click “There is no migration file“Then, click on Set.
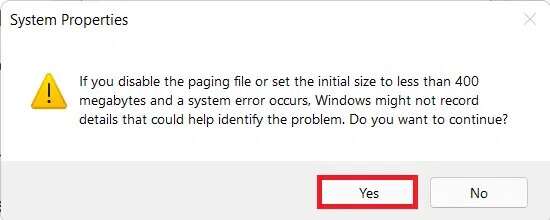
7. Click "Yeah" In the confirmation prompt that appears.
8. Then click Non-primary storage unit (eg D :) in the drives list and select custom size.
9. Enter Migration size in megabytes (MB).
Note 1: Enter the same value for both the initial size and the maximum size.
Note 2: The paging size is ideally twice the size of the physical memory (RAM).
10. Click Set > OK.
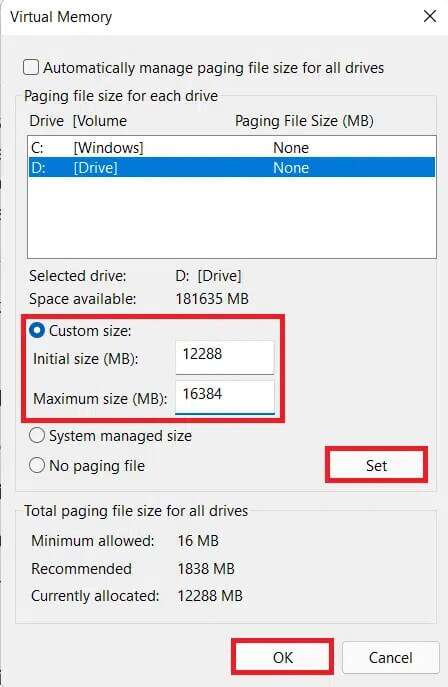
11. Prepare Turn on the computer For the changes to take effect.
Method 9: Run a virus and malware scan
Your computer slowing down could be a symptom of a malware attack, so it is recommended to run an in-depth malware scan. Windows Defender It is an antivirus that has built-in protection for Windows system from Malicious softwareTo perform a malware scan, follow the steps below:
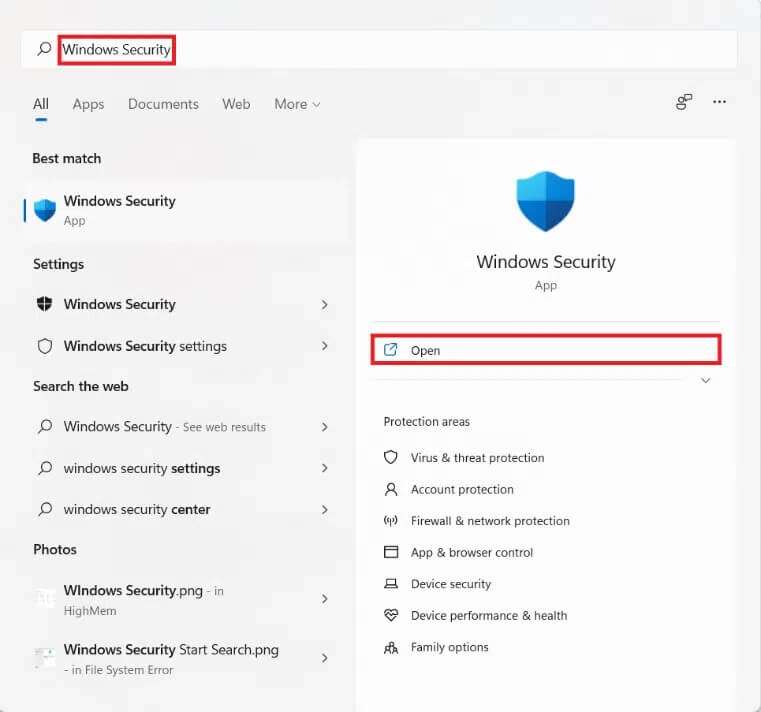
1. Click on the search icon and type Windows Security. Then click to open.
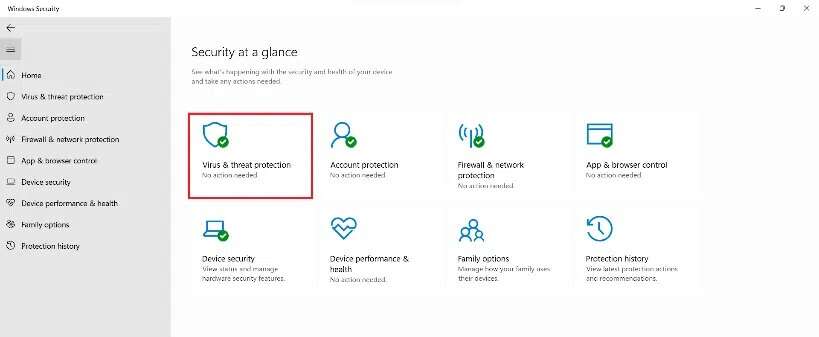
2. Click Virus and threat protection.
3. Click Scan Options.
4. Select the scan. Full And click scanning right Now.
5. Allow the scan to complete to get the report. Click Start. procedures If threats are found.
Method 10: Defragment your storage drive
When data blocks or component parts of a file are spread across the hard disk, it is known as Retail. This happens over time and slows down your system. Defragmentation is the process of putting these pieces together on the physical space of your hard drive, allowing Windows to access files more quickly. Alternatively, to free up space, you can move more data to external drive And restore it when needed. Read our list of the best external hard drives for PC gaming here.
While Windows defragments your hard drive regularly, you can do it manually as well. Furthermore, solid-state drives don't require any special tools. (SSD) New defragmentation, although you should do it on hard drives (hard disk drive). Follow the steps below to speed up Windows 11 by defragmenting your drives:
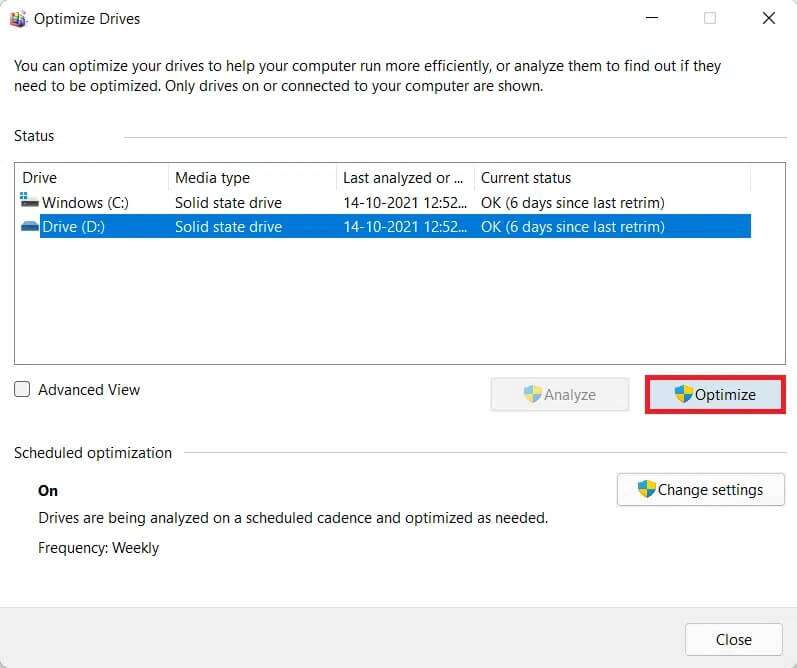
1. Click on the icon Search And type Defragment and optimize drives. Then click to open.
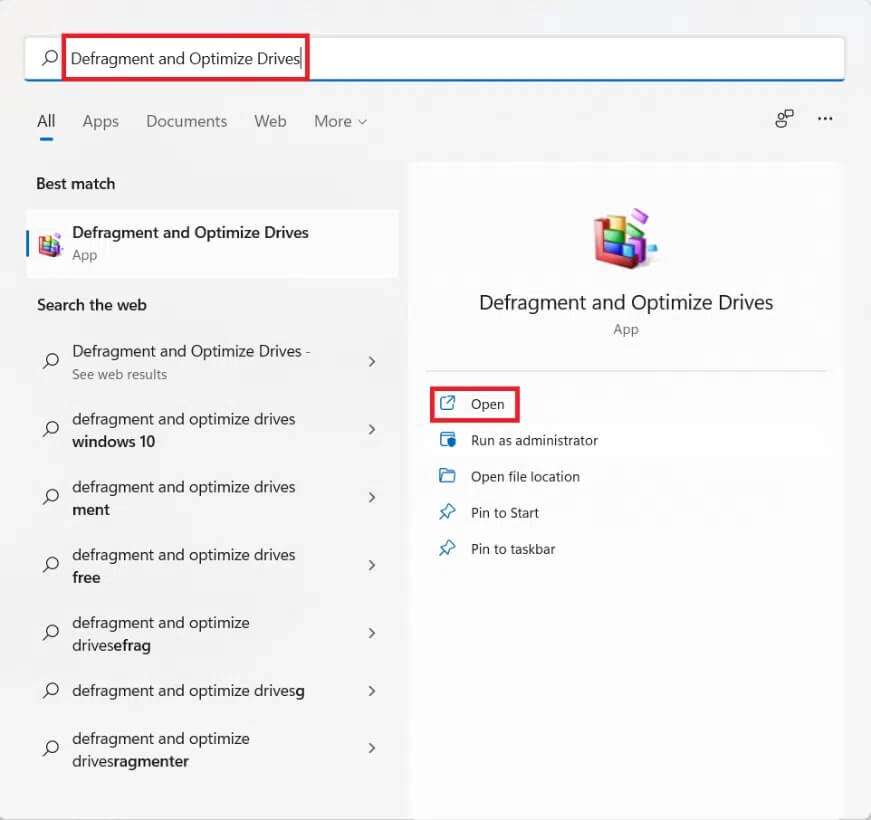
2. Select CD player which you want to defragment from the list of drives connected to your computer. For example, drive (D :)
3. Then click "to improve" , as shown.
Method 11: Update Windows
Windows needs to be updated regularly to run smoothly. Therefore, to speed up Windows 11, update your Windows operating system as follows:
1. Start Settings and click on Windows Update in the right pane.
2. Then click Verification There are no updates.
3. If any update is available, click “Download and install".
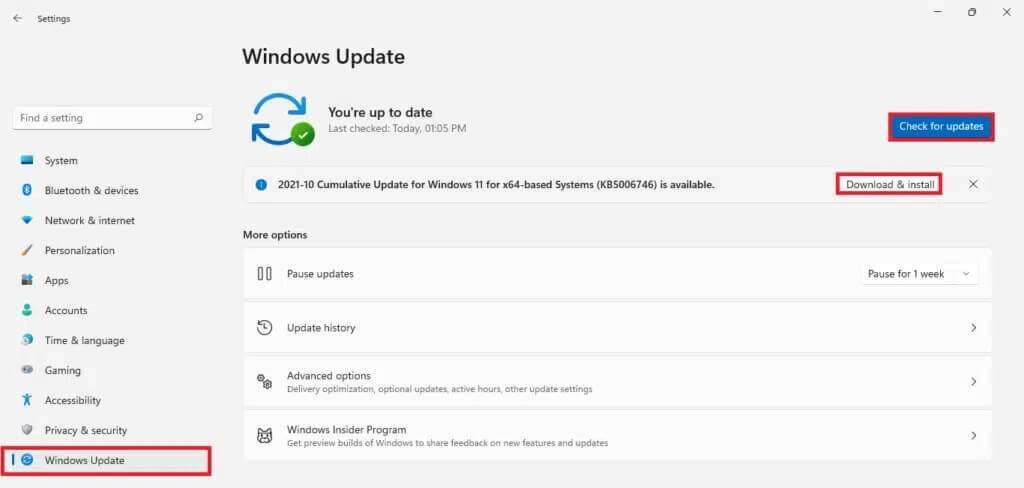
4. Let the installer download and install. Click Reboot Now to implement the update.
Method 12: Update outdated drivers
Outdated drivers can also present themselves as obstacles and slow down your computer. Therefore, to speed up Windows 11, update all system drivers using any of the following methods.
Method 12a: Through the Device Manager window
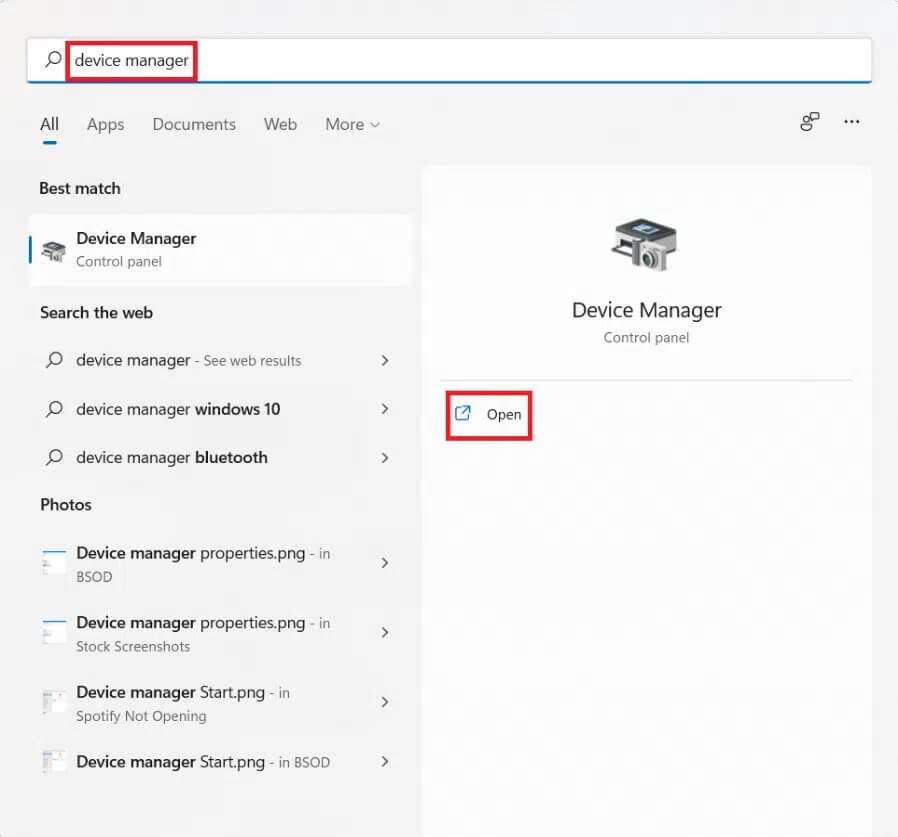
1. Type, search, and run. device Manager From the tape Search , as shown.
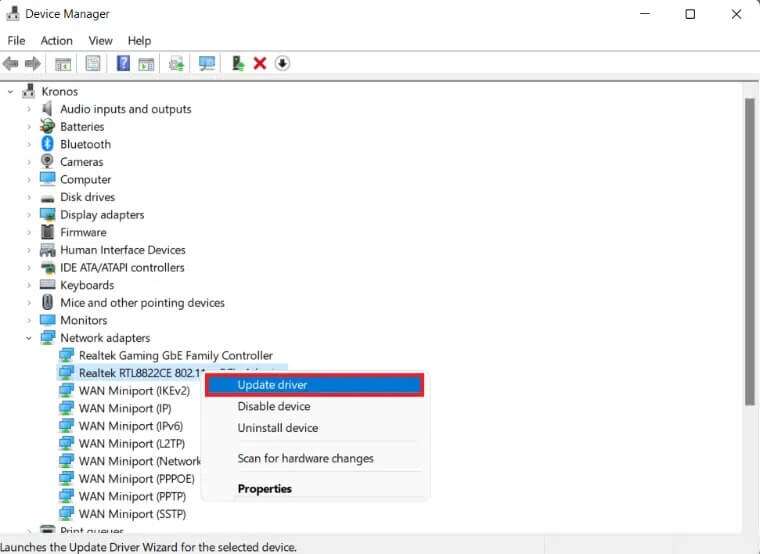
2. Double-click on Drivers , for example, outdated network adapters.
3. Right click on Old driver (Such as Realtek RTL8822CE 802.11 ac PCIe Adapter).
4. Then click Update Driver from the context menu, as shown.
5. Click Search automatically About drivers.
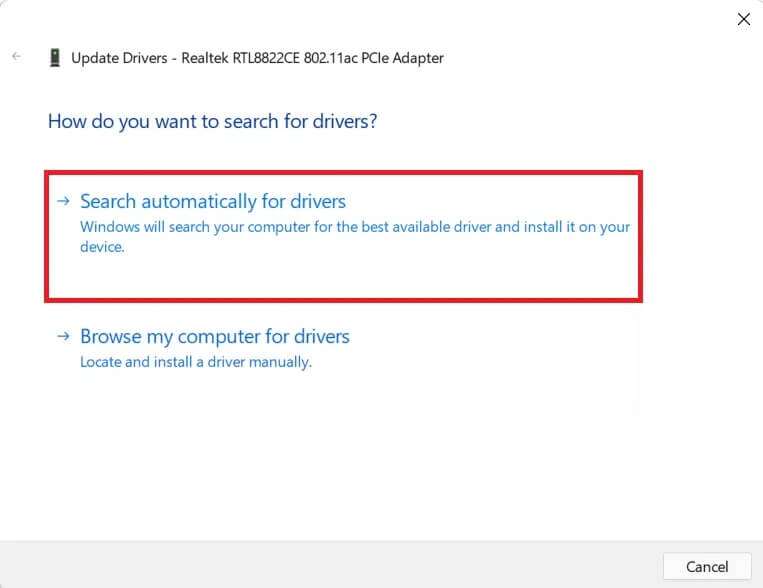
Let the scan run and find the latest driver for your device.
6 A. If available Updates The system will install it automatically.
6b. If not, you will be notified of the same via a message. Install the best software Already running for your device.
7. After updating, click closing.
8. Repeat the above steps. to update All old drivers to speed up Windows 11.
Method 12b: Through Windows Update feature
1. Press the keys Windows + I At the same time to open the application Settings.
2. Click Windows Update in the right pane.
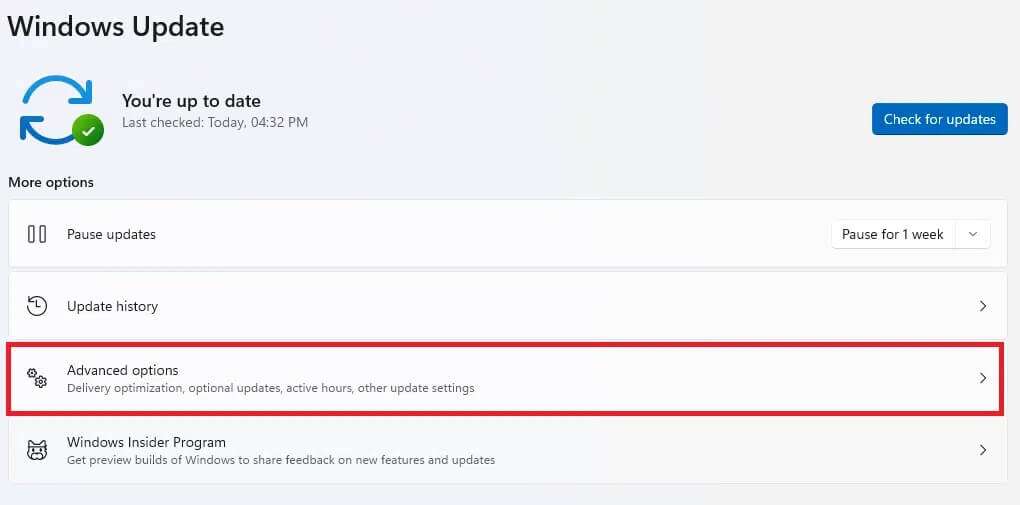
3. Then click on “Advanced Options", distinctively illustrated.
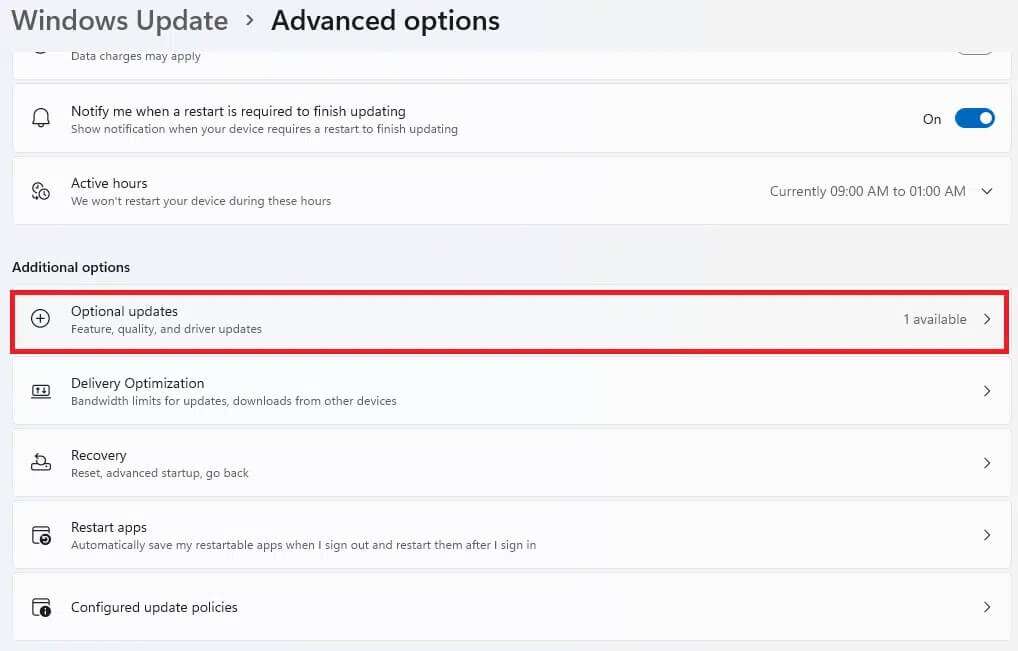
4. Click Optional updates Among additional options.
5. Select an option Updates Driver.
6. Check the boxes for available driver updates and click the “Update” button.Download and install".

7. Prepare Turn on your computer Windows 11 is required to install successfully.
Pro Tip: Automate Storage Maintenance with a Storage Sensor
Automating your storage maintenance will manage your temporary files for you without user intervention. To enable Storage Sense, do the following:
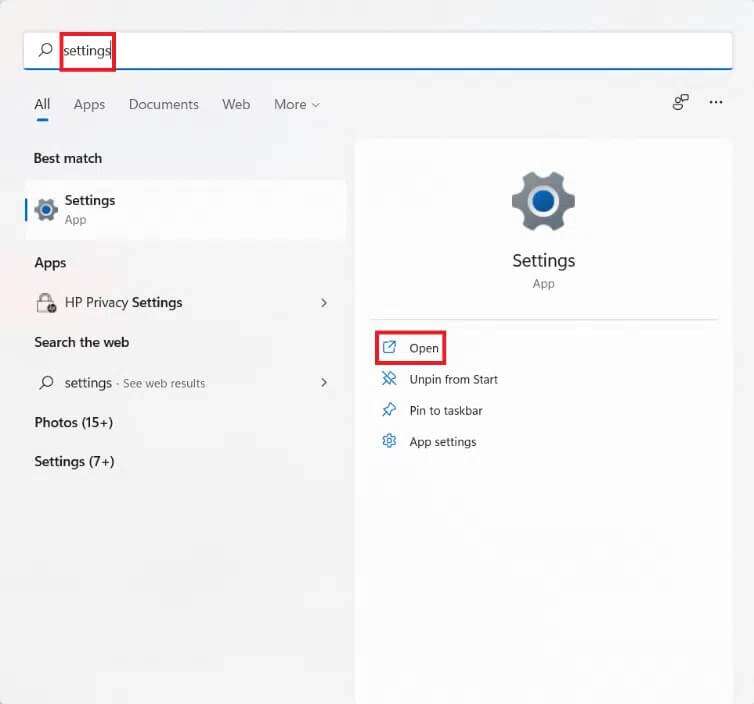
1. Click on the icon Search And type Settings. Click to open.
2. In the mark System tab , Click Storage.
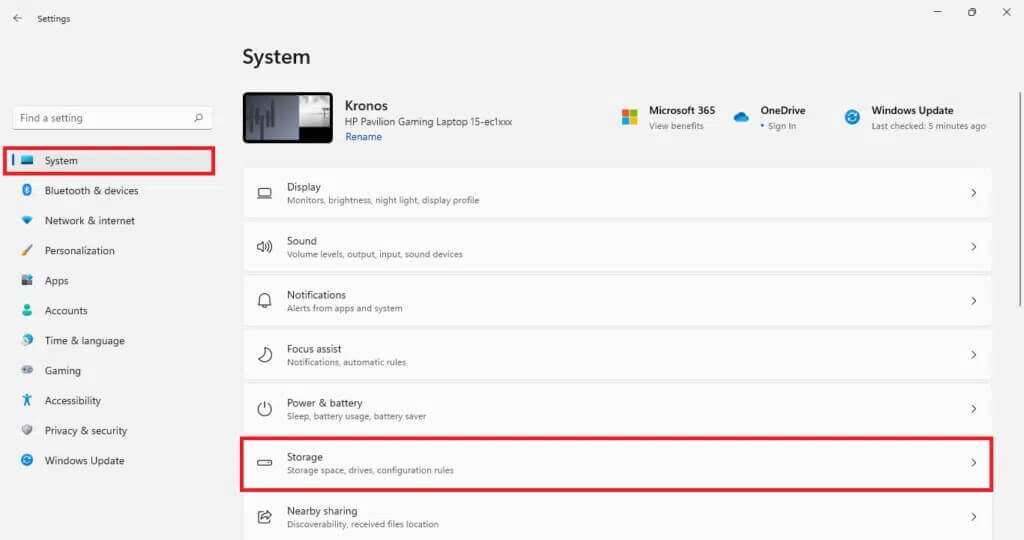
3. Click the toggle switch for Storage Sense to turn it on.
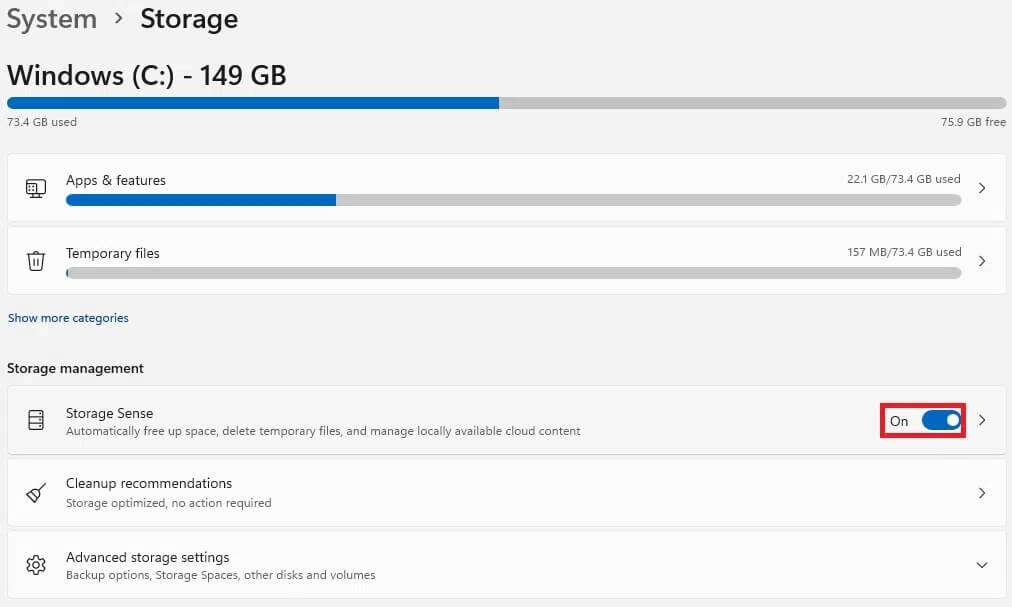
4. Then click Arrow Which refers to right In the Storage Sense box.

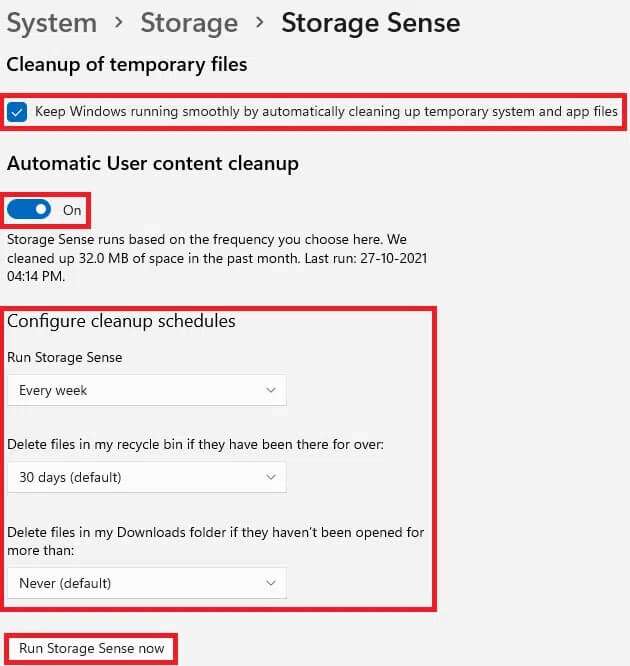
5. Here, select the box marked Keep Windows Running Seamlessly by automatically cleaning temporary system and application files.
6. Adjust toggle switch Under automatic user content cleanup.
7. Formation Settings According to your choice like
- Storage sensor frequency operation
- Delete files in my Recycle Bin if they are present during the period.
- Delete files in my downloads folders if they haven't been opened for a while.
8. Finally, click the “Run Storage Sense now"which appears shaded.
We hope you've learned about different ways to speed up Windows 11. You can post your suggestions and questions in the comments section below. We'd love to hear from you.
