The work-from-home culture has made computer cameras the most widely used built-in tool in the modern era. This is no surprise as all personal and professional meetings are held virtually. But what if your camera doesn't work in the middle of a meeting? Sometimes you may encounter the No Camera is Connected error while using your webcam tools. Many users encounter the 0xC00D36D5 error with no camera connected. If you are also facing the same issue, then you've come to the right place! We present a perfect guide that will help you fix the 0xC00D36D5 No Camera Attached error in Windows 10. So get ready and read on!
How to Fix 0xC00D36D5 No Cameras Attached in Windows 10
When you are dealing with an important meeting or call, you encounter the following error:
- We can't find your camera.
Check to make sure it is connected and installed properly, that it is not blocked by antivirus software, and that the camera drivers are up to date.
If you need it, here is the error code: 0xC00D36D5
The error prompt explains the cause of the problem. In simple terms, here are some possible causes that might be causing this problem on your computer.
- The camera is used by other applications or programs on your computer.
- Outdated camera drivers.
- Your antivirus/firewall is blocking the camera from accessing the app.
- The camera app is not installed correctly on your computer.
- Presence of malware/viruses.
Now, move to the next section for troubleshooting steps to resolve the issue.
In this section, we've compiled a list of troubleshooting methods that will help you fix the error discussed. It's recommended that you follow the methods in the same order for optimal results.
Method 1: Restart the application
As a basic troubleshooting step, it's recommended to restart the video conferencing app when you encounter the error. Exit the app and close all related processes. If you can, then restart your computer and relaunch the app. Finally, check if the error 0xC00D36D5 No Cameras Installed has been fixed.
Method 2: Make sure the camera is turned on.
Sometimes, the camera may be turned off or set to "inactive." Therefore, before following any advanced methods, check that the camera is turned on. You can do this by following these steps:
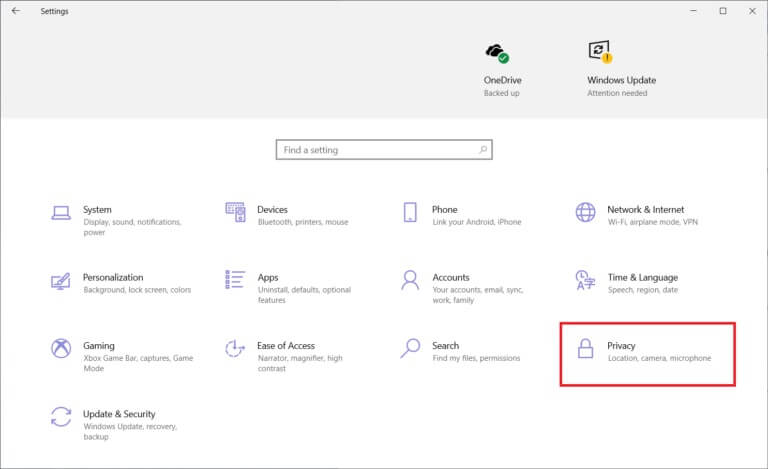
1. Press and hold Windows key + I Together to open Windows Settings.
2. Click Privacy As shown.
3. Select the Camera option in the right pane.
4. Now, on the left side, check Turn on the camera.
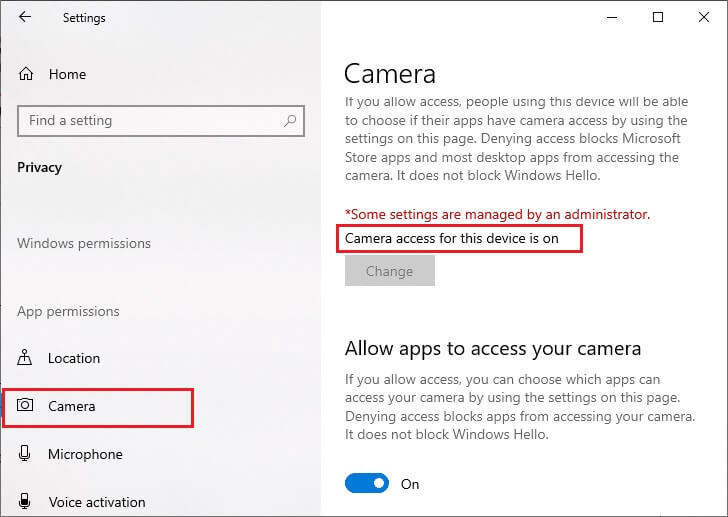
If it is closed, change it to ON. Check if you have fixed it. 0xC00D36D5 There is no error in connecting the cameras.
Method 3: Terminate other camera access apps
Your PC's camera can only be used by one program at a time. Make sure you're not on a video call/conference in other applications when accessing the camera. To close all other applications running in the background, follow the steps below.
1. Turn on Task management By clicking on Ctrl + Shift + Esc keys At the same time.
2. In a window Task Management , Click Operations tab.
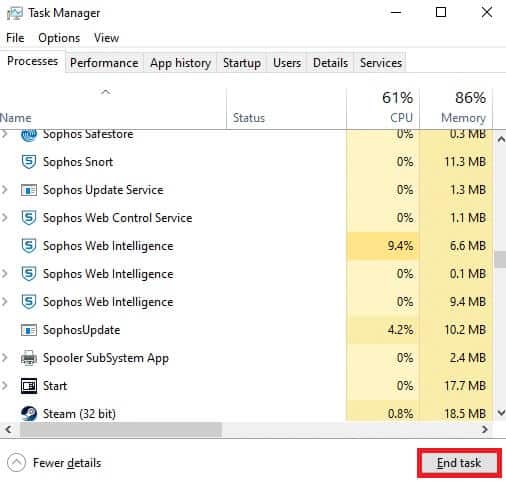
3. Now find and select the unnecessary programs accessing the camera that are running in the background.
4. Click finish the job As shown in the image above.
This will close all other camera access apps, and you can now check if the 0xC00D36D5 error has not connected any cameras.
Method 4: Allow access to the camera
There is a specific list of apps and programs that have been granted camera permissions. If your app (in the case of a meeting) is not on that list, you may encounter error 0xC00D36D5 No camera attached. To enable camera permissions, please follow the steps below.
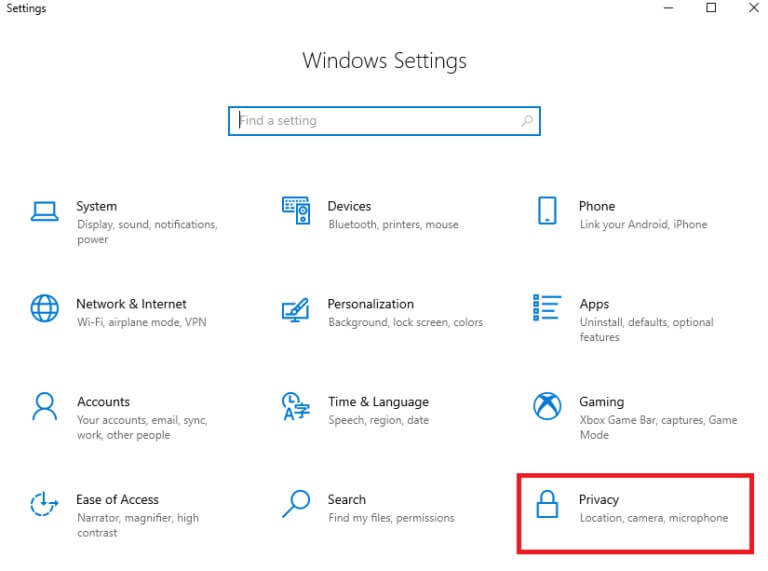
1. Start Windows Settings by pressing Windows key + I together.
2. Click Privacy As shown.
3. Scroll down the left pane and click Camera optionMake sure it is enabled. Allow apps to access To the camera option as shown.
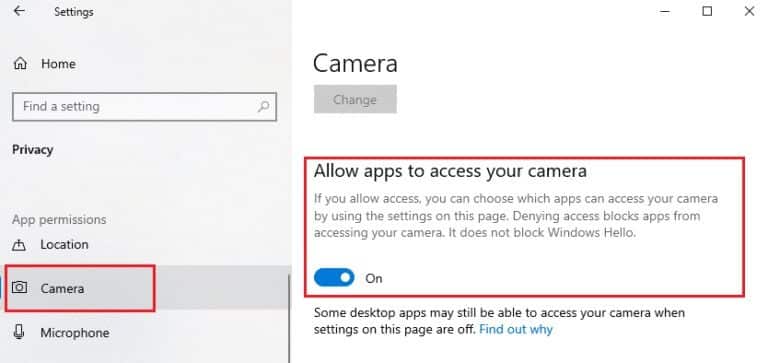
4. Scroll down the left pane and make sure the video conferencing app is turned on under Section Choose Microsoft Store apps which can access the camera as shown. Here, the Zoom For example.
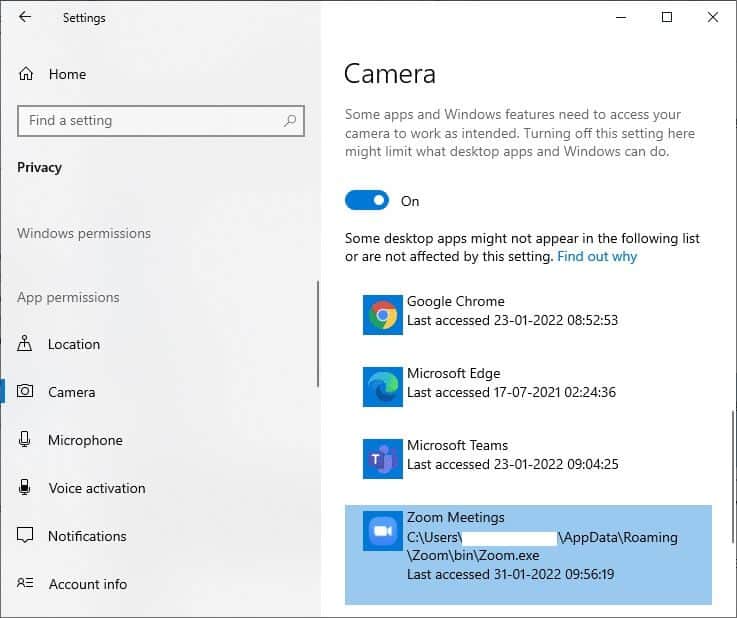
5. If you cannot find your order in the list, visit this link for more details.
Method 5: Run a malware scan
Experts suggest that you should scan your computer periodically to keep it virus-free. Viruses and other similar entities can intrude on your software, including the camera app, and affect Windows performance. Follow the steps below to run a Windows Security Scan on your Windows 10 computer.
1. Press Windows key + I At the same time to open Settings.
2. Click Update and security , as shown.
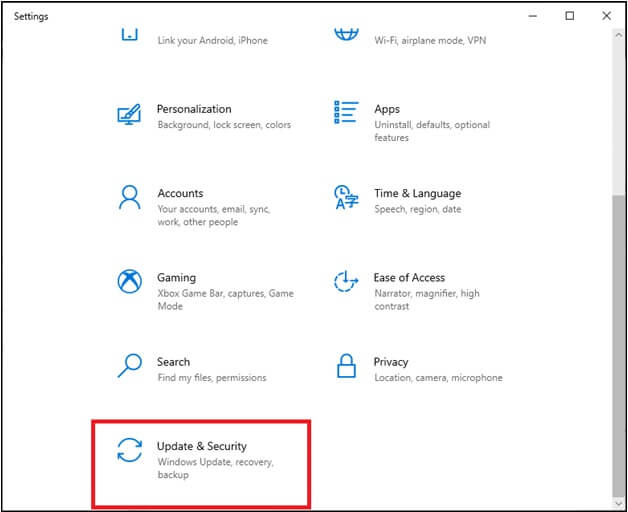
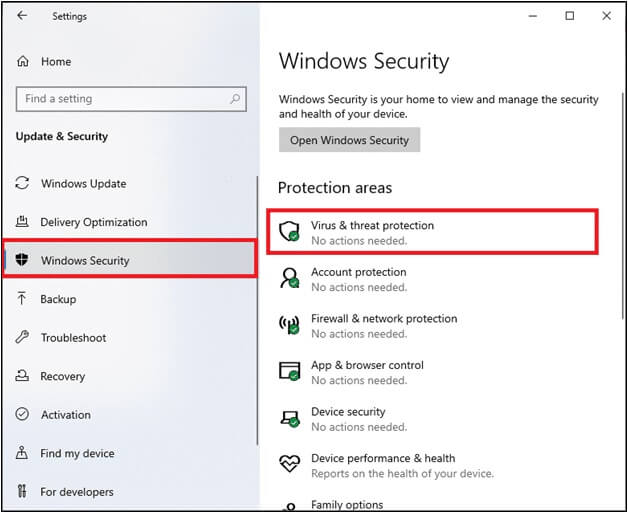
3. Click Windows Security in the right pane.
4. Next, select an option Protection from viruses and dangers Within the protection areas.
5. Click Options scanning , as shown.
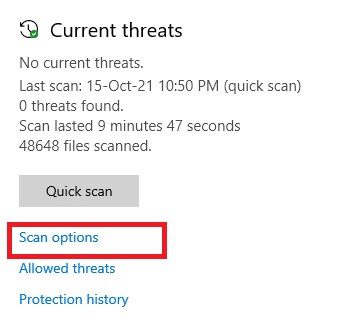
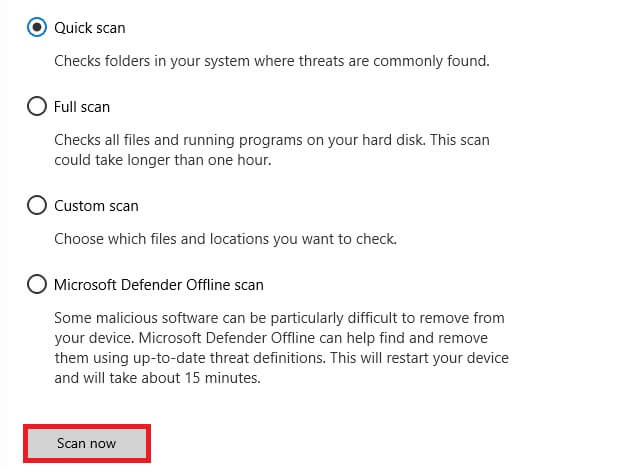
6. Choose the scan option. Quick or full scan According to your preferences and click on Scan Now.
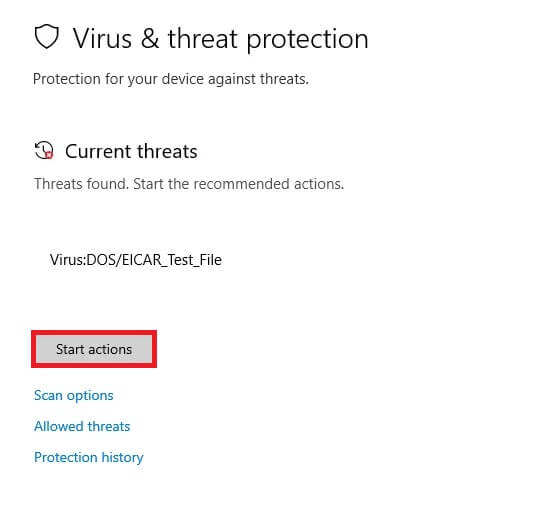
7a. After the scan is complete, all threats will be removed. Click Start the process Under current threats to remove or fix threats.
7b. If you do not have any threats on your system, no current threats will be displayed as shown below.
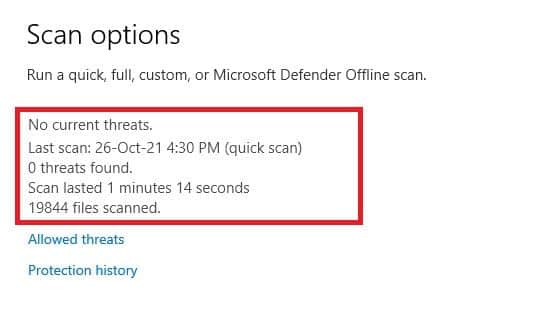
Windows Defender Firewall will fix all virus related issues and you can check if the error 0xC00D36D5 No cameras attached in Windows 10 is fixed.
Method 6: Disable antivirus (temporarily)
An antivirus suite is an essential component because it protects your computer from malware and virus attacks. In some cases, certain programs perceive certain applications or websites as threats and block them, preventing you from accessing their features. You can prevent your video conferencing application from being blocked by your antivirus software or temporarily disable your antivirus protection if the situation is dire. Follow the steps below:
Note: Different antivirus programs will have different settings for this method. As an example, we use Avast Free Antivirus.
Option 1: Apply a whitelist in your antivirus
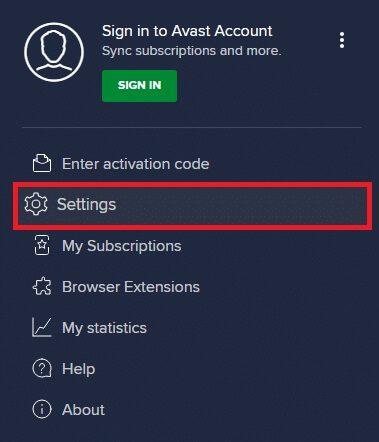
1. Go to menu Search , And type Avast Click on the menu option in the top right corner as shown.

2. Now, click on “Settings” from the dropdown menu.
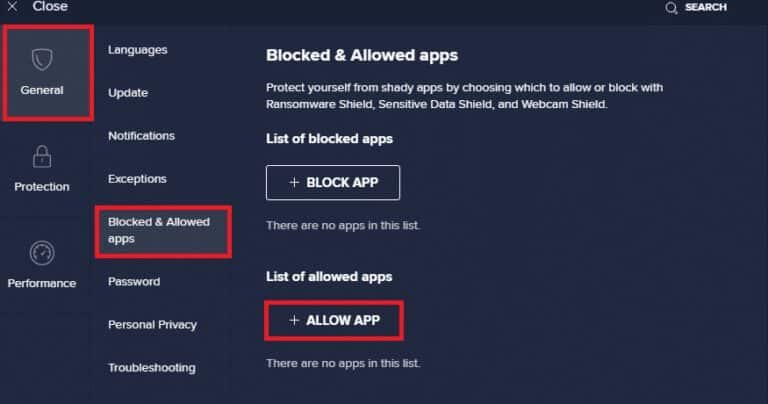
3. In the tab "general" , click the tab Prohibited and allowed applications And click "Allow the application" within the section List of allowed applicationsRefer to the image below.
4. Click Add> Option Next to the video conferencing app to add the app to the whitelist.
Note: You can also browse to the application path by selecting the SELECT APP PATH option.
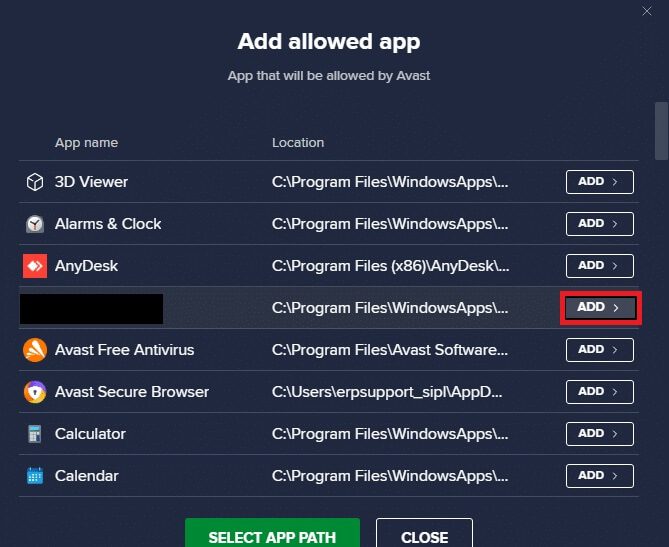
5. Finally, click Add to confirm the prompt and your app will be added to the Avast Whitelist.
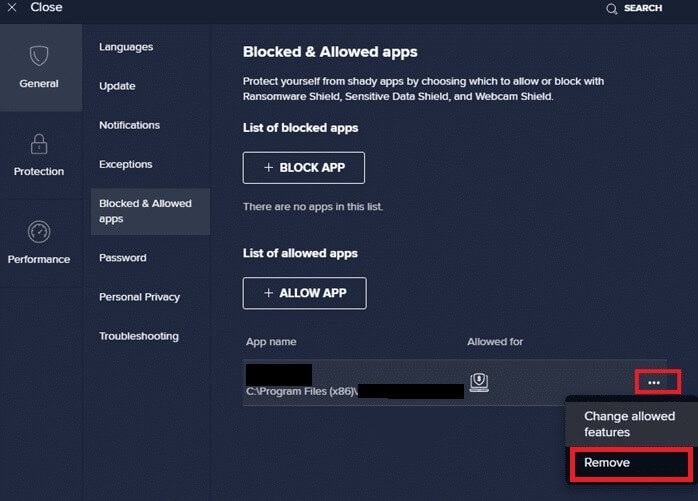
6. If you would like to Remove the application/program From the Avast whitelist, click three-dot icon in window Main SettingsYou will see two options here.
- Change allowed features – This option will allow you to change the features you enabled while whitelisting the program.
- Remove – This option will remove the program from the Avast whitelist.
7. Restart your computer Your and check if the error 0xC00D36D5 No camera attached in Windows 10 is fixed. If not, you can disable your antivirus as described below.
Option 2: Disable antivirus
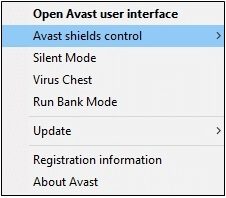
1. Go to Antivirus code in Taskbar Right click on it.

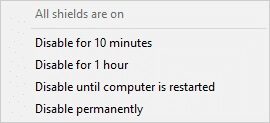
2. Select an option Control Avast Shields And you can Temporarily disable Avast Using the following options:
- 10 minute disablement
- Disabled for 1 hour
- and disable until the computer is restarted
- Permanently disabled
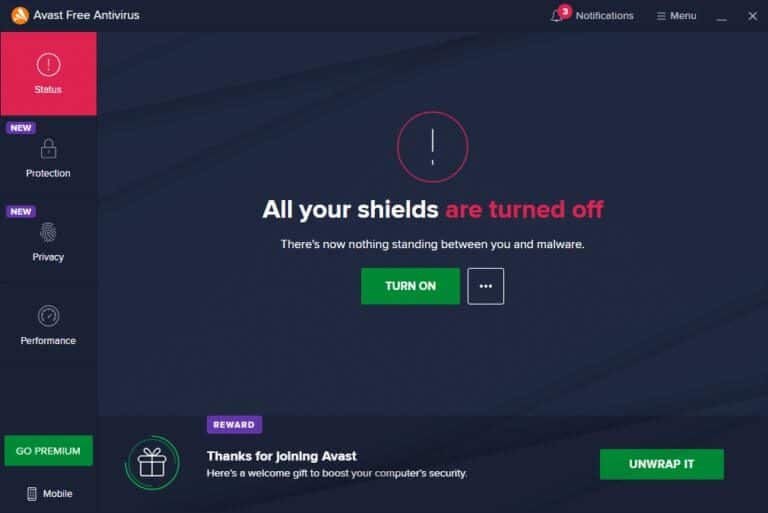
4. In the main window, you will see a note that says "All your shields are turned off," indicating that you have disabled your antivirus. To turn it back on, click employment.
Method 7: Whitelist the application in the firewall
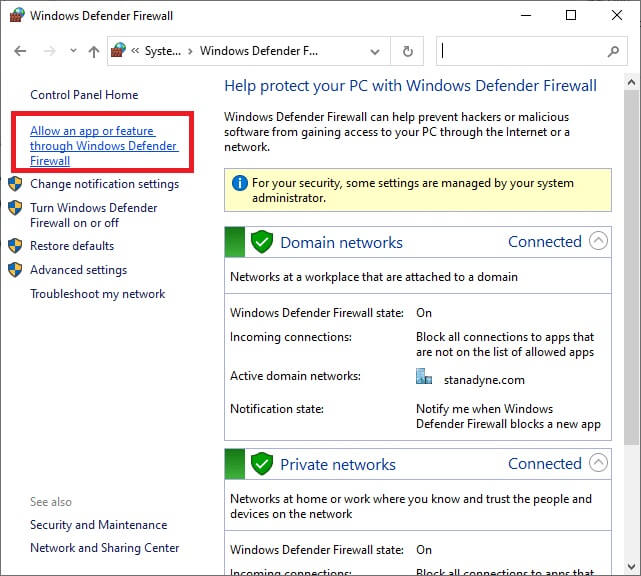
Similar to antivirus software, Windows Defender Firewall may block an application, resulting in the "No Camera" error. Here are some steps to whitelist any application in Windows Defender Firewall. Using this method, you can whitelist a video conferencing application on your firewall.
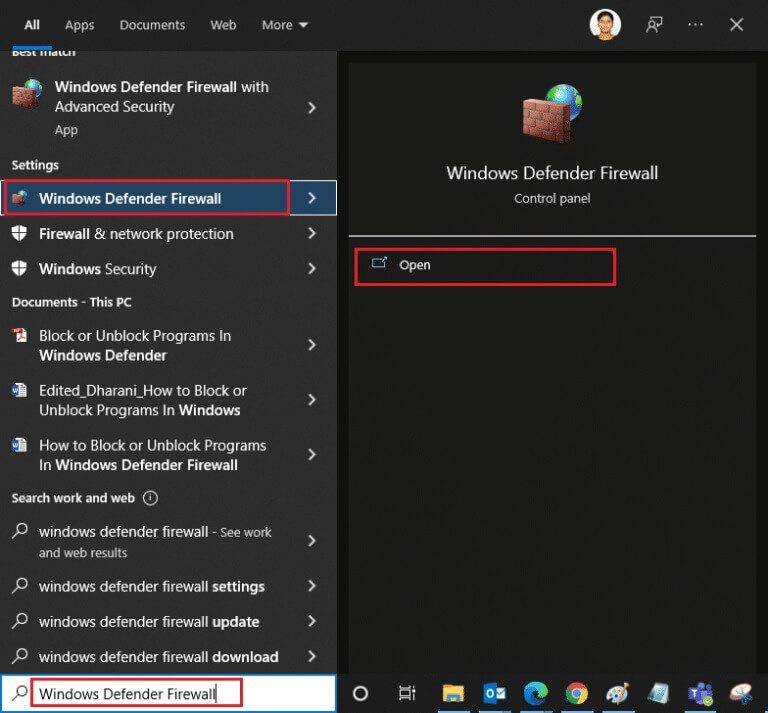
1. Press Windows key And type Windows Defender Firewall. Click to open.
2. In the pop-up window, click Allow an app or feature through Windows Defender Firewall located in the right pane.
3. Click Change settings and check out Allow conferencing through the firewall.
Note: You can tap Allow another app... to browse your app if it's not listed.
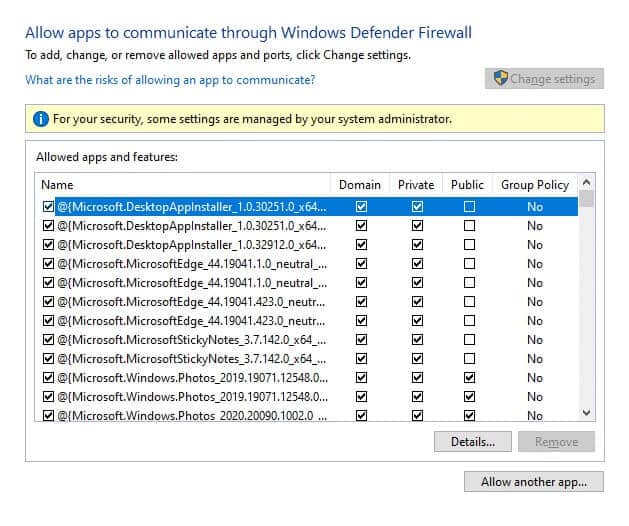
4. Click OK to save the changes.
Method 8: Update/Restore Camera Drivers
This problem can occur if you have outdated camera drivers on your computer. This can create compatibility issues. In many cases, updating the drivers will help resolve the issue. You can also reinstall them, if necessary.
Option 1: Update drivers
To resolve compatibility issues with outdated drivers, update your camera drivers as described below.
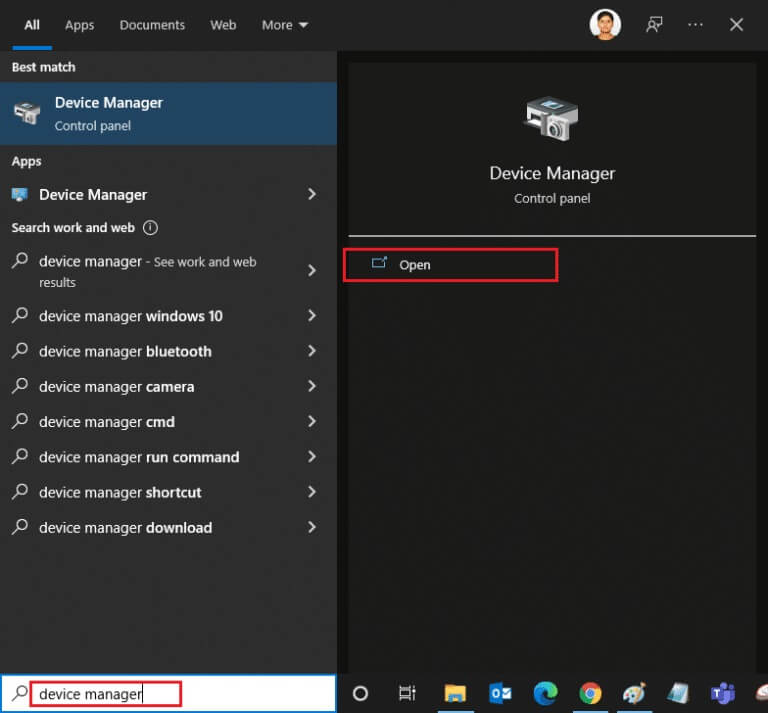
1. Write Device Manager in Windows 10 search menu. Click open.
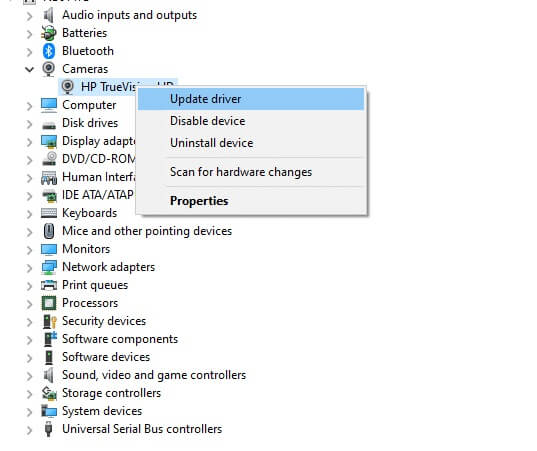
2. You will see Cameras On the main panel. Double-click it to expand it.
3. Right click on Your driver (for example, HP TrueVision HD) And click Update the driver.
4. Click Option Search automatically About drivers to install the driver automatically.
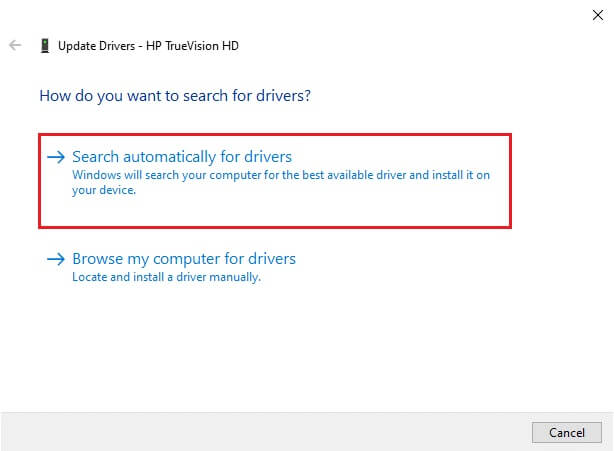
5a. Now, the drivers will be updated to Latest version , if not updated.
5b. If it has already been updated, you will receive the following message: The best drivers for your device are already installed..
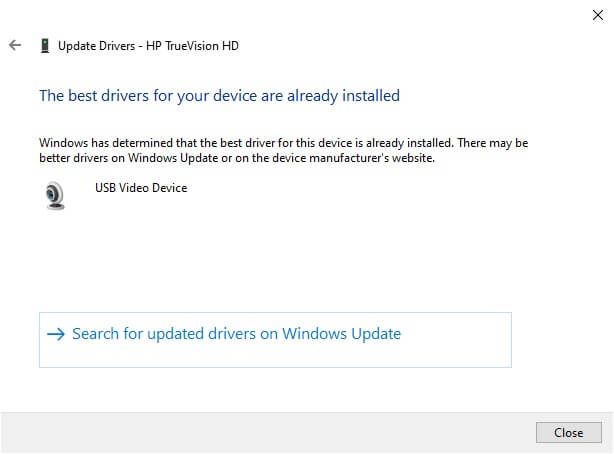
6. Click Close to exit the window.
Restart your computer and check if the error 0xC00D36D5 No cameras attached in Windows 10 is fixed.
Option 2: Rollback Programs
If you still encounter any camera-related errors or error code 0xC00D36D5 after updating the driver, it may mean that the new driver version is incompatible with your system. In this case, you can roll back the drivers to a previous version as described below.
1. Follow Steps 1 and 2 of Method 8A.
2. Right click on Expanded Field > Properties , As shown below.
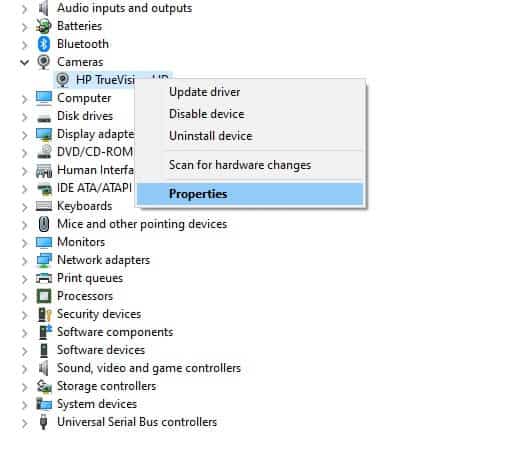
3. Switch to Driver tab and select Roll Back Driver , as shown.
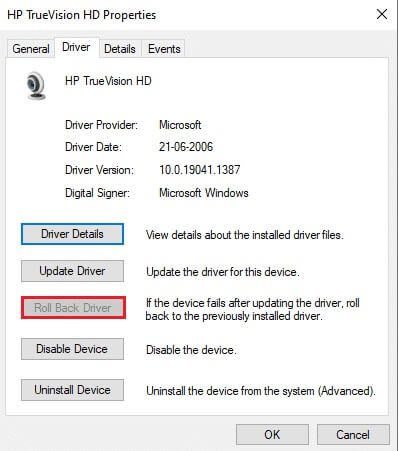
4. Click "OK" To apply this change.
5. Finally, tap "Yeah" In the confirmation message, reboot your system to make the rollback effective.
Note: If the Roll Back Driver option is grayed out on your system, it indicates that your system does not have pre-installed driver files or that the original driver files are missing. In this case, try the alternative methods discussed in this article.
Method 9: Reinstall the camera drivers
If updating your drivers doesn't resolve the issue, you can reinstall them. Follow the steps below to do so.
1. Follow Steps 1 and 2 of Method 8A.
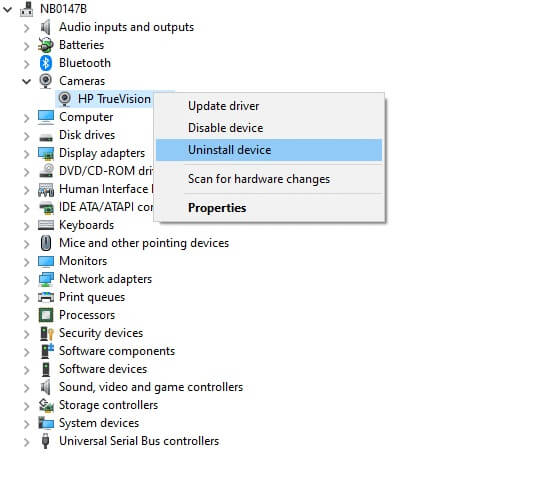
2. Now, right-click on Operating system and select Uninstall device.
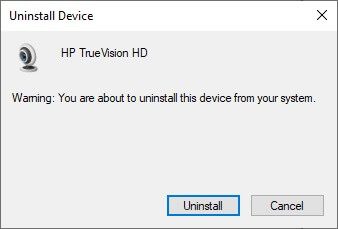
3. Now, a warning prompt will be displayed on the screen. Confirm the prompt by clicking uninstall.
4. Go to Manufacturer's website.
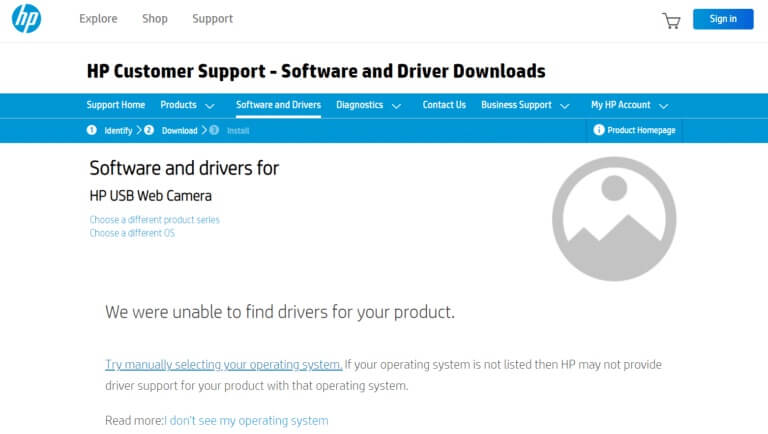
5. Search for Drivers matching your Windows version Download it to your computer.
6. Once downloaded, double-click the downloaded file and follow the instructions provided to install it.
Method 10: Repair Microsoft Store
Fix the mentioned error by running the troubleshooter and then using command prompt commands to repair Microsoft Store as shown below.
Step 1: Run the Windows Store Apps Troubleshooter
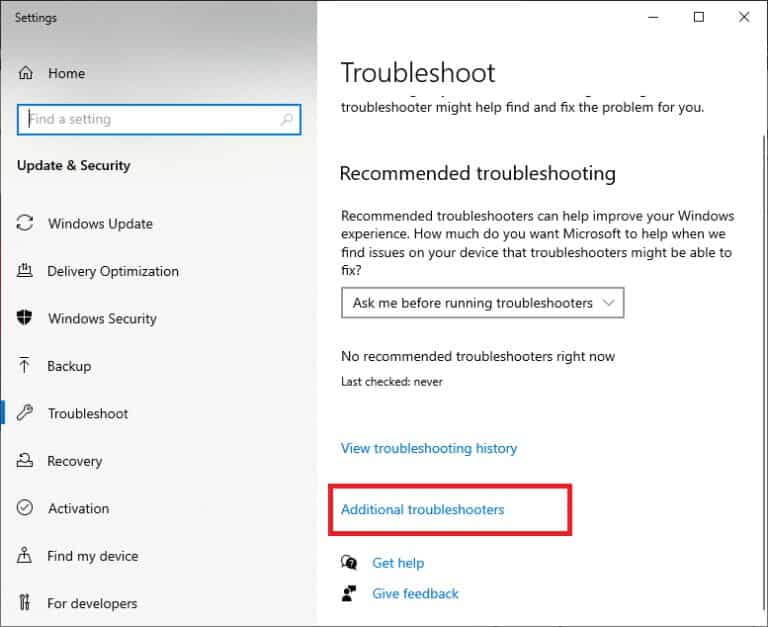
1. Press Windows key And type Troubleshoot settings in the search bar.
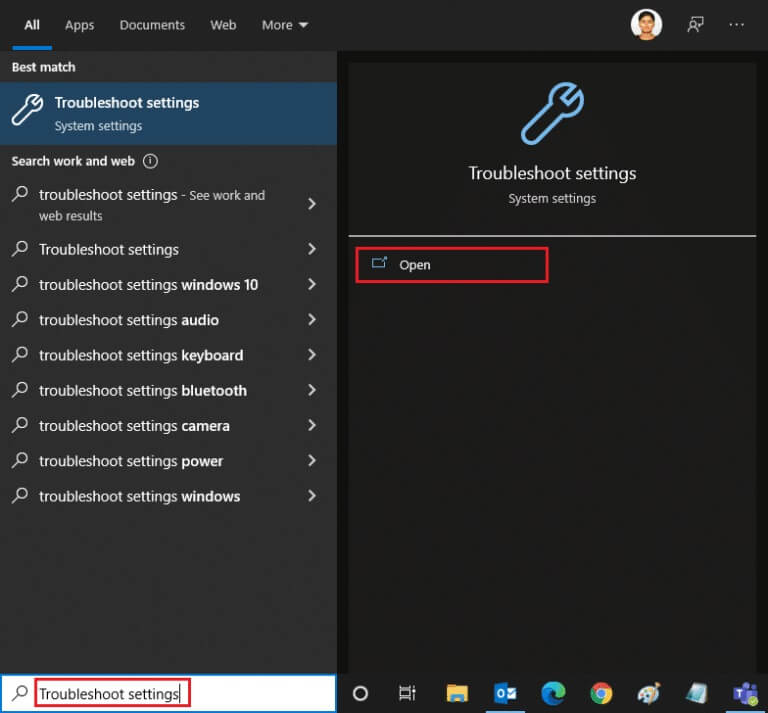
2. Click Tools find the mistakes and resolve it Additional as shown below.
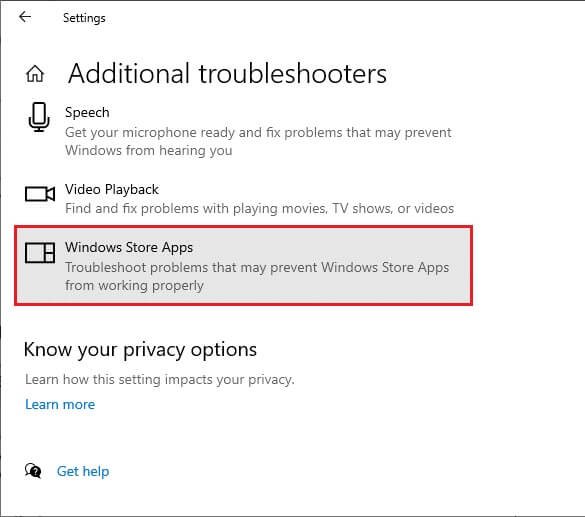
3. Now, select Windows Store Apps Displayed in section Find and fix other issues As shown.
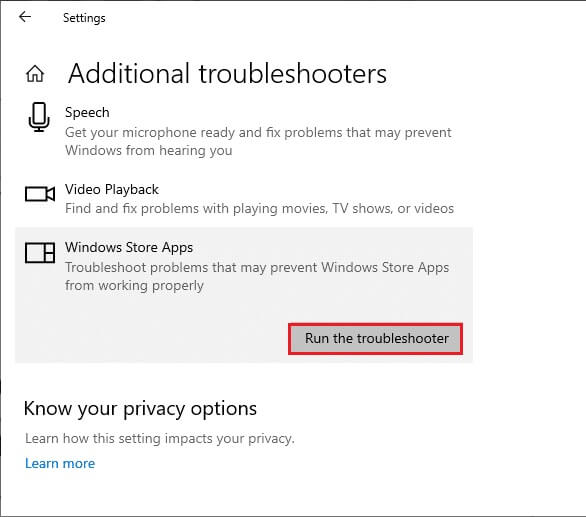
4. Select Run the troubleshooter The Windows Store Apps Troubleshooter will now run.
5. Wait for the sorting process to complete. If any problems are found, click Apply this fix Follow the instructions in the successive prompts.
Step 2: Use the command prompt
You can also use command lines to repair Microsoft Store as shown below.
1. Turn on Command Prompt by typing cmd Or Command Prompt in Search menu. Open Command Prompt using Administrator rights.
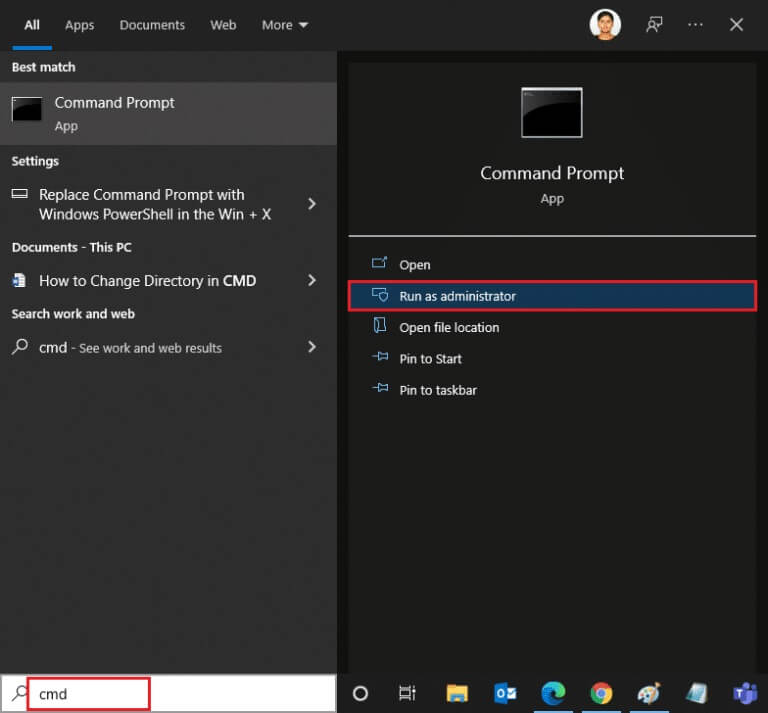
2. Type the following commands one by one and press Enter key After every order.
net stop appidsvc
net stop cryptsvc
Del "%ALLUSERSPROFILE%\Application Data\Microsoft\Network\Downloader\*.*"
rmdir %systemroot%\SoftwareDistribution /S /Q
rmdir %systemroot%\system32\catroot2 /S /Q
regsvr32.exe / s atl.dll
regsvr32.exe /s urlmon.dll
regsvr32.exe / s mshtml.dll
netsh winsock reset
netsh winsock reset proxy
net start bits
net start wuauserv
net start appidsvc
net start cryptsvc
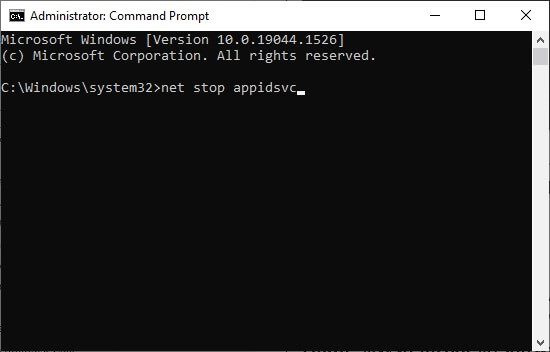
3. Wait for the commands to execute and check if the error 0xC00D36D5 is resolved.
Method 11: Reset the Camera app
Any changes or problems with the default camera app can cause the 0xC00D36D5 camera connection error. To restore your camera settings to their defaults, follow the steps below and reset the camera app.
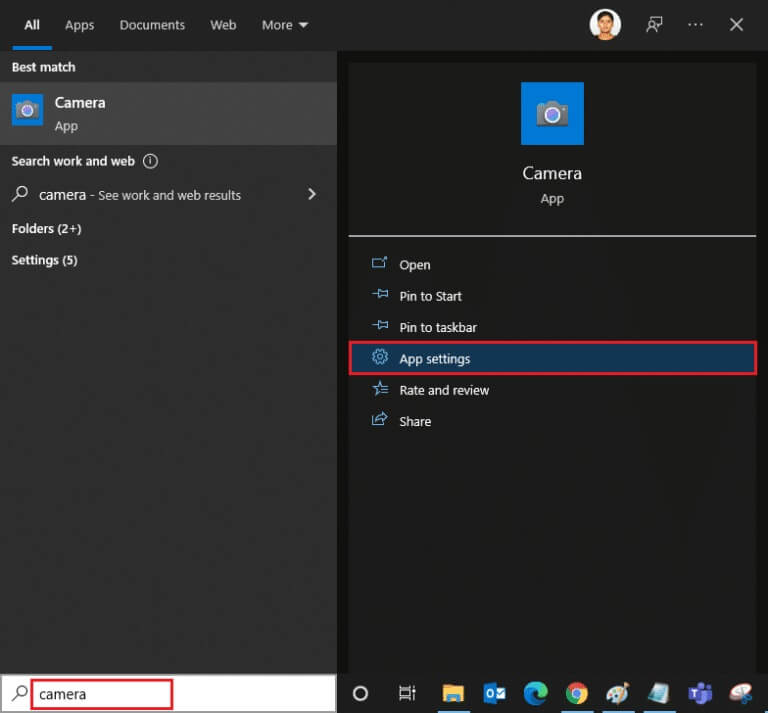
1. Write Camera in Search menu and click Application settings As shown.
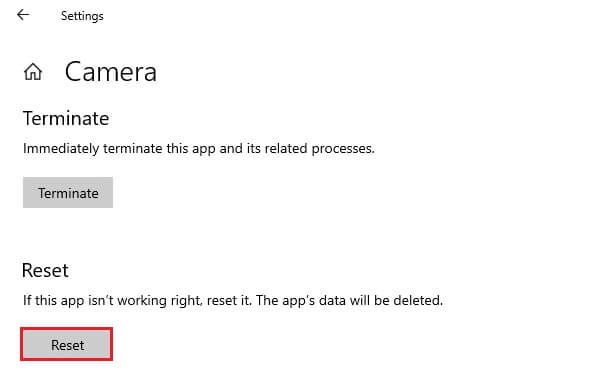
2. Scroll down the screen and select the option Reset As shown.
3. Confirm the following prompt by clicking "Reset" As shown.
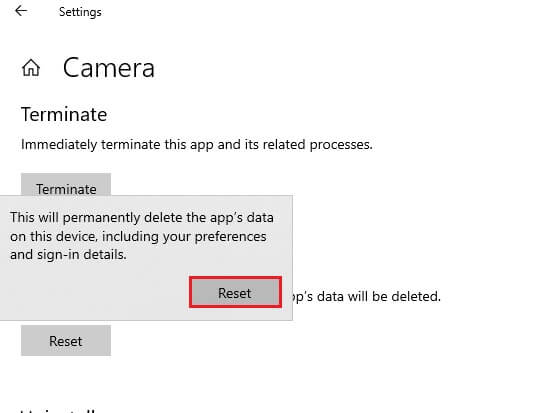
4. Close Settings app Check if you have fixed the issue of cameras not connecting.
Method 12: Reset your computer
If none of the above methods work for you, this is your last resort. You can reset your PC to fix this error once and for all. Here's how to do it.
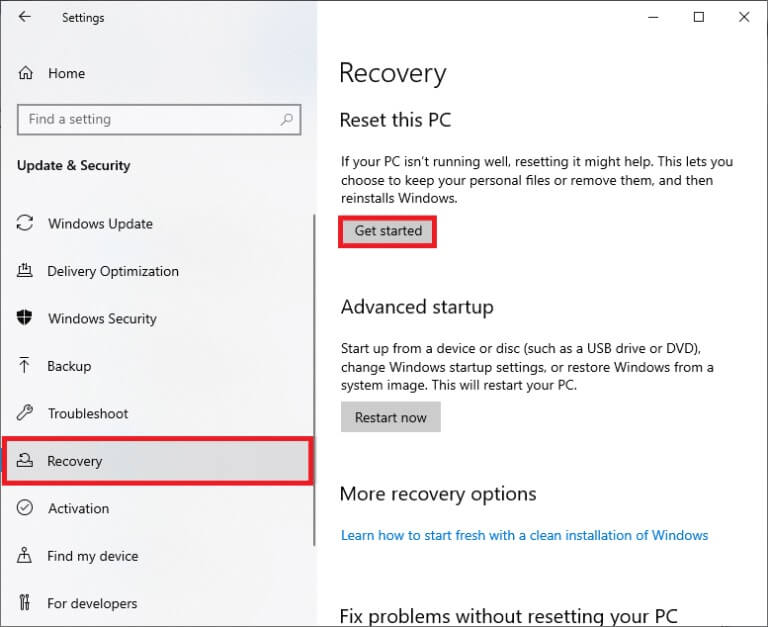
1. Follow Steps 1 and 2 From the fifth method.
2. Select an option recovery From the right pane, click on "Getting Started" in the right pane.
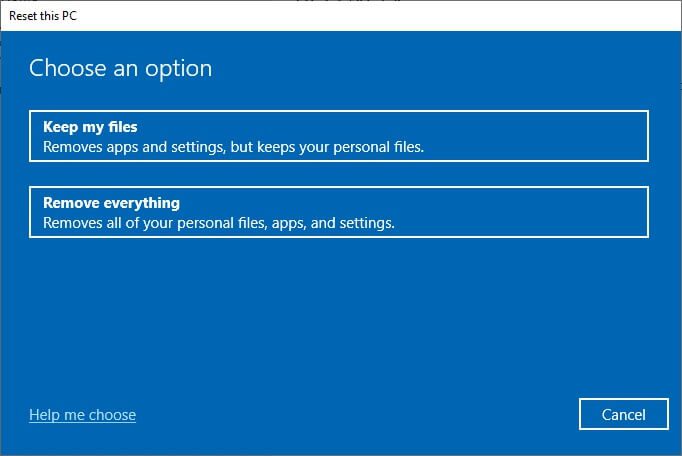
3. Now, choose any of the given options from the window. “Reset this computer”.
- keep my files – This will remove apps and settings but will keep your personal files.
- remove everything – All your files, apps, and personal settings will be removed.
4. Finally, follow the on-screen instructions to complete the reset process.
We hope this guide was helpful and you were able to fix the error 0xC00D36D5 No Cameras Attached in Windows 10. Let us know which method worked for you and if you have any queries/suggestions regarding this article, feel free to leave them in the comments section.


