Windows 11 was released worldwide in October 2021 with a number of bugs. This is most evident with the new operating system, especially with drivers that are still in the testing phase. Many users have recently complained that Realtek audio controller Sound enhancements in Windows 11, such as headphone virtualization, loudness equalization, and so on, are not working for headphones, speakers, and other devices. Therefore, today we present a perfect guide that will help you fix the sound controller not working. Realtek On Windows 11.
How to Fix Realtek Audio Controller Not Working on Windows 11
The Realtek audio controller not working issue has been on the rise after people upgraded to Windows 11 and was absent in Windows 10. Although Microsoft is constantly improving Windows 11 and the latest version has brought a lot of stability as compared to the initial releases. However, you may still face the said issue. There can be a lot of reasons that can lead to issues with the Realtek audio controller, few of such reasons are listed as below so that you get an idea of the scenario;
- Damaged or outdated peripherals
- Device connection problems, damaged cable wires
- Corrupted or outdated drivers for a particular device
- Improperly managed audio settings or driver installation is disrupted due to an unwanted application interfering with the background process.
- A loose connection at the cabinet end of the system failed to complete the circuit.
- The cables were incorrectly inserted into the wrong ports.
Typically, one of these reasons might cause the Realtek audio controller to not work properly on Windows 11. To fix these, let's go through the methods.
Method 1: Basic hardware troubleshooting
To start from the basics, check the connectivity of the devices you've connected. Follow the steps below to do so.
- Go to your system cabinet or docking station and check if the connections are made correctly.
- Untangle the wire and reconnect it if it is, this may cause stress to the cables.
- Also check your system if there is muffled or low-level sound made by some applications to optimize the system for comfortable listening experiences.
- The device must also be connected and reconnected to check.
This method can fix basic peripheral connectivity issues, but if not, move on to the next method.
Method 2: Run the Audio Troubleshooter
Sometimes troubleshooting audio can fix persistent audio issues on your system. To try it, follow these steps:
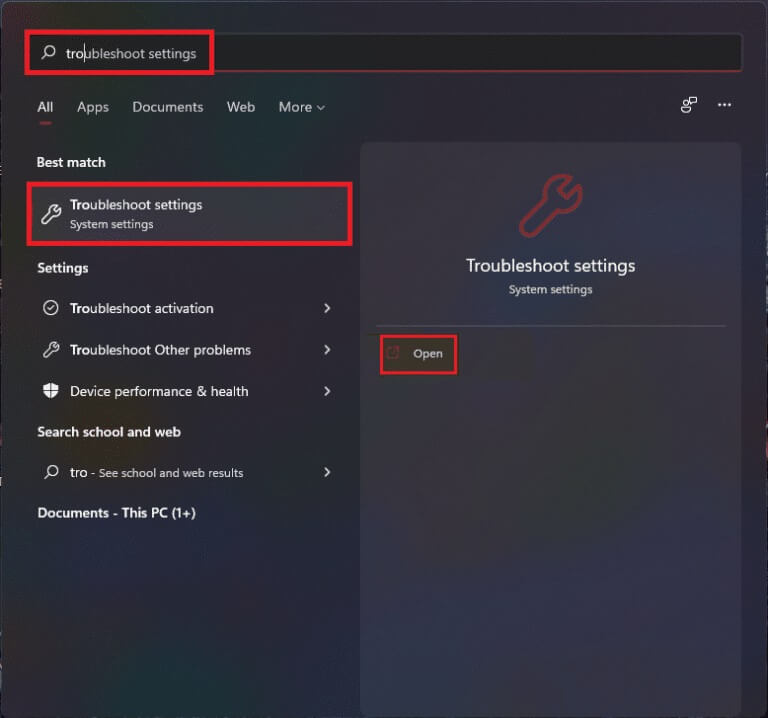
1. Click Search code , And type Troubleshoot settings , then tap to open.
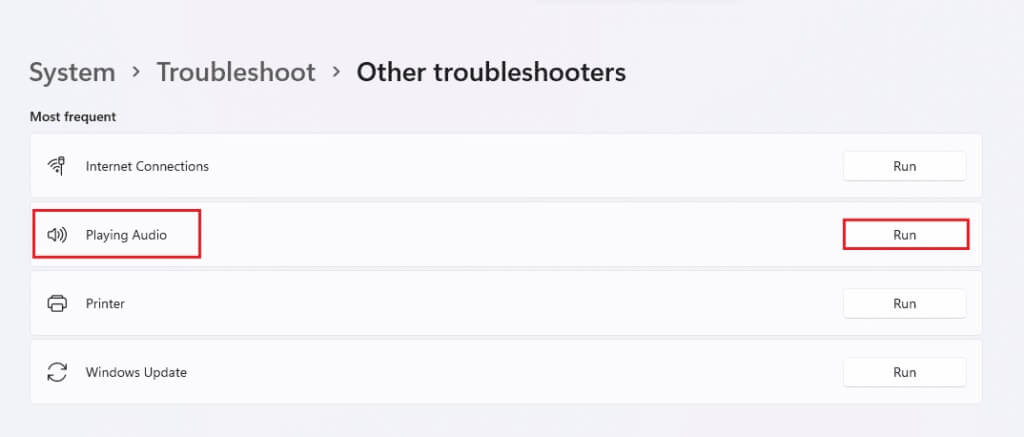
2. Here, click Other troubleshooters and fixes Among the options find the mistakes and resolve it.

3. Select Audio playback site And click "employment" Right to start Troubleshooter.
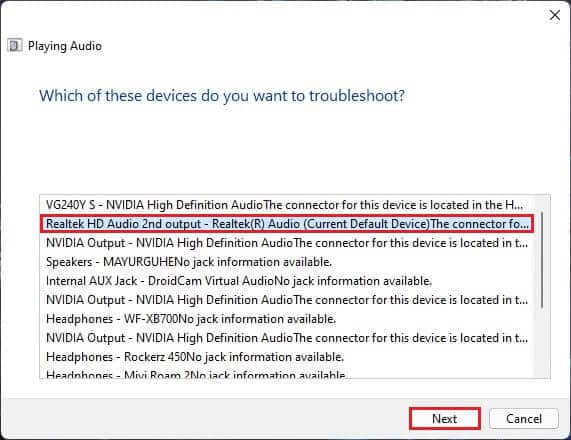
4. Now, select Realtek audio device and click the . button next one.
5. Wait until Troubleshooter detects problems.
6. Apply fix If you encounter any problems, follow the troubleshooter instructions.
7. Restart your computer After making changes.
Open the sound controller and choose your settings to check the sound if the Realtek sound controller not working issue.
Method 3: Set the default audio device
Multiple audio devices can sometimes cause misbehavior, which can result in the Realtek audio controller not optimizing sound. Follow these steps to set your audio input/output as the default device for your system.
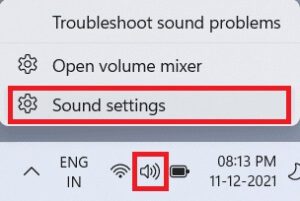
1. Right click on loudspeaker icon in Taskbar and select Audio settings , As shown below.
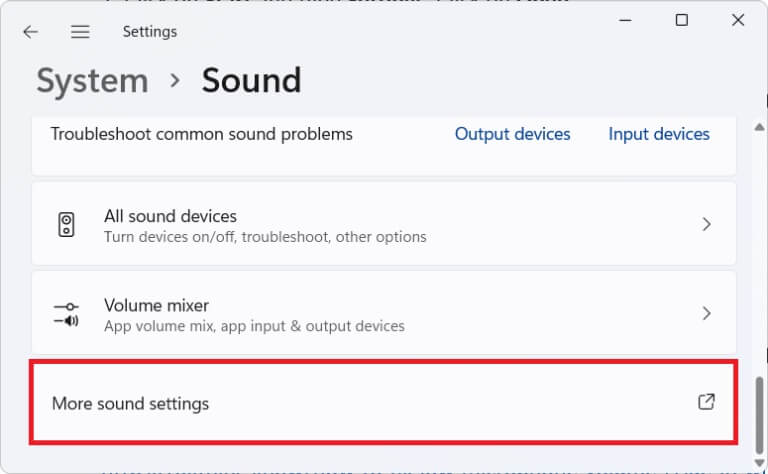
2. Click “More sound settings” within the section "Advanced Options".
3. Click on the tab running In the sound window.
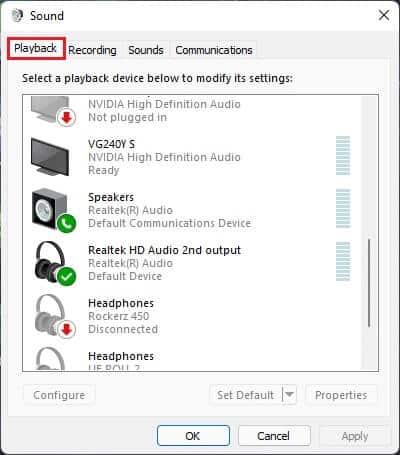
4. Locate Realtek audio device In the menu, click on it and choose Set default options below.
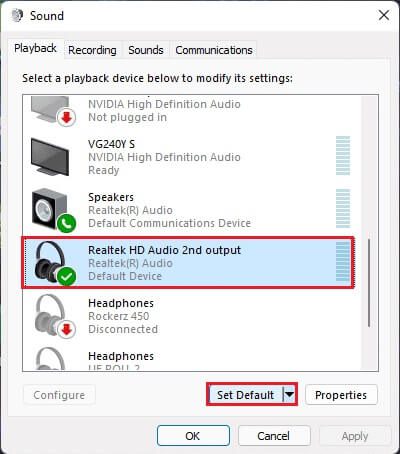
5. Click Apply > OK To save changes and close the window.
Open Control unit , and adjust Settings You want it, and also check the sound if the Realtek audio controller isn't improving the sound. If this doesn't resolve the issue, move on to the next method.
Method 4: Check the audio output
This may sound silly, but ensuring the correct sound output can be just as important when connecting multiple audio outputs. Sometimes, repeated failed attempts to improve your audio device by ignoring these small details can keep you busy for hours without leading you to the desired sound output. To check this,
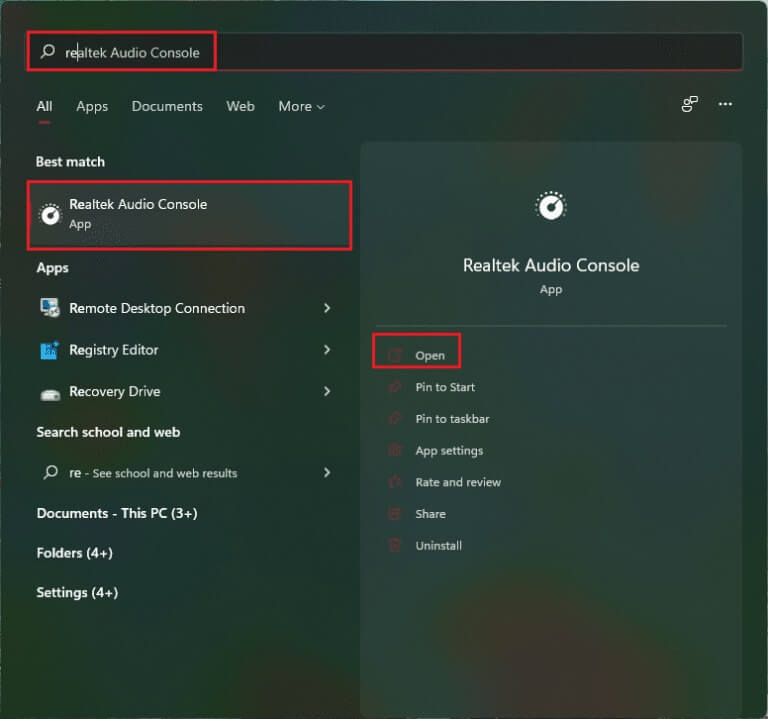
1. Click Search code , And type Realtek audio controller , and click to open.
2. In the left pane, click Realtek HD Audio output of Included devices.
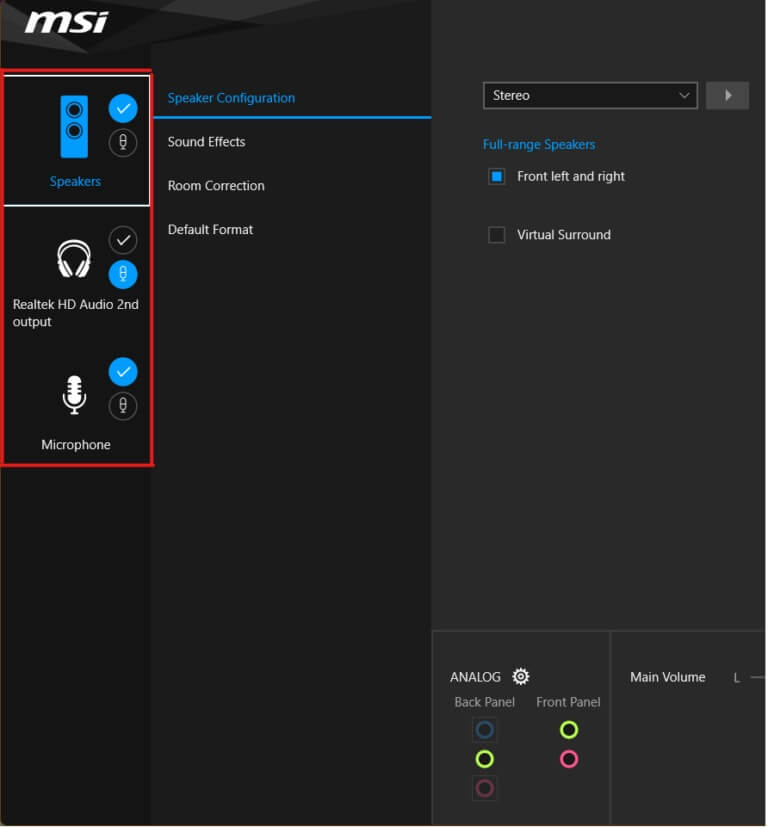
3. Now make the required audio changes to the device and close the app.
4. Next, play any random music after selecting your desired settings on the controller and check if the issue persists. If this doesn't work, continue with the next method.
Method 5: Change the Realtek audio device format
It's recommended to improve the audio quality of your audio output by selecting the best studio quality available in Windows to address this issue. To do so, follow these simple steps:
1. Go to Sound Settings > More Sound Settings > Sound Window As shown in the third method.
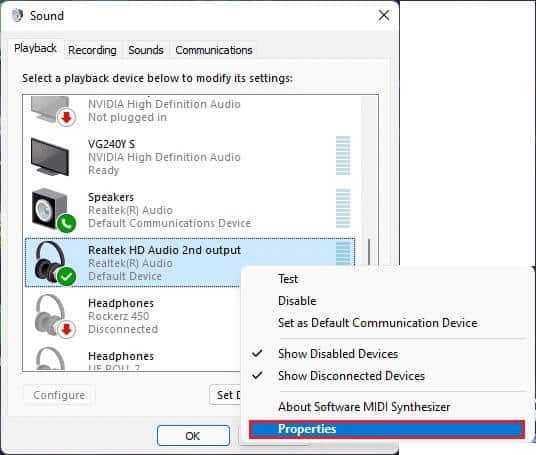
2. Right click on Realtek audio device and select Properties.
3. Click on the tab Advanced Options Select the drop-down menu under Default Format.
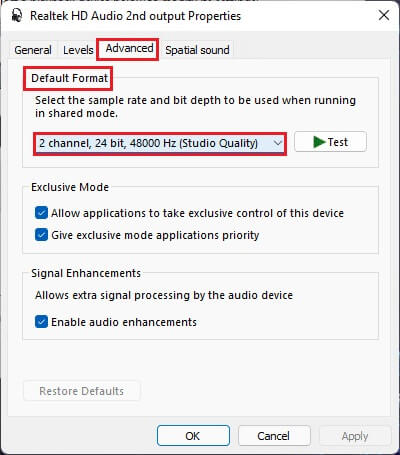
4. Then select the second channel, 24 bit ، 192000 Hz (studio quality) from the dropdown menu options.
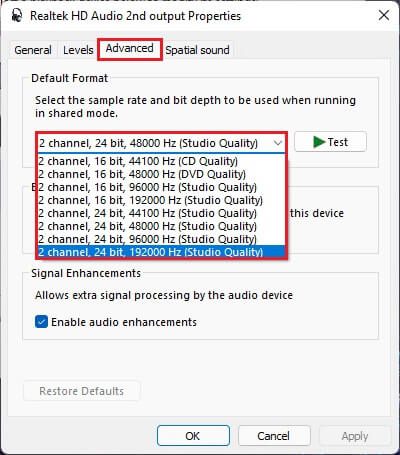
5. Click Apply > OK to save the changes.
Check the settings on the sound controller and play any audio to check if the Realtek sound controller is not boosting the sound permanently.
Method 6: Reinstall the audio service
Here are the steps to reinstall the audio service to fix the Realtek audio controller not improving sound in Windows 11 issue.
1. Click Search code , And type Services , then tap to open.
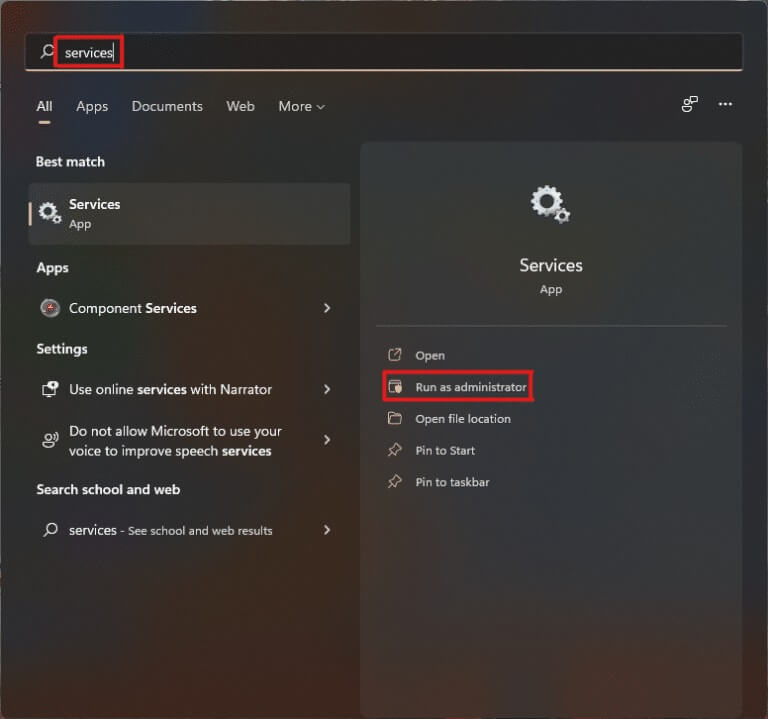
2. In the Services window, scroll down the list at the top to locate the Windows Audio service and check its Status tab.
3a. If the Status tab is off, click the option start in Windows Audio section.
3b. If the Status tab shows Running, click the option Reboot As shown in the image below.
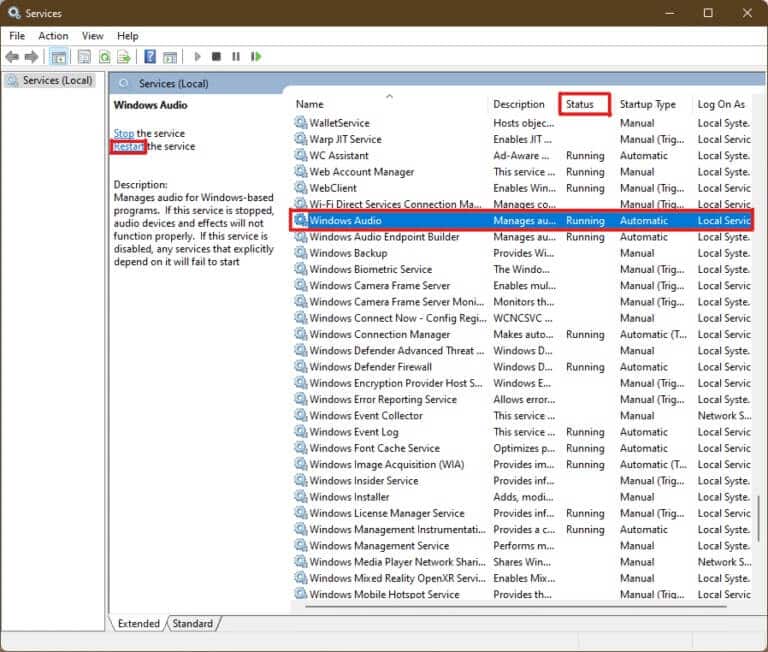
4. Now, restart the following services as well by repeating the above steps.
- Windows Audio Endpoint Generator
- Make a remote call
Method 7: Update the audio driver
A pending audio driver update will restrict further work by other related applications. To check this, follow these steps:
1. Click Search code , And type device Manager , and click open.
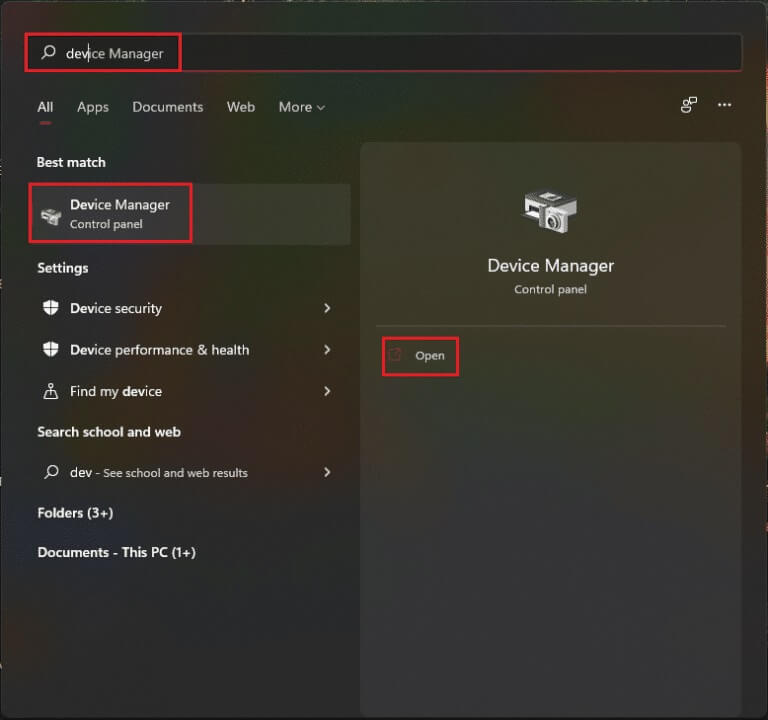
2. Double-click on Audio inputs and outputs To expand and display installed drivers.
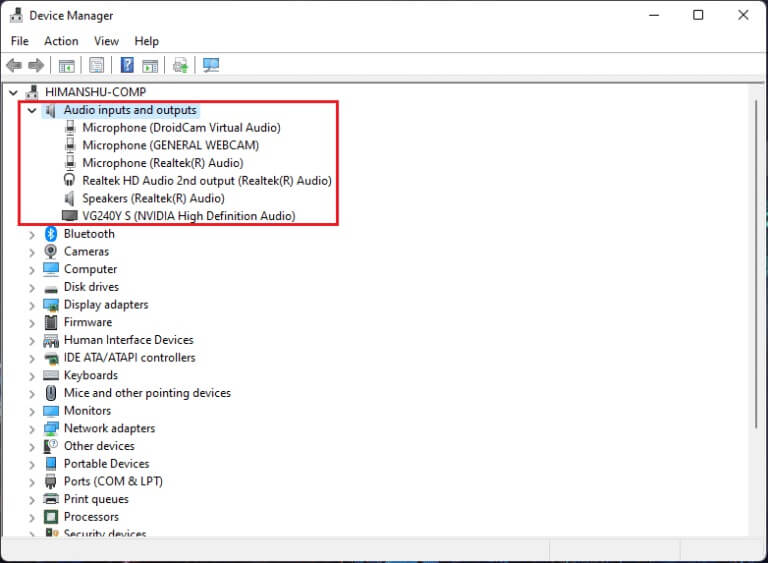
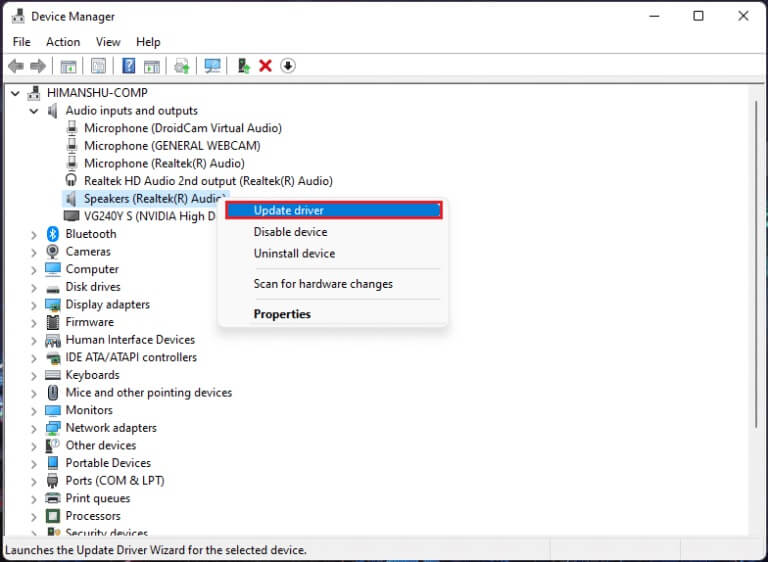
3. Right click on audio driver and select an option Update the driver.
4. Click Search automatically About Drivers To download and update the driver automatically.
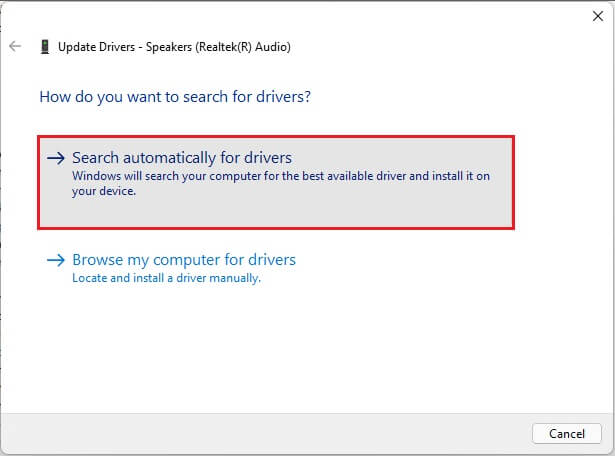
5a. If any updates are available, Windows will download and install them.
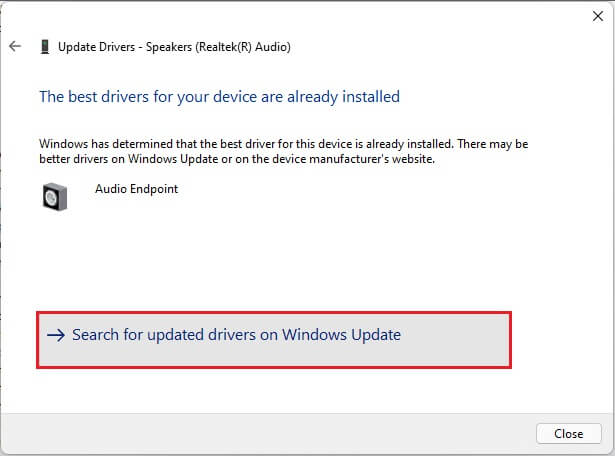
5b. If your driver is updated after that, you will receive the message "The best drivers for your device are already installed." Click Search for updated drivers On the Windows Update option.
6. Then select Advanced Options In the right pane of the Windows Update list.
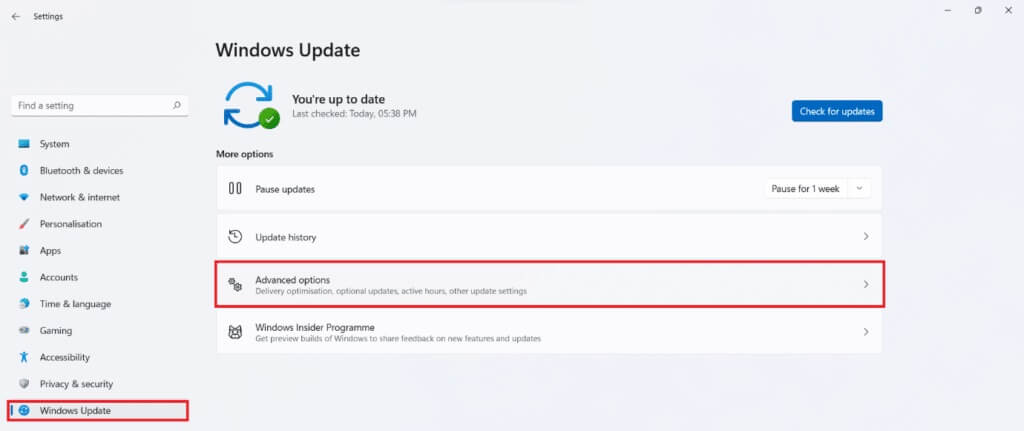
7. Click Option Optional updates within Additional options.

8. If any updates are available, they will be listed here. Find the audio driver update and select the box next to it.
9. Next, tap Download & install (Download and install).

10. Finally, Restart your computer After installing the updates.
Method 8: Reinstall the audio driver
If all these methods don't work, the installed drivers may be the problem, and reinstalling them will fix the Realtek audio controller not improving sound in Windows 11 issue. To do this, follow these steps:
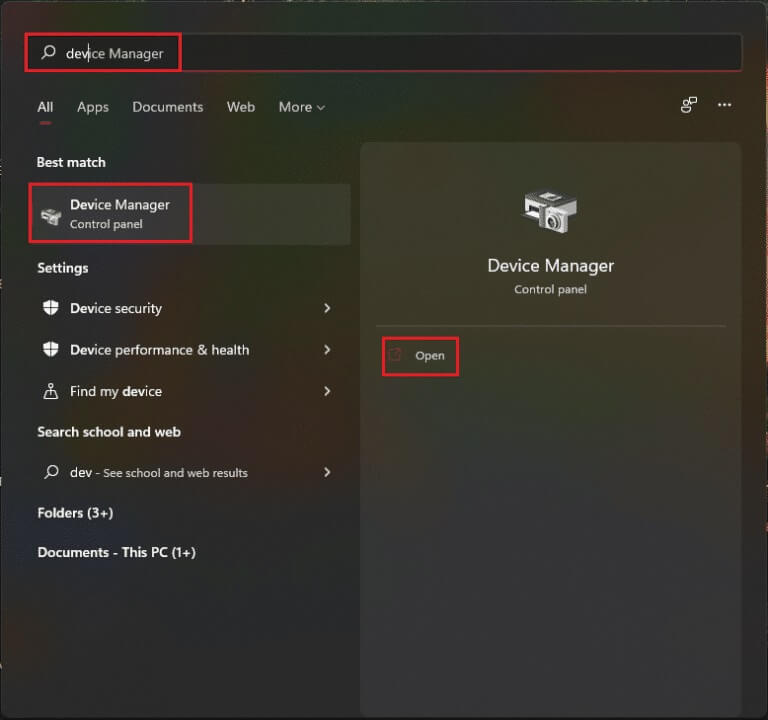
1. Click Search code , And type device Manager And click to open.
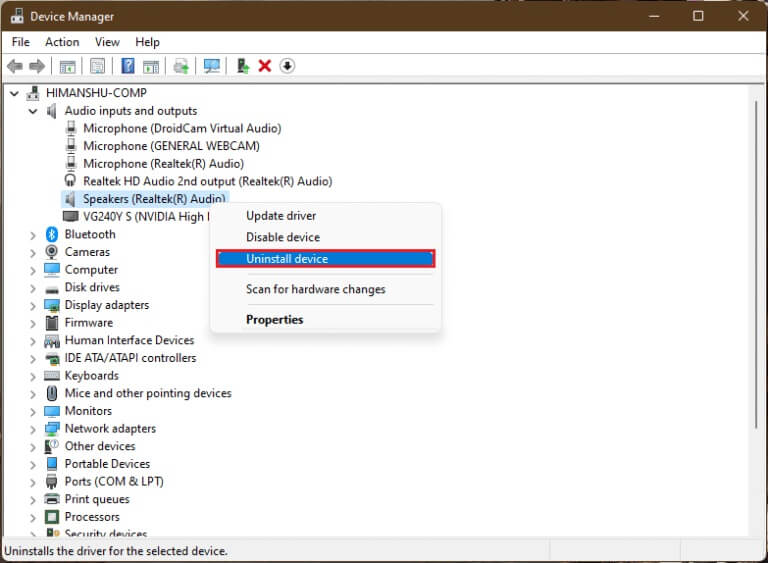
2. In a window device Manager , double-click Audio inputs and outputs to expand it.
3. Right click on audio driver And click “Uninstall device” from the context menu.
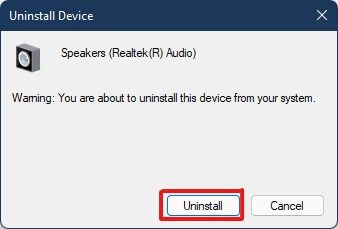
4. In confirmation prompt Uninstall Device , Click Uninstall.
5. Then Restart the computer.
6. Download Latest Realtek audio driver of Official Website.
Note: You can also select the compatible driver for your system from the page. Intel Driver and Support Assistant.
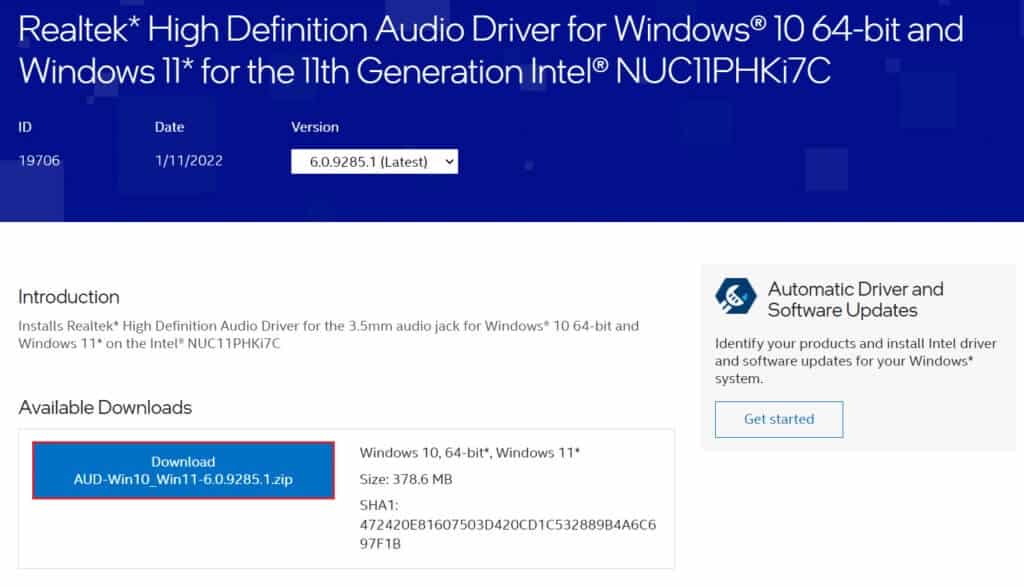
7. Go to the location where you downloaded the driver setup file.
8a. If the downloaded file is executable, double-click it. exe file And follow Instructions The on-screen prompts for installing the Realtek audio driver on Windows 11.
8b. If the downloaded file is in formats such as .zip Or .rar , use Archive Extraction Application مثل 7Zip Or WinRAR. After extracting the contents of the archive, double-click on Setup file Executable and By installing the driver.
Now, check if your Realtek audio controller is working or not.
Method 9: Perform a System Restore
If none of the above methods fix the Realtek audio controller not working on Windows 11, you should restore your system to a time when the issue did not occur. Follow these steps to perform a system reset.
1. Click Password Search , And type Control Panel And click to open.
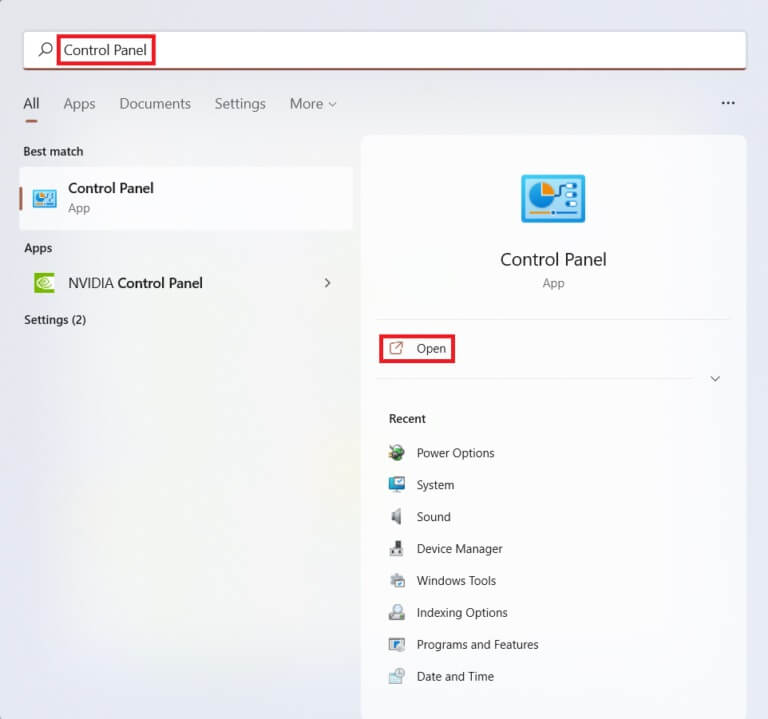
2. Set View by: > Large icons and click on the Recovery option, as shown.
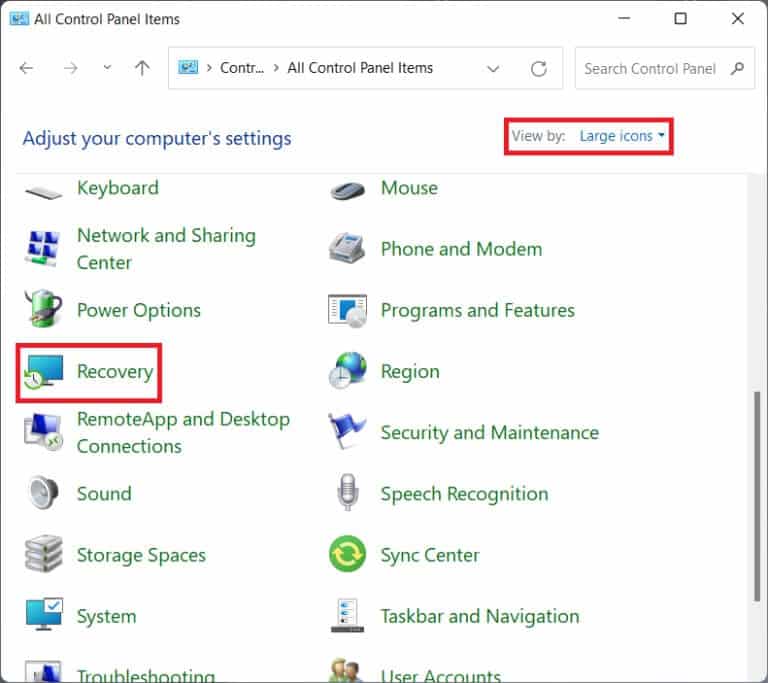
3. Then click "Open System Restore."
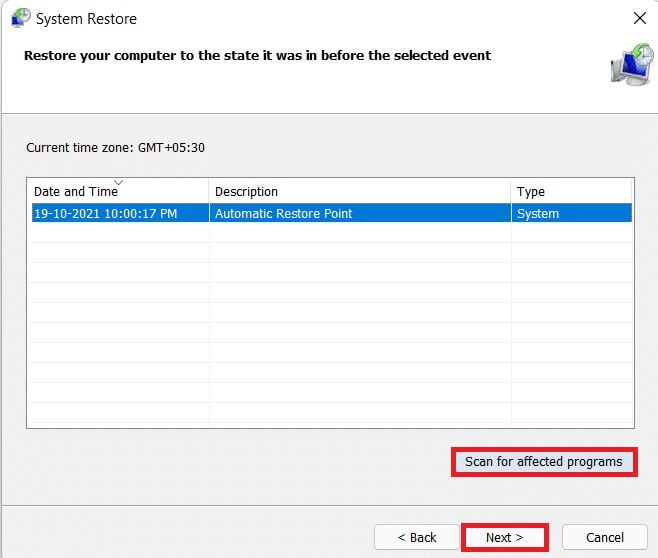
4 a. Now, choose the recommended restore and select Next in window System Restore. And click next one.
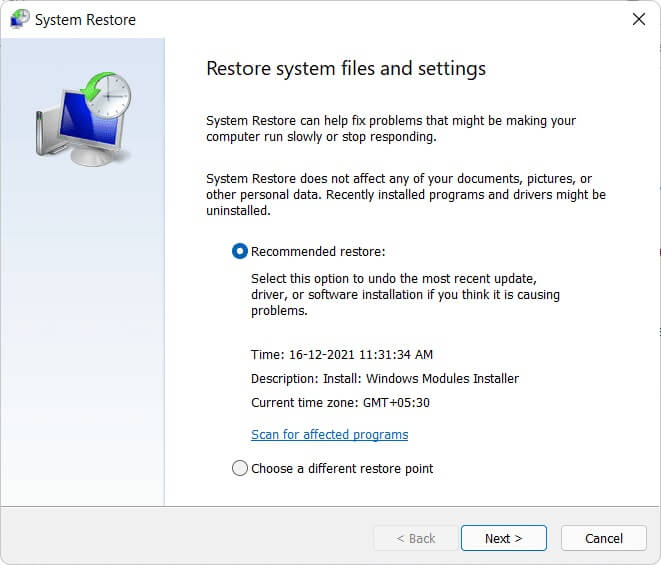
4b. Alternatively, you can manually select a different restore point. Then, select latest restore point To restore your computer to a point when you weren't experiencing the problem, click Next.
Note: You can click Scan for affected programs to see a list of applications that will be affected by restoring your computer to a previously selected restore point. Click Close to close the newly opened window.
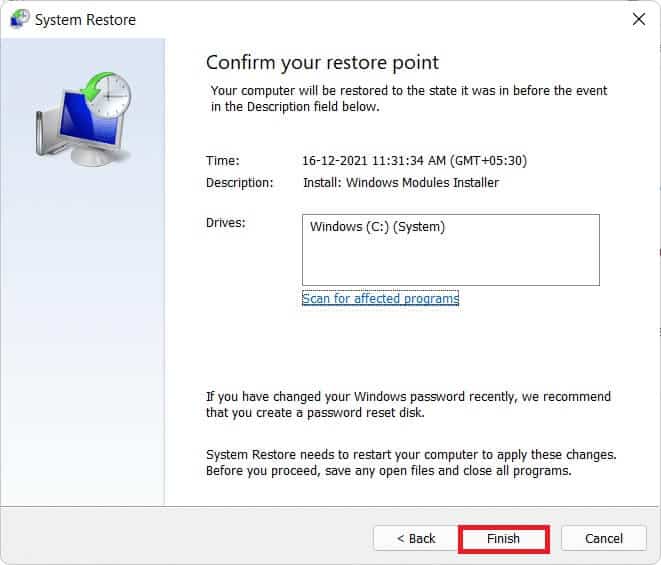
5. Finally, tap "ending" To start system restore.
With this article, we hope you were able to fix the Realtek audio controller not working on Windows 11. There are two of these methods that work to resolve the issue, let us know in the comments section below which of these methods worked for you and if you have any further queries.


