The Windows registry contains some of the most important files for the Windows operating system and its applications. However, there may be times when you need to make changes to the registry for troubleshooting purposes. If you're not careful, you could cause irreparable damage to your computer. Therefore, learning how to back up and restore the registry is essential. Windows 11 It becomes vital.

While that Making changes to the registry It's a very simple thing to do, but sometimes things can go horribly wrong. The slightest mistake can render the entire database inaccessible. Or worse, your computer may fail to boot. This post will discuss the steps involved in backing up and restoring the registry on Windows 11. Let's get started.
How to Back Up Registry Files in Windows 11
There are two ways you can back up the registry. You can either create a backup from the Registry Editor or Use System Restore to achieve that.
1. Use the Registry Editor
To back up registry files via Registry Editor, follow the steps below.
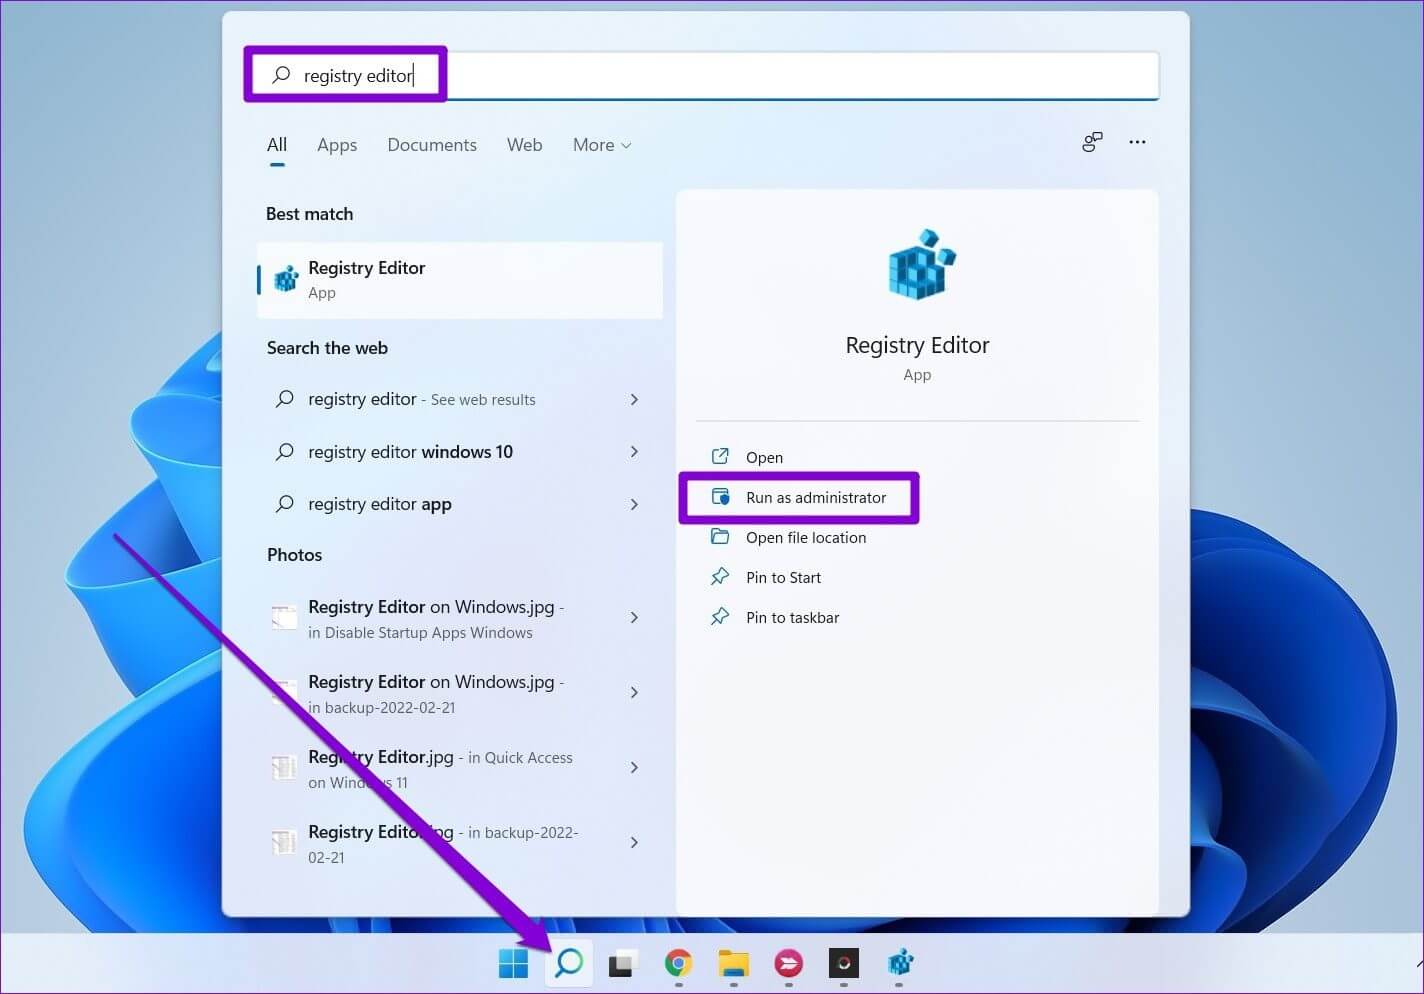
Step 1: Open Windows Search , And type Registry Editor and click Run as administrator To open Registry editor with administrative privileges.
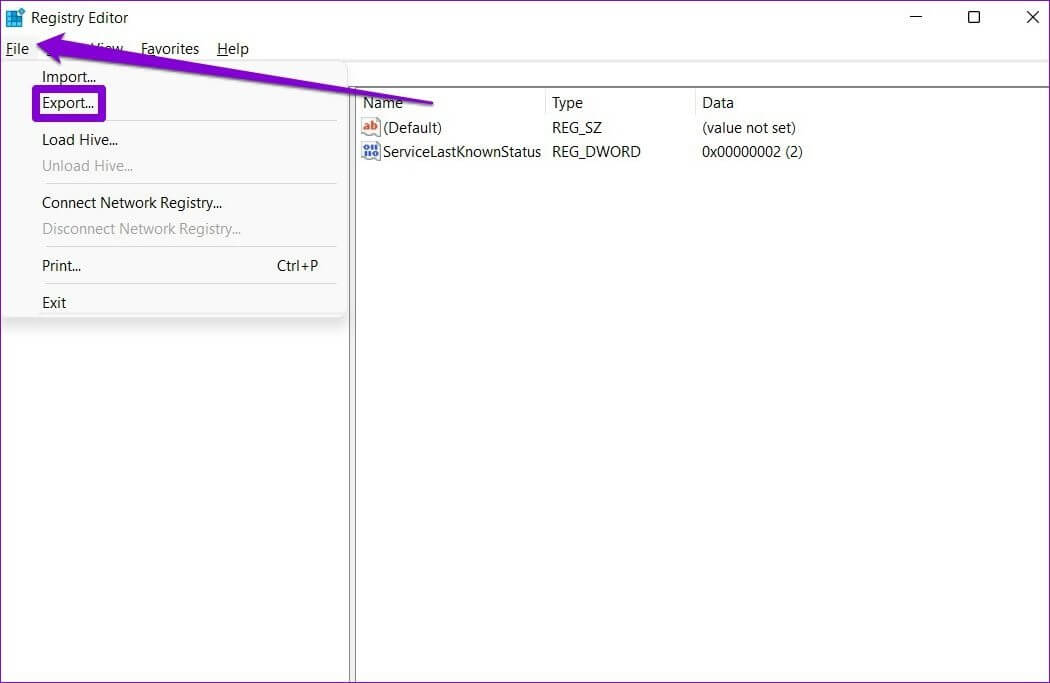
Step 2: Click Menu a file at the top and select export.
Step 3: Type an appropriate name for the file and choose a location. Under Export scope , Locate All And press save.
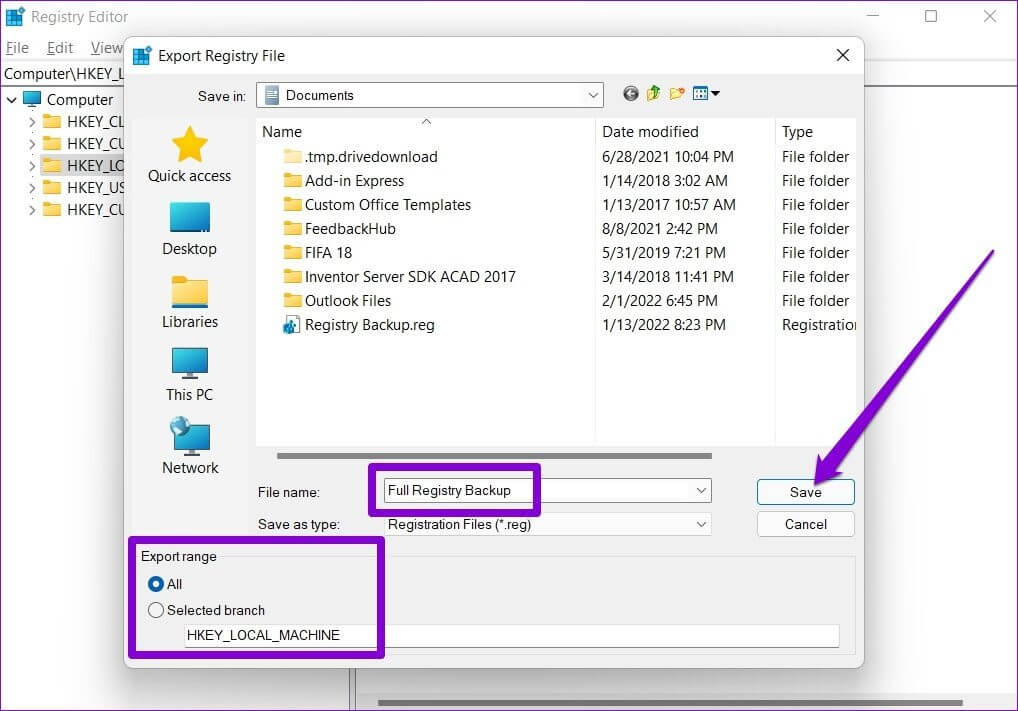
Wait a few seconds and it will be created. backup file on your computer.
2. Use System Restore
While the above method is fairly straightforward, you can also use System Restore on Windows to back up your registry files. This can be useful when Windows fails to boot properly and you want to restore your registry files via the Advanced Startup Environment.
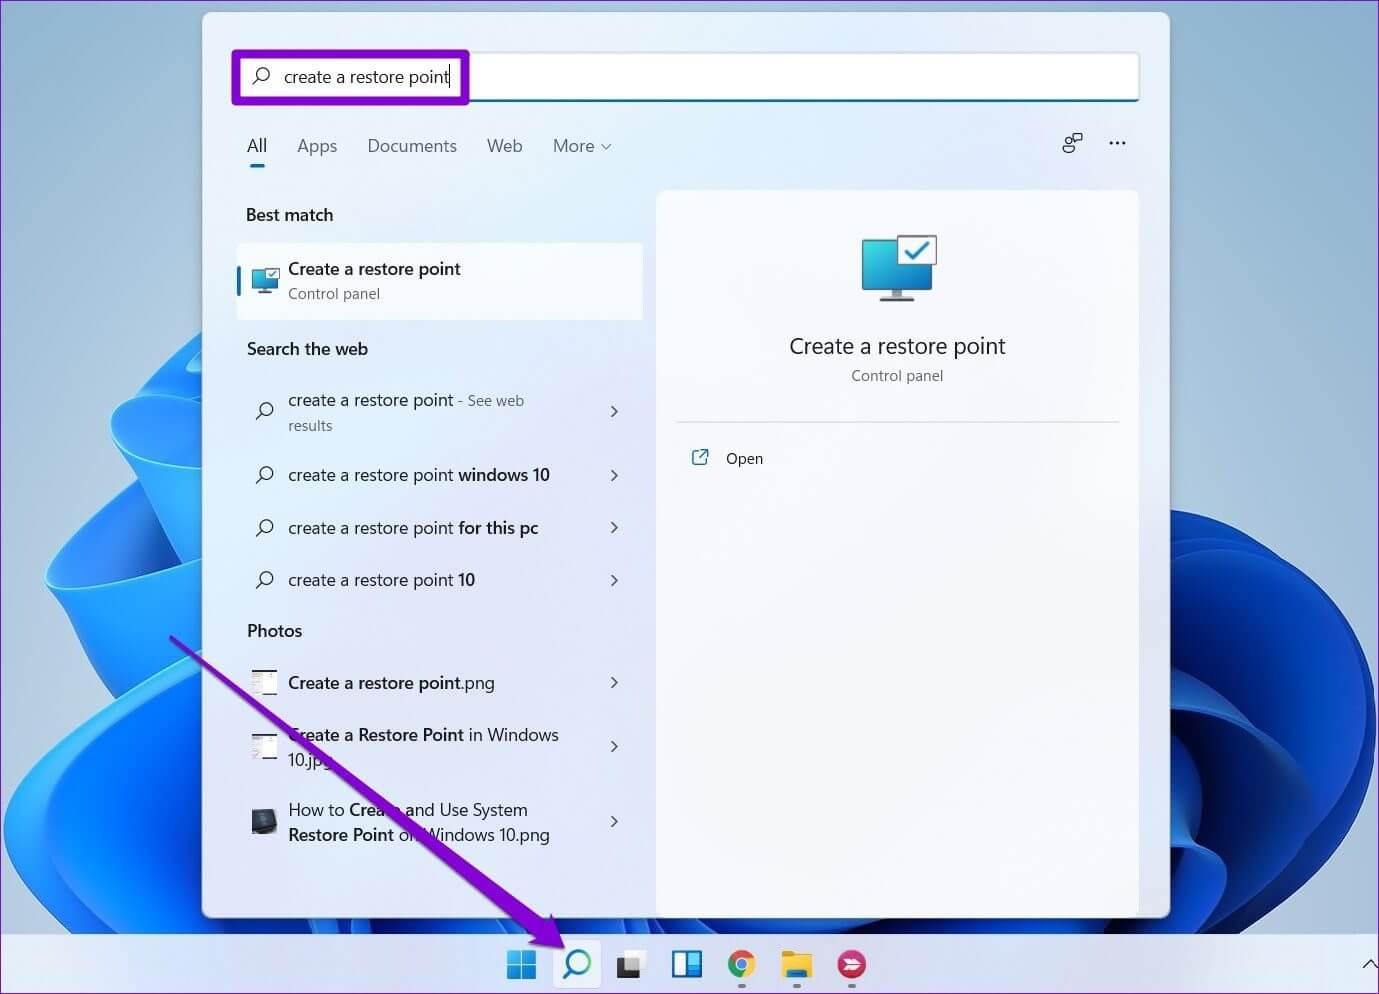
Step 1: Open start menu , And type Create a restore point , And press Enter.
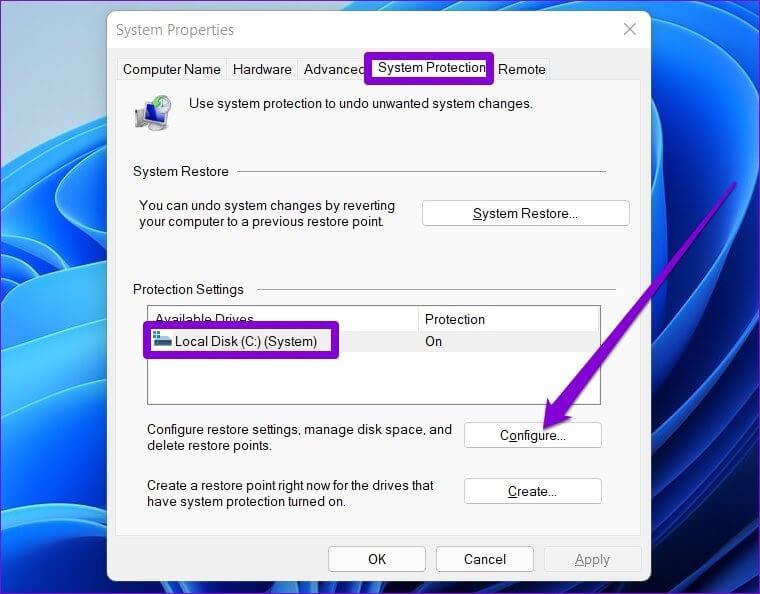
Step 2: within system protection , Locate System drive. Then click formation.
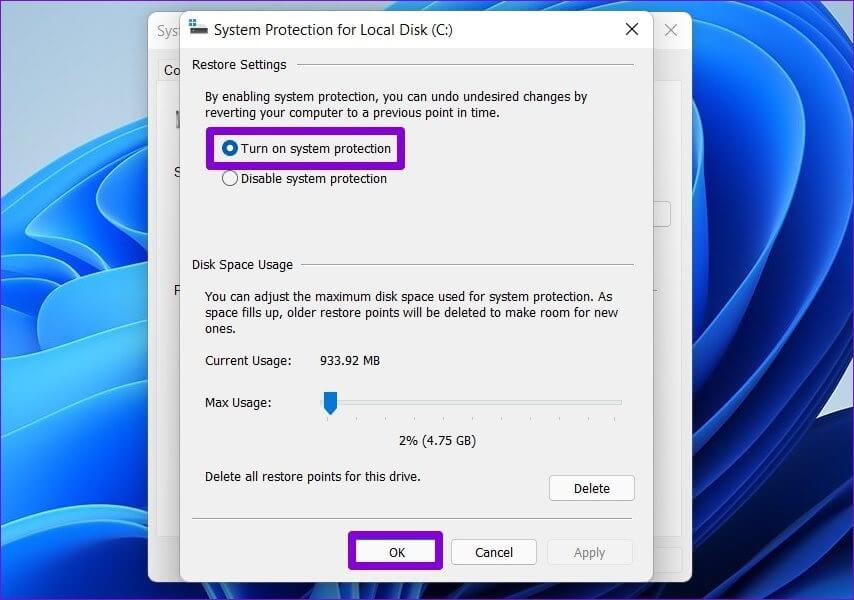
Step 3: In the next window, select the option “Turn on system protection” within restore settings. Click on Application ثم OK.
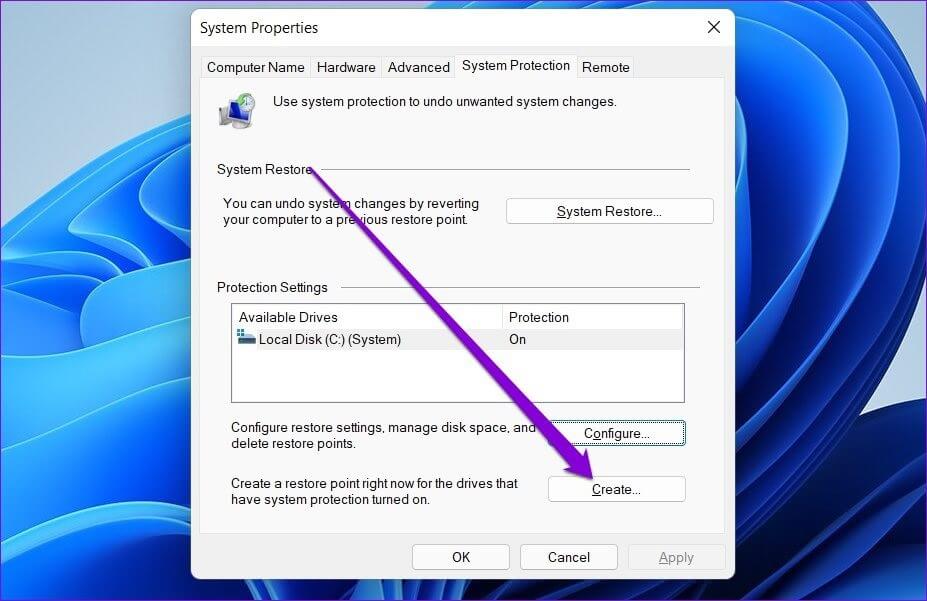
Step 4: Next, tap construction.
Step 5: Enter a suitable name for the restore point and click OK. build up once again.
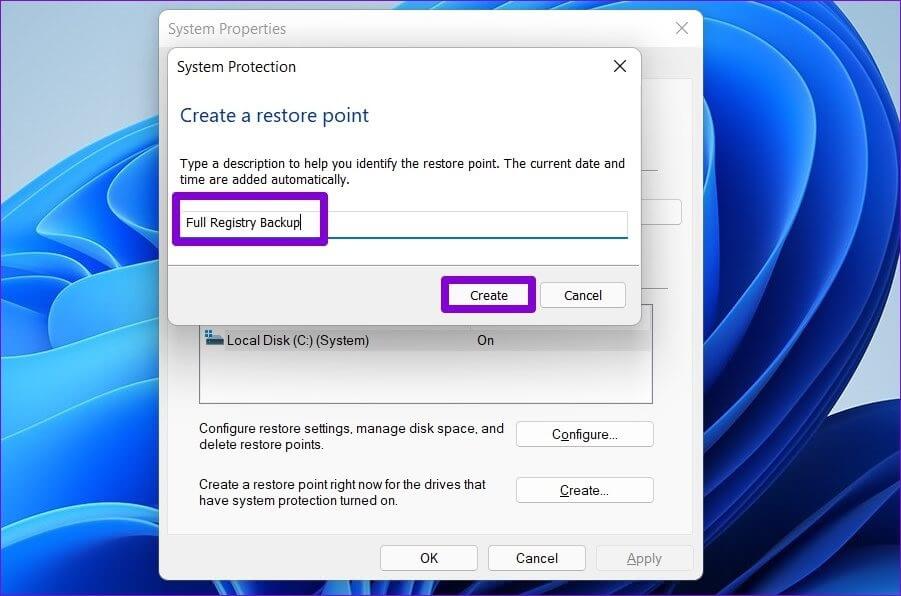
Windows will take a few moments to create a system restore point and will back up all of your registry files in the process.
How to Restore Registry in Windows 11
Restoring your registry files on Windows 11 is just as easy if something goes wrong. Depending on how you backed up your registry files, you can use the Registry Editor or System Restore to restore the registry files.
1. Use the Registry Editor
to restore Registry files using Registry Editor Follow the steps below.
Step 1: Click Search code in Taskbar , And type Registry Editor , and click Run as administrator.
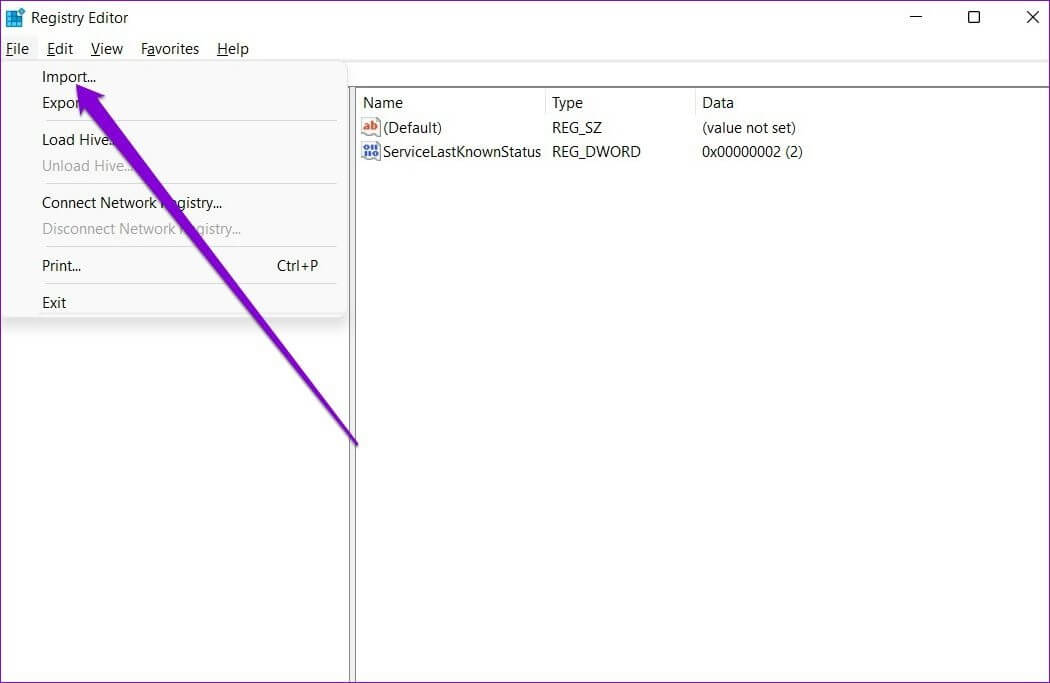
Step 2: Expand the list "a file" and select "import" from the list.
Step 3: Locate backup file Select it. Then click to open.
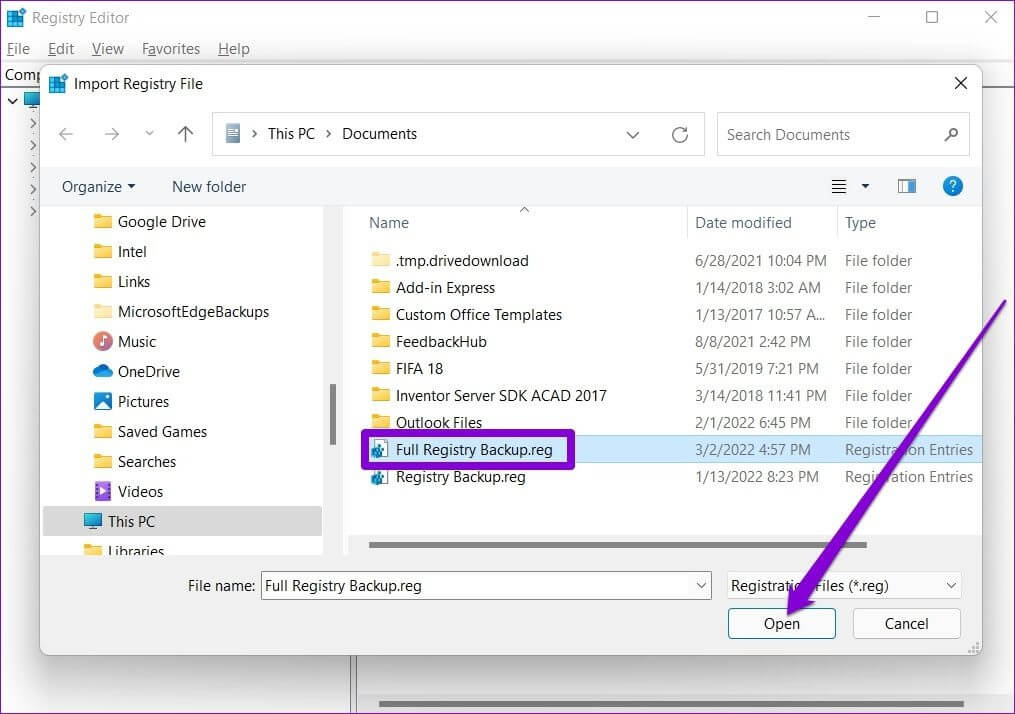
Wait while your registry files are restored.
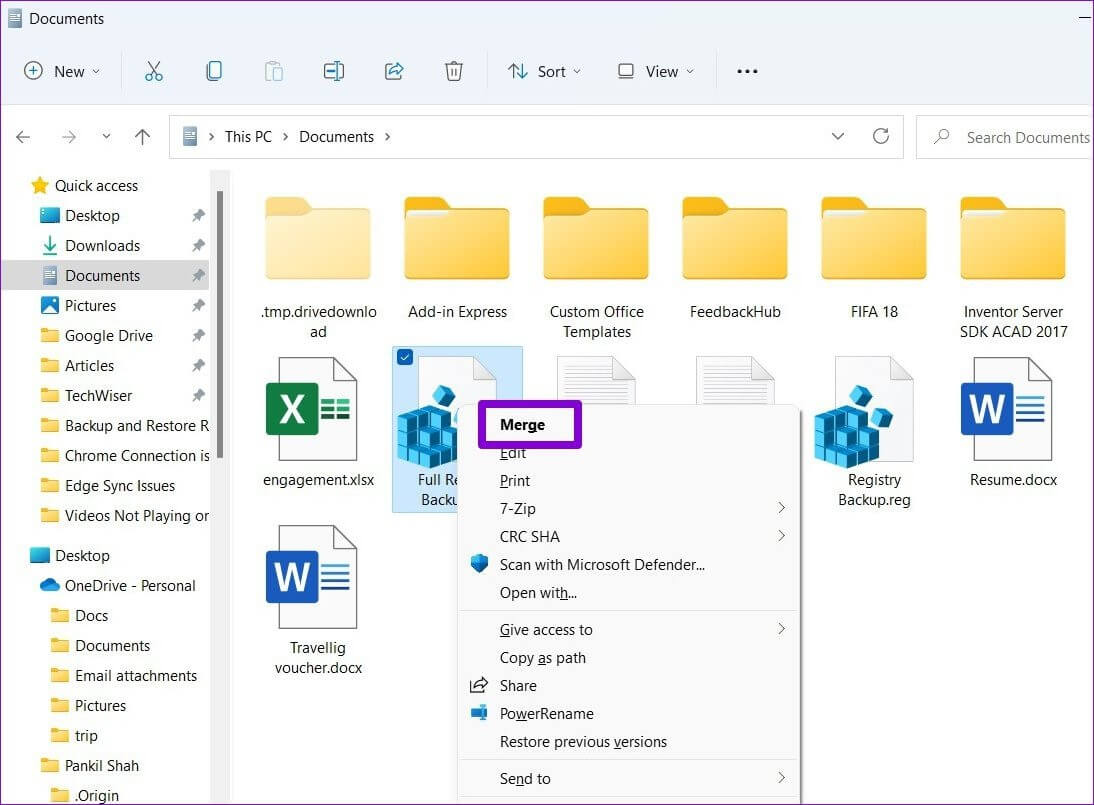
Alternatively, you can also restore the registry file by right-clicking on it and choosing Merge.
2. Use System Restore
Step 1: Click on Windows key + S To open Windows Search. Write Create a restore point , and select First result that appear.
Step 2: within system protection , Click system recovery.
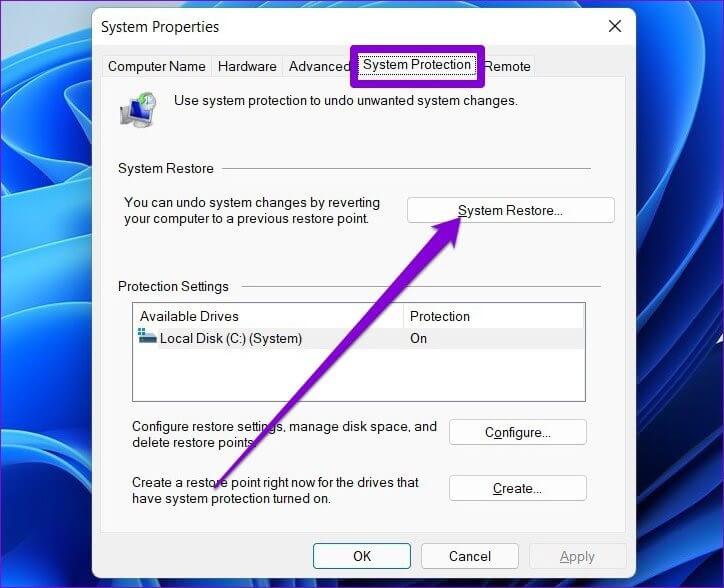
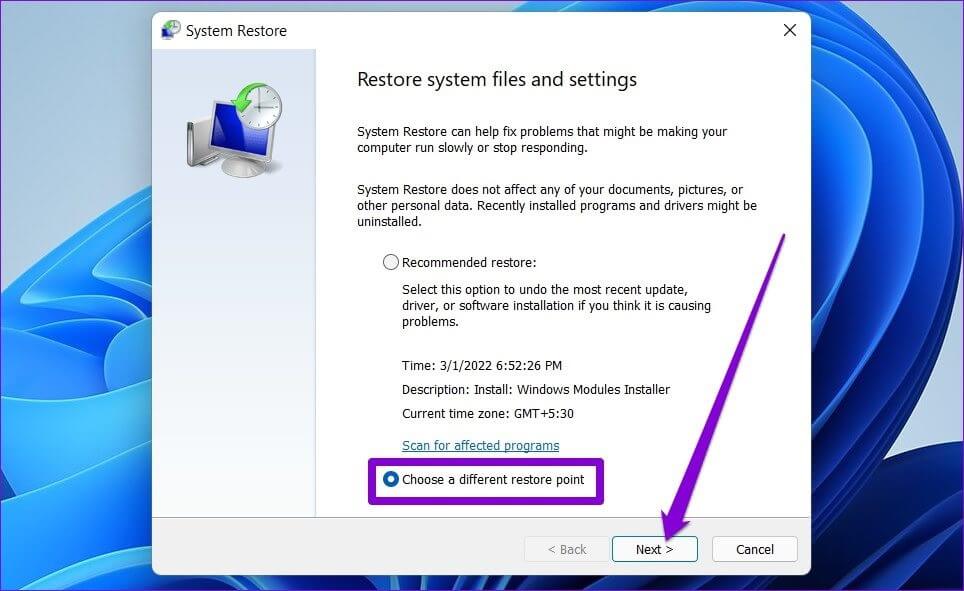
Step 3: You will get two options. Select “Choose a different restore point” And press next one.
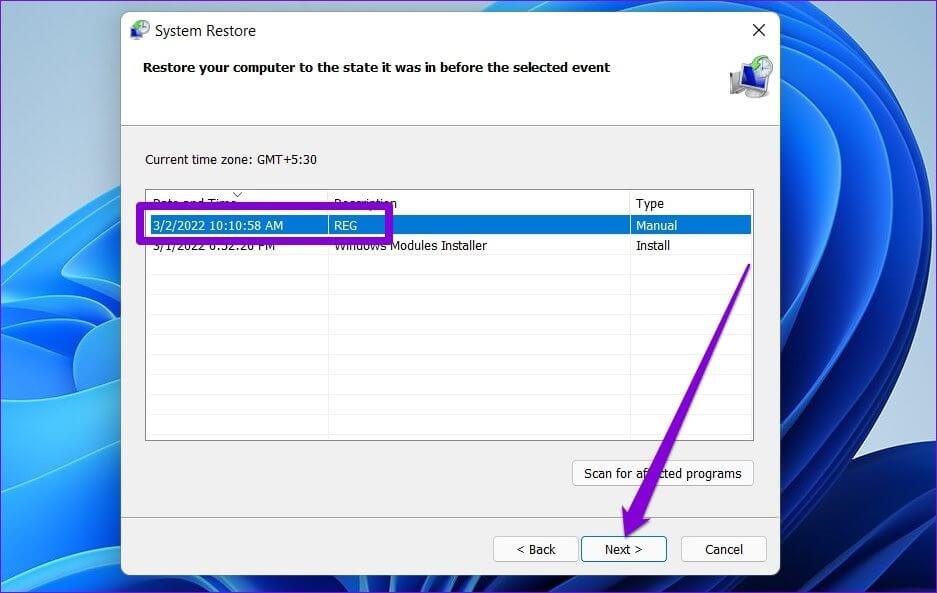
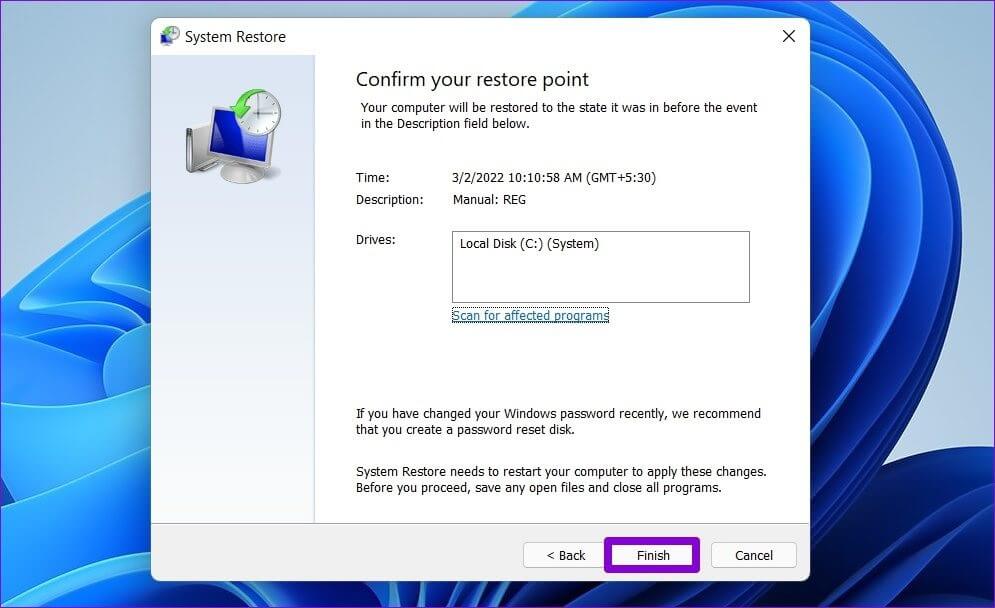
Step 4: Locate restore point that you created earlier. Then click on next one.
Bonus: How to Backup and Restore Individual Registry Keys on Windows 11
If you're making changes to only a few specific parts of the registry, which is often the case, you might consider backing up that specific section of the registry instead of creating a full backup. It's very easy to do. Here's how.
Step 1: Press Windows key + R To open Run . dialog. Write regedit in the box and press Ctrl + Shift + Enter To open it with rights responsible.

Step 2: Use the right side to navigate to The key you want to back upRight-click on it and select export.
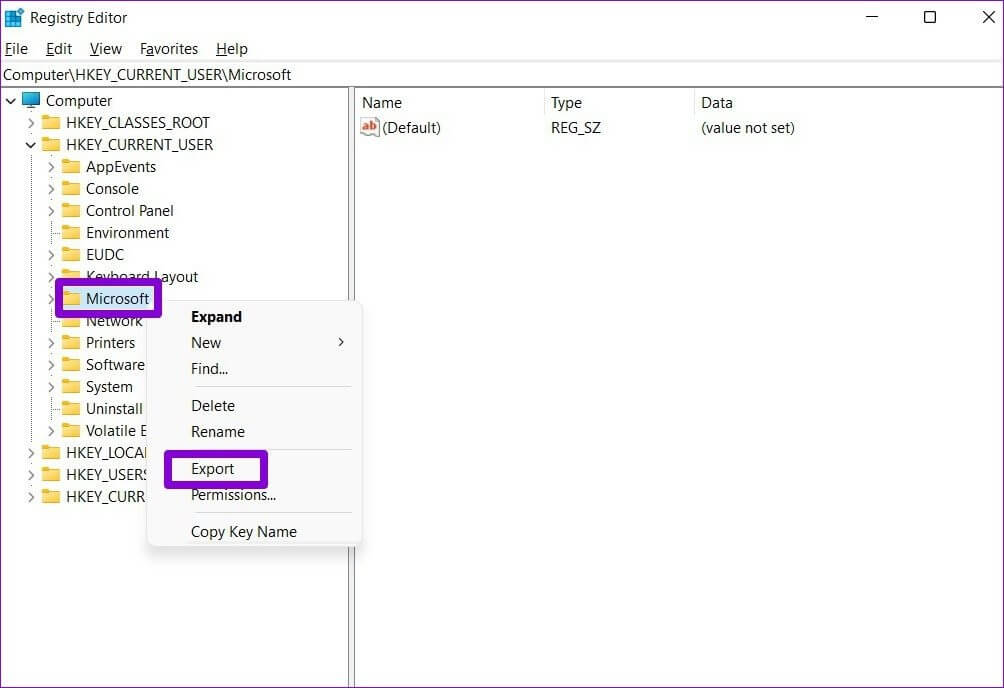
Step 3: Enter a suitable name for the backup file and click OK. save.
That's all. Your registration key will be backed up.
You can restore your backup at any time, should something go wrong. Simply double-click the backup file and click Yes when prompted to confirm.
Better safe than sorry
Having a backup is always great, which is why you should know how to back up and restore the registry in Windows 11. But even then, you should only make registry changes after you've exhausted all other options. You can choose whichever method works best for you and keep your registry safe.


