Snapchat's most notable feature is its ability to automatically delete Snaps. However, there may be times when you want to recover deleted Snaps to revive some memories. With this guide, we'll show you all the possible ways to do so without any hassle.

As we all know, Snapchat prioritizes user privacy. This is one of the biggest reasons behind its success. Although Snapchat has made it difficult to recover Deleted SnapsBut it's not impossible. We've made sure to make the steps easy to understand and implement. Let's get started.
1. Recover Deleted Snaps Using SNAPCHAT Memories
Snapchat offers an easy and convenient way to recover deleted Snapchat photos using its Memories feature. This allows you to recover Snapchat photos on iOS and Android devices without a computer. Here's how to check it:
Note: You need to enable Snapchat Memories for this feature to work. We've listed the steps in the last part of the guide.
Step 1: Open an app Snapchat Swipe up to open a tab. camera
Step 2: Open Term that you want to recover.


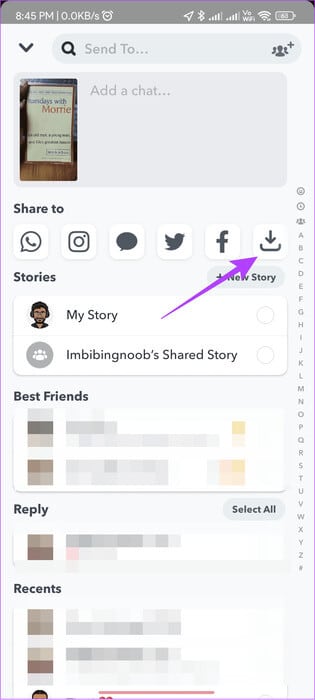
Step 3: Click on send, From here, send the snapshot or save it to your device.


2. Download data to recover deleted photos
Like most platforms, Snapchat also stores data related to your account. This can include your name, phone number, email address, and sometimes recently deleted Snaps. You can use this method for iPhone, Android, and even snapchat web.
However, this method cannot completely recover all deleted Snapchat Snaps. However, you can still try this option.


Step 1: Open Snapchat And press symbol picture Yours in the top left corner (of the camera page).
Note: Your avatar icon will be in the top right corner if you are on the Messages page.
Step 2: Click on Settings gear in the upper right corner.
![]()

Step 3: Scroll down to Account procedures And click My data.
Step 4: Here, enter User name your and click next one.


Step 5: Now, enter Password Then press next one.
Step 6: Switch to Include your memories and other saved media.
Step 7: Enable All options Other on the same page and click next one.


Step 8: Select the time range and then click send.
Tip: You can also turn off "Filter export by date range." This will download all data associated with the account.
Step 9: Wait for the export to complete. This may take hours or even days, and once the data is exported, you'll receive an email to the associated email address.
Step 10: Open the email and click Click here inside it. This will open Snapchat launch On the web. Enter Your credentials.


Step 11: Download the data Open the compressed file using any opener. ZIP Or File manager.
Step 12: Open Vol and search for folders chat_media Or memories once extracted.


From here, you can recover deleted Snapchat photos. Just move them to the location you want.
3. Recover deleted photos using the Photos app on iPhone and Android
Normally, you can find saved Snaps on your device. However, if you delete saved Snaps from your device, you can find them on your device. Surprised? Check out our guide on how to do this. How to Recover Deleted Photos on iPhoneFor Android, here's how to find deleted photos using the Photos app.
Note: If you are using any other gallery app on your Android smartphone to delete Snaps, it is best to find them inside the Trash folder of that app.
Step 1: Open an app Google Photos Then press the library.
Step 2: Choose Trash.


Step 3: Press and hold the photo you want to restore, then choose restoration.

To select multiple photos, tap and hold on a photo and select all photos to restore. Then tap Recover to restore the photos.
How to Prevent Snapchat from Auto-Deleting
Thanks to Snapchat's strong data protection policy, it takes more than a few clicks to recover deleted Snaps. While you can use all of the tricks above, you can still take the following steps to prevent Snapchat from deleting your Snaps.
1. Save Snaps
Step 1: Open Snapchat Use the chat screen from wherever you want. Save Snaps in it.
Step 2: Press and hold Snap > Choose “Save to Chat.”
Tip: This will only work with Snaps that are in Delivery status.


step 3To save it to your device, press and hold Snap again and choose Save to camera roll.


2. Take a screenshot
You can also take a quick screenshot of the Snap if you don't want to follow the steps above. However, the other person will be notified that you took a screenshot.
Note: Take a screenshot on Snapchat without them knowing
3. Use Snapchat Spotlight
You can also use Snapchat's Spotlight feature to share and save Snaps. However, keep in mind that your Spotlight will be public when shared. Here's how to add a Snap to Spotlight.
Step 1: Open Snapchat, And record a video for more than 5 seconds, then tap "the following".
Tip: You can add media from your camera roll using the card button next to the capture button.
Step 2: Click on Spotlight and select button send.


To view your Snaps, open your profile > scroll down to see your Spotlights within “Spotlight & Snap Map.”
4. Backup Snaps
Since there's a chance Snaps could be deleted from the servers or your device, it's best to back them up to a reputable cloud storage service like iCloud or Google Drive. This way, you can access these Snaps on virtually any device.
Frequently Asked Questions About Recovering Deleted Snaps
Q1. How to recover deleted photos from Snapchat My Eyes Only?
The answer: According to SnapchatYou cannot recover deleted photos from the My Eyes Only tab. This is to protect your privacy and security.
Q2. Does Snapchat keep deleted Memories?
The answer: Yes. Once you delete a Snap from your Snapchat Memories, it's gone forever. You won't be able to recover it, as Snapchat designed its servers that way.
Q3. How long does Snapchat keep data after it's deleted?
The answer: Although recovering any deleted Snapchat memories is impossible, you can still recover Deleted Snapchat Account You have 30 days to reactivate your account before all memories and other data are removed from the servers.
Keep your memories safe
While most of us love Snapchat for how messages are deleted after a certain period of time, some Snaps are worth keeping. We hope you can recover Snapchat photos by following our guide. If you still have any questions, we'll be happy to answer them in the comments.