تواصل Apple تحسين تطبيق Notes بالعديد من الميزات التي طال انتظارها. يمكنك الآن قفل الملاحظات وتثبيت الملاحظات في الأعلى واستخدام العلامات لتصنيف الملاحظات وحتى التعاون مع الأشخاص. لكن كيف يمكنك العمل مع الآخرين في نفس الملاحظة أو عدة ملاحظات؟ في هذا الدليل ، سنوضح لك كيفية مشاركة الملاحظات على جهاز iPhone الخاص بك والتعاون مع الآخرين.
مشاركة الملاحظات الفردية على IPHONE
هناك عدة طرق يمكنك استخدامها لمشاركة الملاحظات الفردية على جهاز iPhone الخاص بك. تعد مشاركة ملاحظة واحدة فكرة جيدة عندما تعمل على عدد قليل من الأشخاص في مشروع صغير أو عندما تقوم فقط بالعصف الذهني من خلال الأفكار.
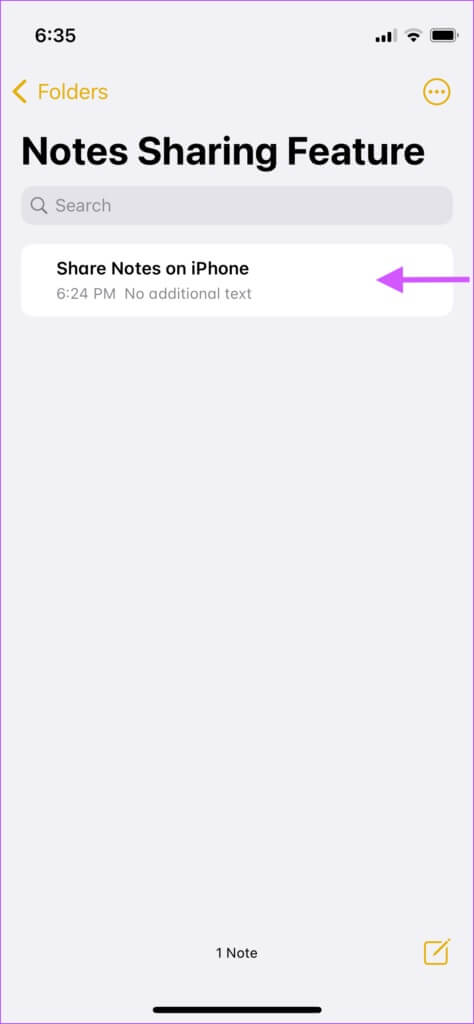
الخطوة 1: قم بتشغيل تطبيق Notes على جهاز iPhone الخاص بك وانقر فوق المجلد الذي يحتوي على الملاحظة التي تريد مشاركتها.
الخطوة 2: اسحب من اليمين إلى اليسار على الملاحظة التي تريد مشاركتها.
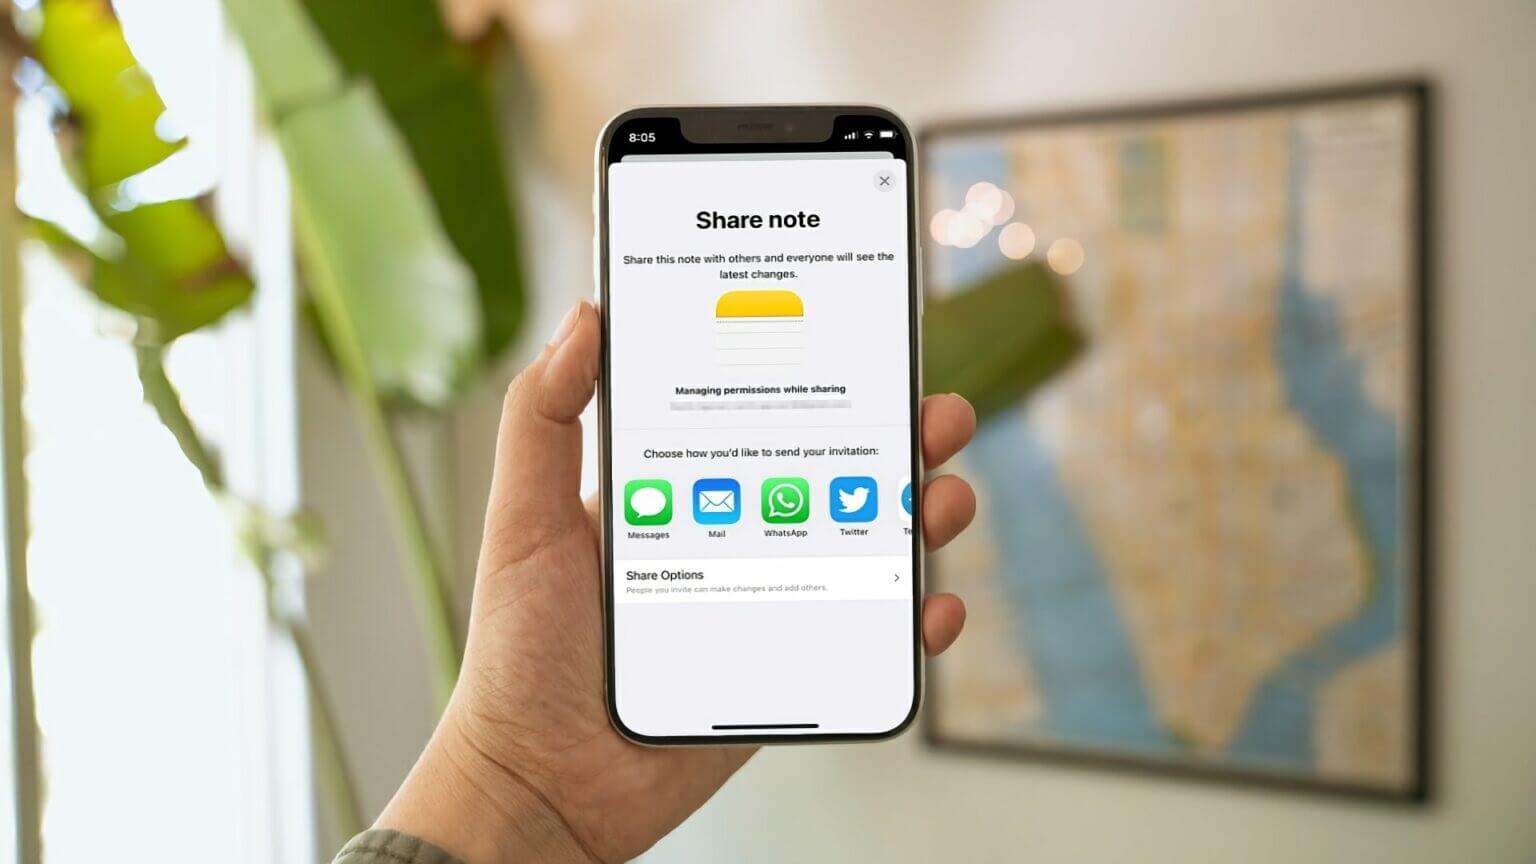
خطوة 3: اضغط على أيقونة المشاركة.
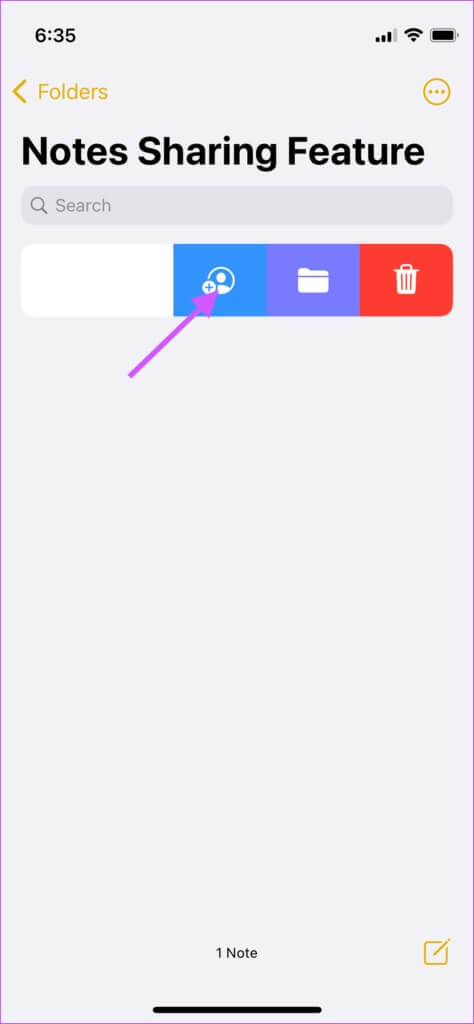
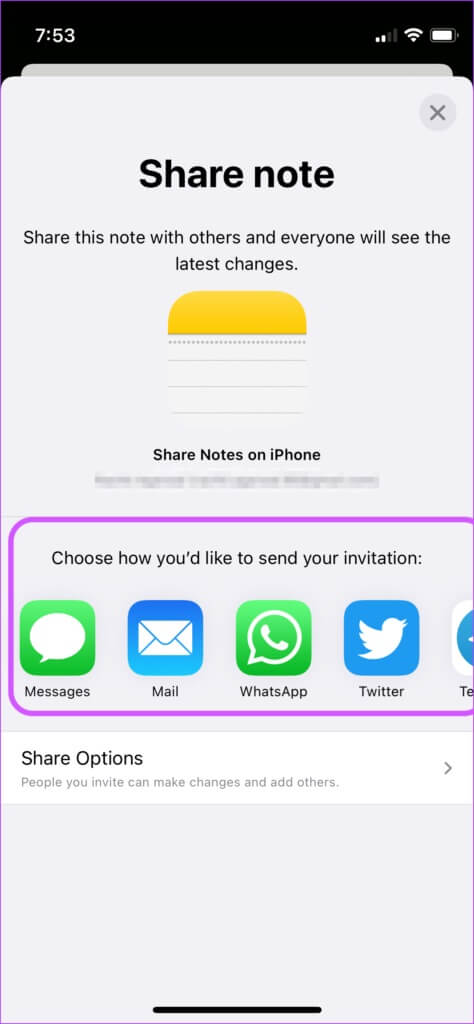
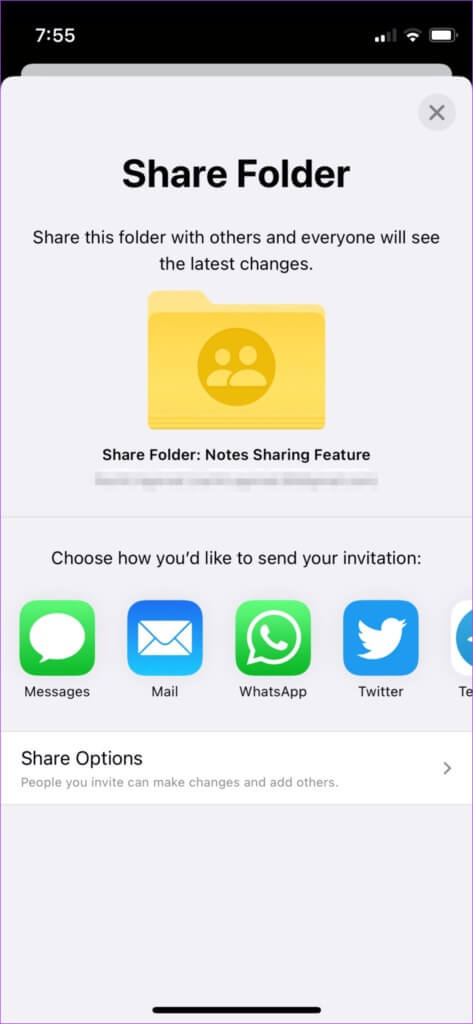
الخطوة 4: هنا ، يمكنك تحديد الطريقة التي تريد بها مشاركة ملاحظاتك. يمكنك مشاركة ملاحظاتك باستخدام الرسائل والبريد وتطبيقات الدردشة الأخرى.


الخطوة 5: يمكنك أيضًا استخدام 3D Touch (على أجهزة iPhone المدعومة) لفتح القائمة السياقية ومشاركة الملاحظة.
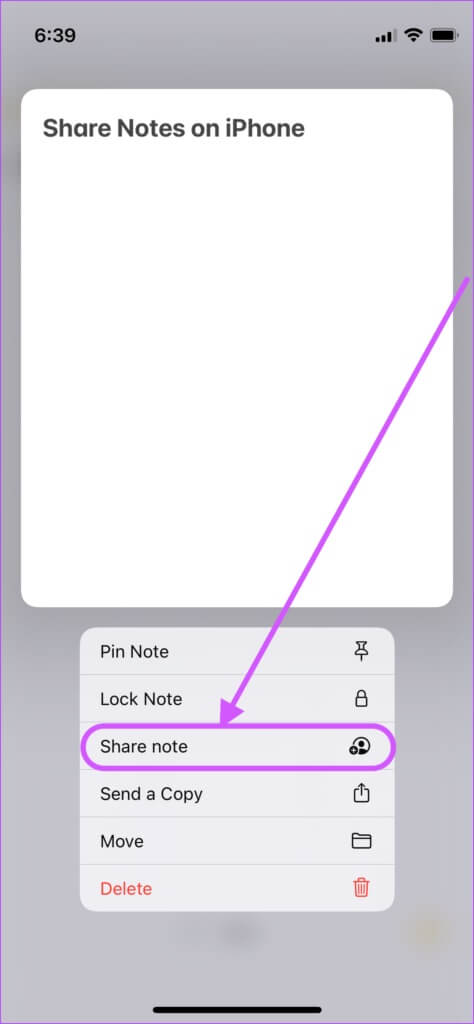
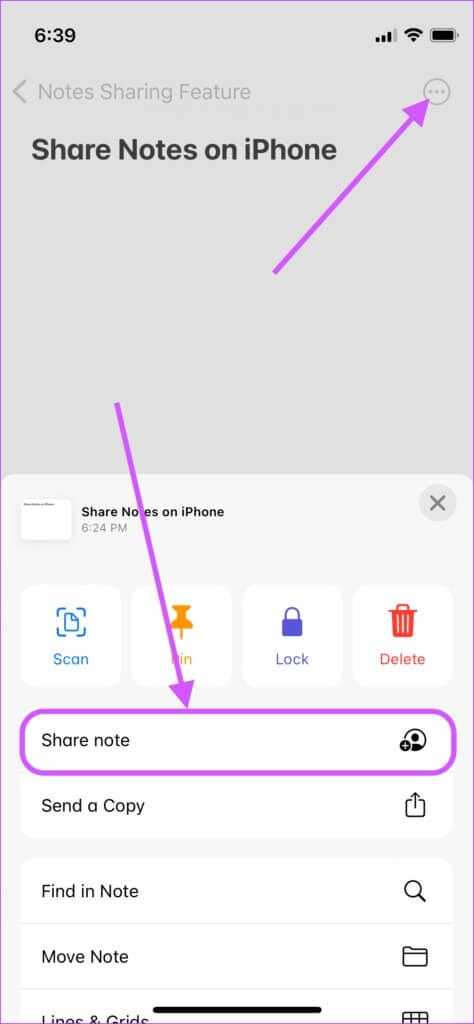
خطوة 6: إذا كانت الملاحظة مفتوحة بالفعل ، فانقر فوق القائمة ثلاثية النقاط في الزاوية العلوية اليمنى ثم على خيار مشاركة الملاحظة.
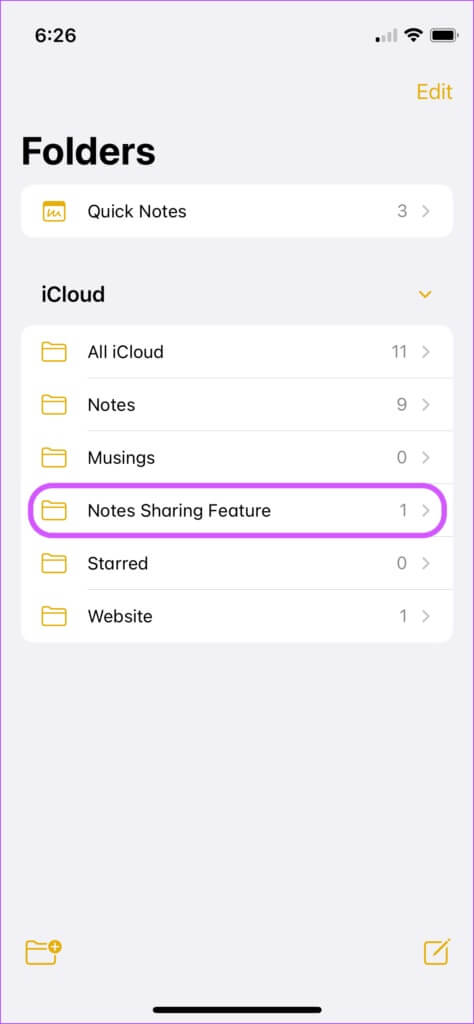
مشاركة مجلد الملاحظات على IPHONE
إذا كنت تدير مشروعًا كبيرًا يتطلب منك مشاركة ملاحظات متعددة ، بدلاً من مشاركتها بشكل فردي ، يمكنك الاحتفاظ بجميع الملاحظات في نفس المجلد ومشاركة المجلد.
أفضل شيء في إنشاء مجلد Notes مشترك هو أن كل ملاحظة جديدة تقوم بإنشائها هناك تتم مشاركتها تلقائيًا مع المشاركين الآخرين. هذا يوفر عليك المتاعب لمشاركة الملاحظات الجديدة مرة أخرى.
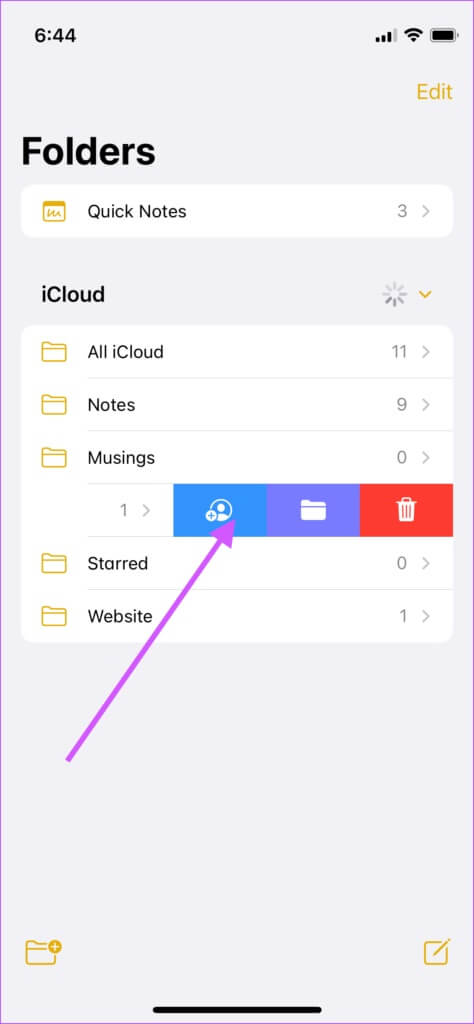
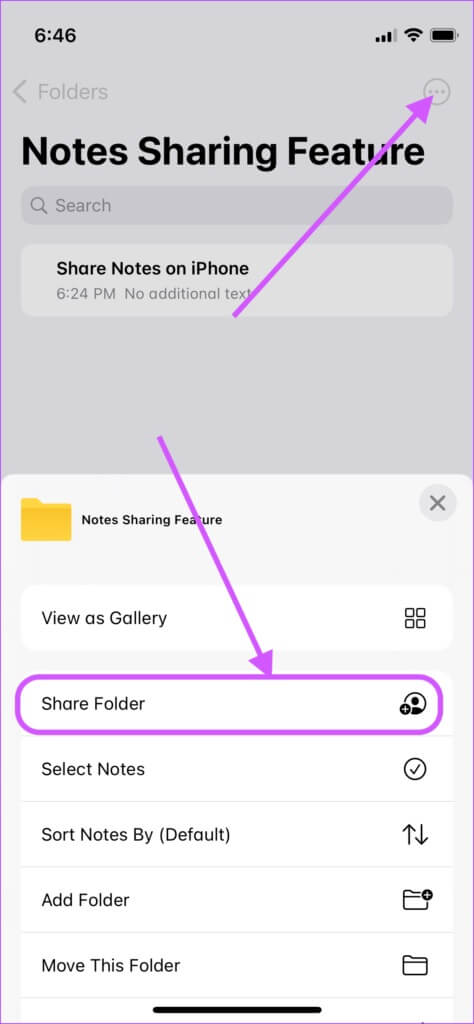
الخطوة 1: افتح تطبيق Notes. اسحب من اليمين إلى اليسار على مجلد الملاحظات وانقر على أيقونة المشاركة.
الخطوة 2: سيتم تقديمك مرة أخرى بكل ميزات مشاركة Notes المعتادة ، لذا اختر الميزة التي تريد استخدامها.
خطوة 3: يمكنك أيضًا استخدام ميزة 3D Touch (على أجهزة iPhone المدعومة) لإظهار القائمة السياقية ومشاركة المجلد.
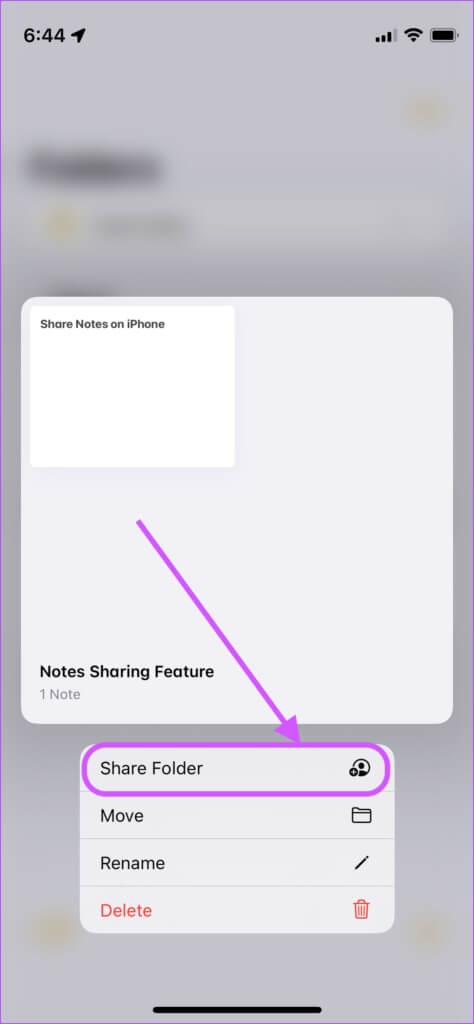
الخطوة 4: عندما تكون داخل مجلد ، انقر فوق القائمة ثلاثية النقاط في الزاوية العلوية اليمنى لإحضار خيار المشاركة.
تتبع التغييرات في الملاحظات المشتركة
تأتي Apple Notes مع ميزة مضمنة تسمح لك بتتبع التغييرات التي أجراها المشاركون الآخرون.
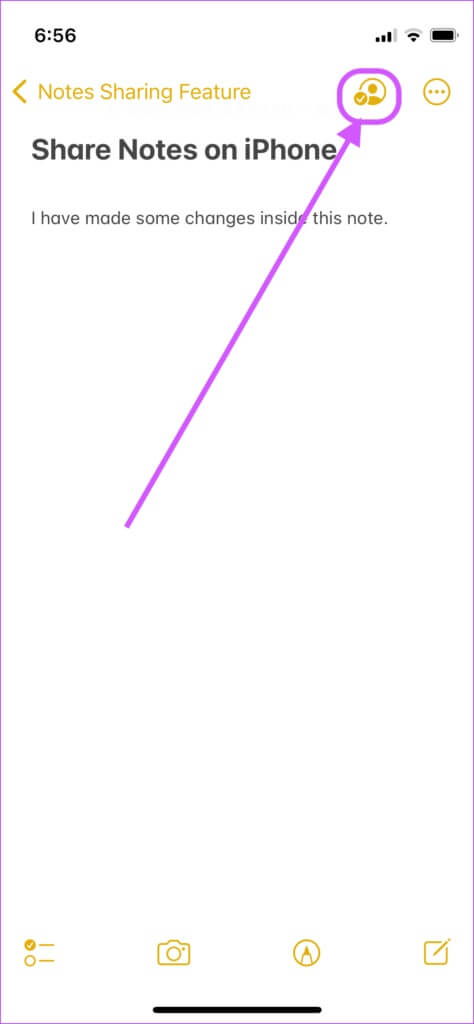
الخطوة 1: قم بتشغيل تطبيق Notes. افتح ملاحظة مشتركة واضغط على أيقونة الملاحظة المشتركة.
الخطوة 2: اضغط على خيار Show Highlights.
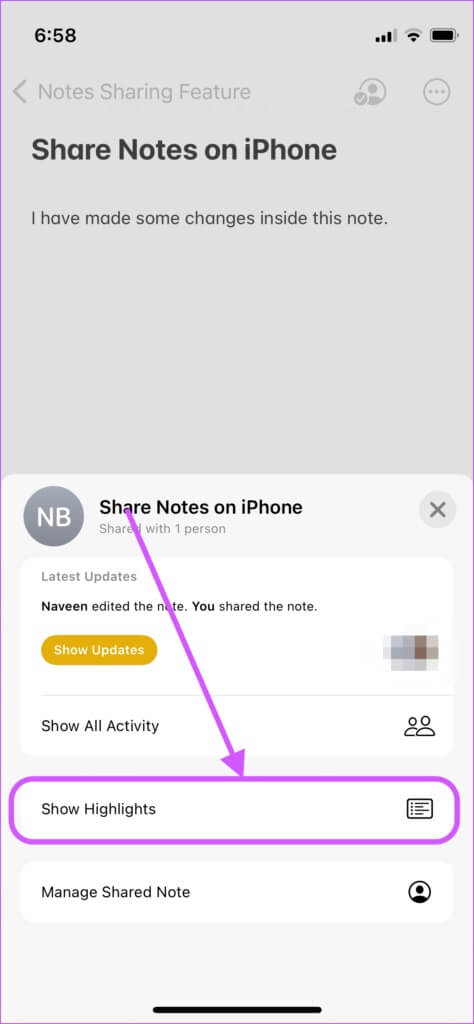
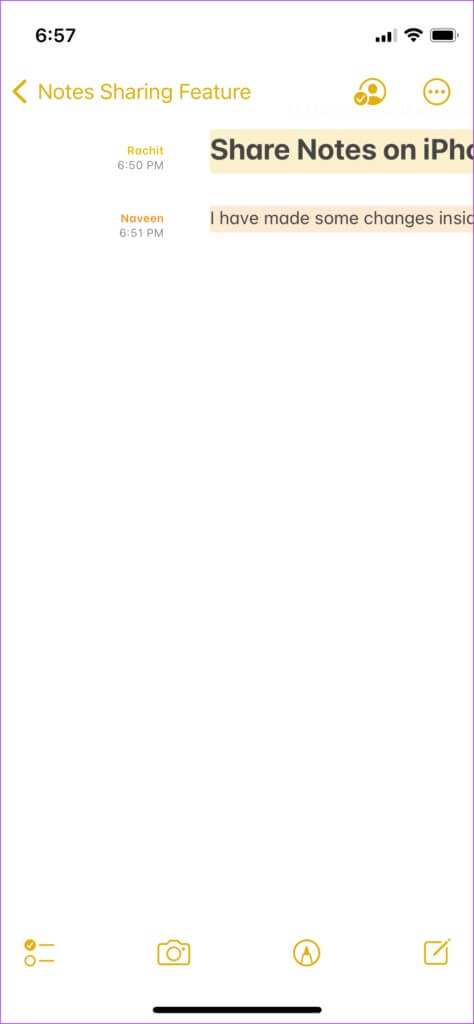
خطوة 3: الآن ، يمكنك رؤية التغييرات التي أجراها المستخدمون الآخرون بأسمائهم وطابعهم الزمني.
إدارة أذونات الملاحظات المشتركة
في بعض الأحيان لا تريد أن يقوم الآخرون بإجراء تغييرات في الملاحظات التي شاركتها. لحسن الحظ ، تتيح لك Apple Notes إدارة الأذونات لمنح المشاركين حق الوصول للعرض فقط.
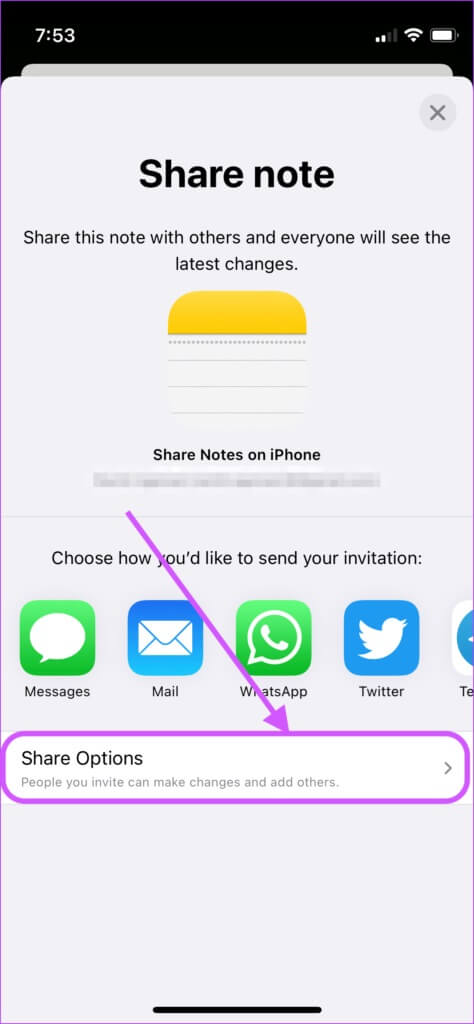
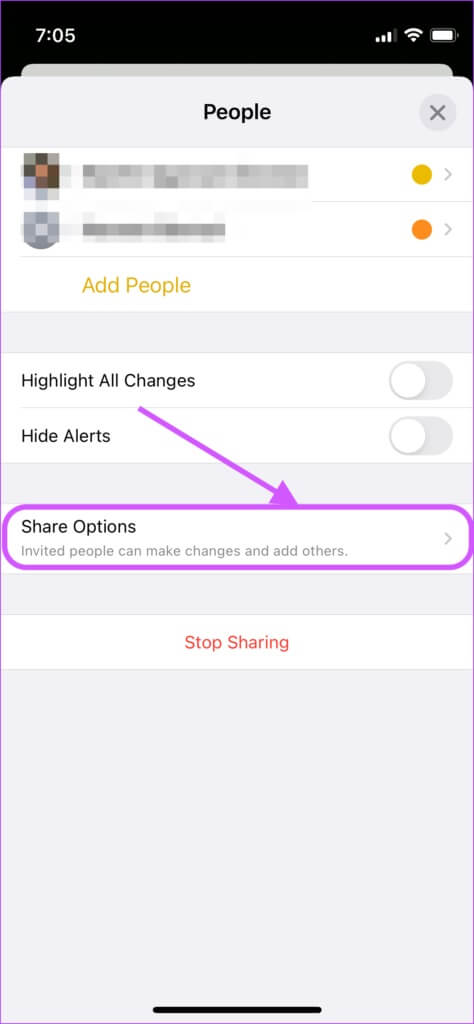
الخطوة 1: عند مشاركة ملاحظة أو مجلد ، اضغط على قائمة خيارات المشاركة.
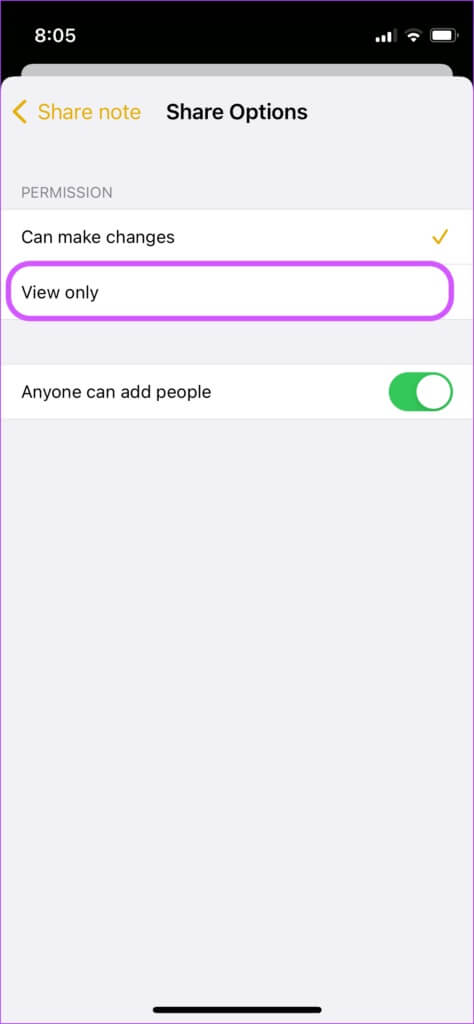
الخطوة 2: يمكنك منح إذن العرض فقط عن طريق تحديد خيار العرض فقط.
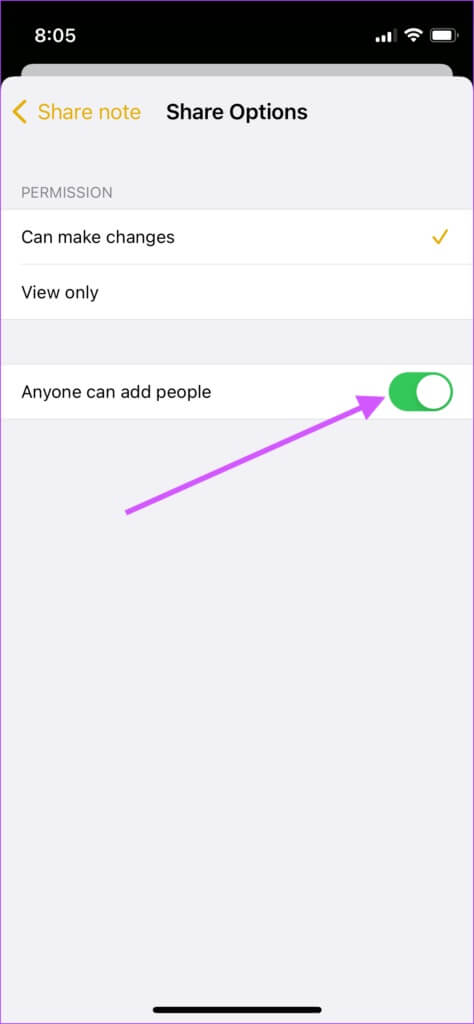
خطوة 3: يمكنك أيضًا تعطيل مفتاح التبديل بجوار “يمكن لأي شخص إضافة أشخاص” إذا كنت لا تريد أن يضيف المشاركون أشخاصًا آخرين إلى الملاحظة.
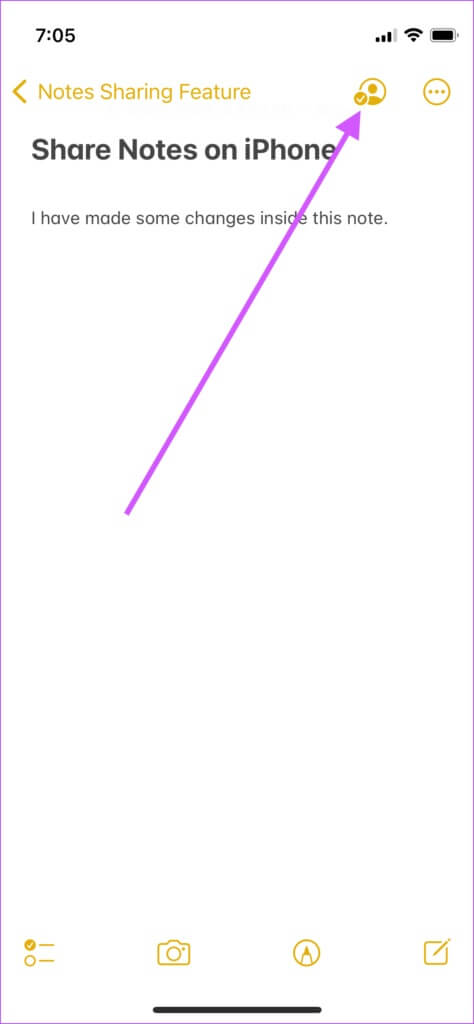
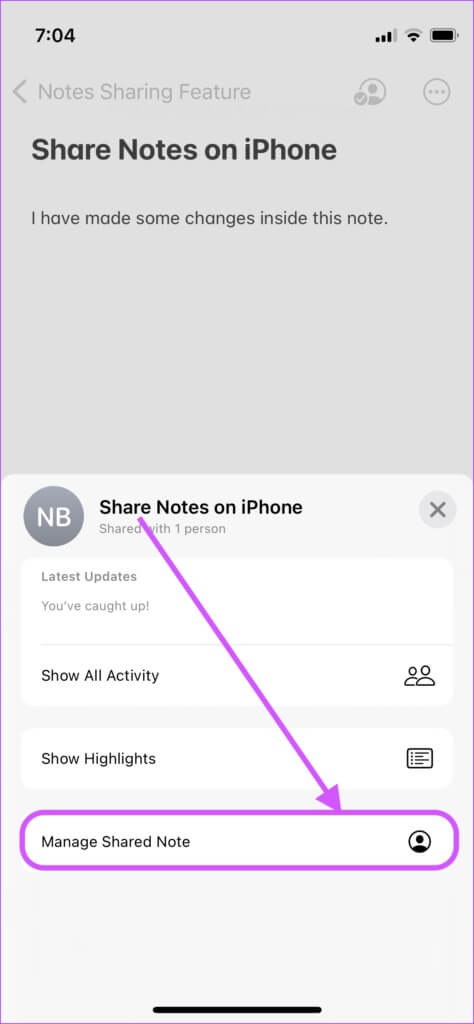
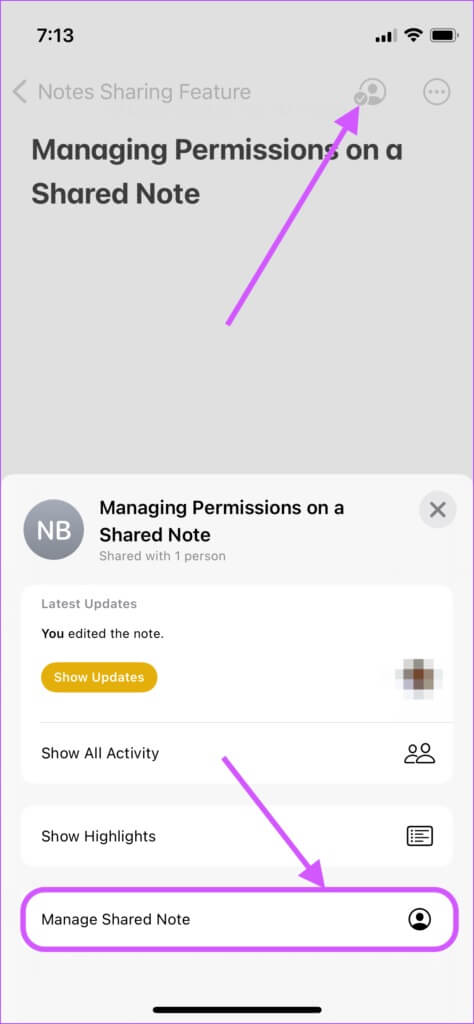
الخطوة 4: لإدارة الأذونات في ملاحظة مشتركة بالفعل ، انقر على أيقونة الملاحظة المشتركة في الأعلى.
الخطوة 5: اضغط على خيار “إدارة الملاحظة المشتركة”.
خطوة 6: الآن اضغط على خيارات المشاركة لتتمكن من إدارة الأذونات.
قم بإزالة الأشخاص من الملاحظات المشتركة
إذا غادر شخص ما فريقك أو تمت إضافة شخص غير مرغوب فيه إلى ملاحظة أو مجلد مشترك ، فيمكنك إزالته بسهولة.
الخطوة 1: اضغط على أيقونة الملاحظة المشتركة وحدد “إدارة الملاحظة المشتركة”.
الخطوة 2: في شاشة الأشخاص ، انقر فوق اسم الشخص الذي تريد إزالته.
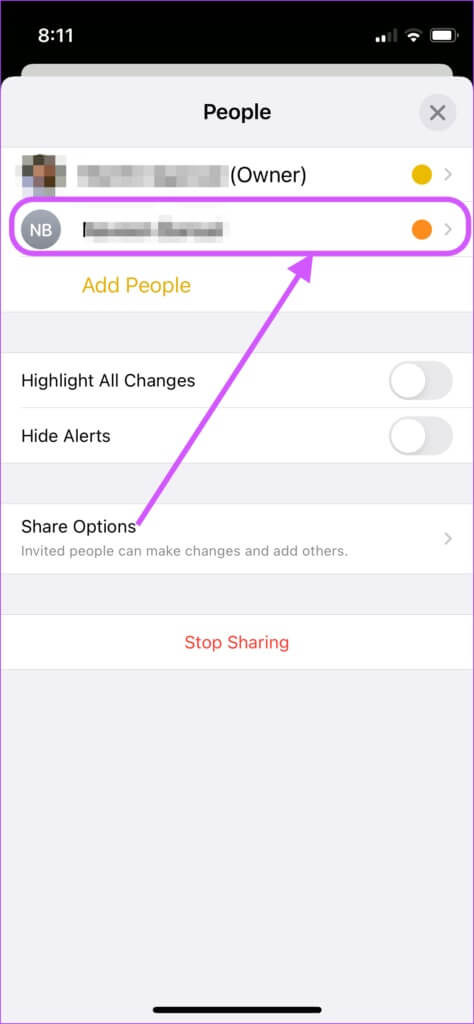
خطوة 3: من الشاشة التالية ، انقر فوق “إزالة الوصول” لإزالة هذا الشخص من قائمة المشاركة.

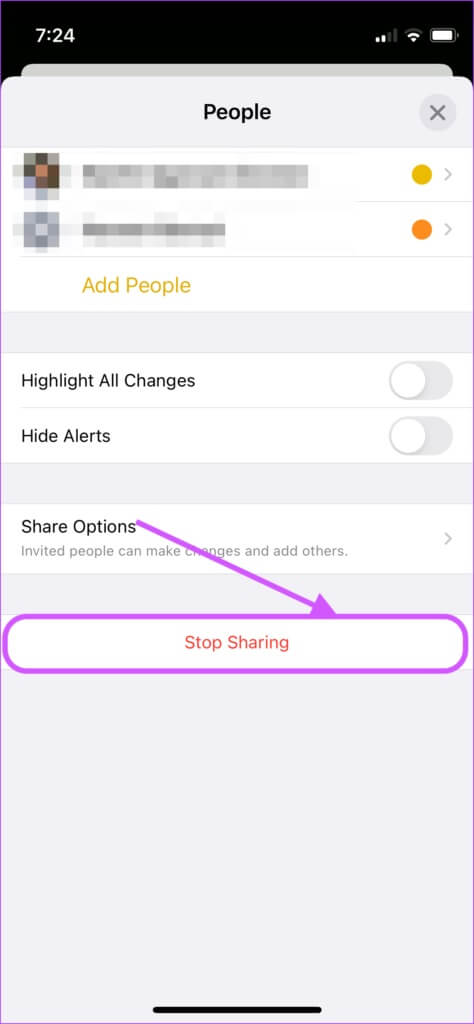
وقف تبادل الملاحظات
بعد انتهاء عملك ، ولست بحاجة إلى مدخلات من الآخرين ، يمكنك التوقف عن مشاركة الملاحظات.
الخطوة 1: اضغط على أيقونة الملاحظة المشتركة وحدد “إدارة الملاحظة المشتركة”.

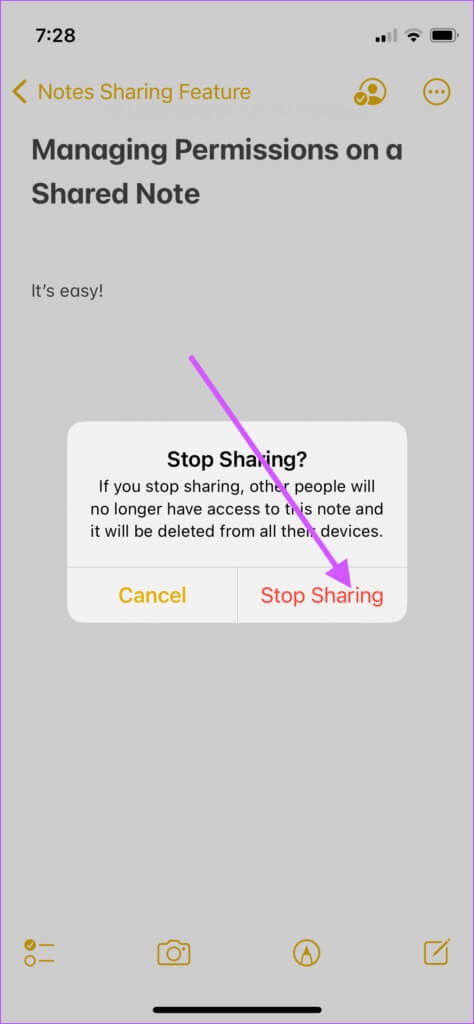
الخطوة 2: على شاشة الأشخاص ، انقر فوق إيقاف المشاركة.
خطوة 3: أخيرًا ، قم بالتأكيد عن طريق النقر فوق الزر Stop Sharing (إيقاف المشاركة) في مربع التأكيد.
مشاركة الملاحظات على iPhone والتعاون بسهولة
جعلت Apple من السهل التعاون مع الآخرين في المستندات دون استخدام تطبيق تابع لجهة خارجية. أفضل جزء في مشاركة Notes على iPhone هو أنه تتم مزامنة جميع التغييرات على الفور ، مما يتيح لك التعاون في الوقت الفعلي. إذا كنت تعمل مع أشخاص آخرين في مشروع ما ، فاستخدم ميزة مشاركة Apple Notes وأخبرنا كيف تسير الأمور.