Windows 11 lets you create shared folders to easily share files with other computers or people. Using a shared folder makes it easier to access files stored on another computer on the same networkSo if you can't access it, there are ways to fix the "shared folder can't be accessed" issue in Windows 11.

1. Use Command Prompt
If you can't open the shared folder in File Explorer, you can also use Command Prompt To get there. Here's how.
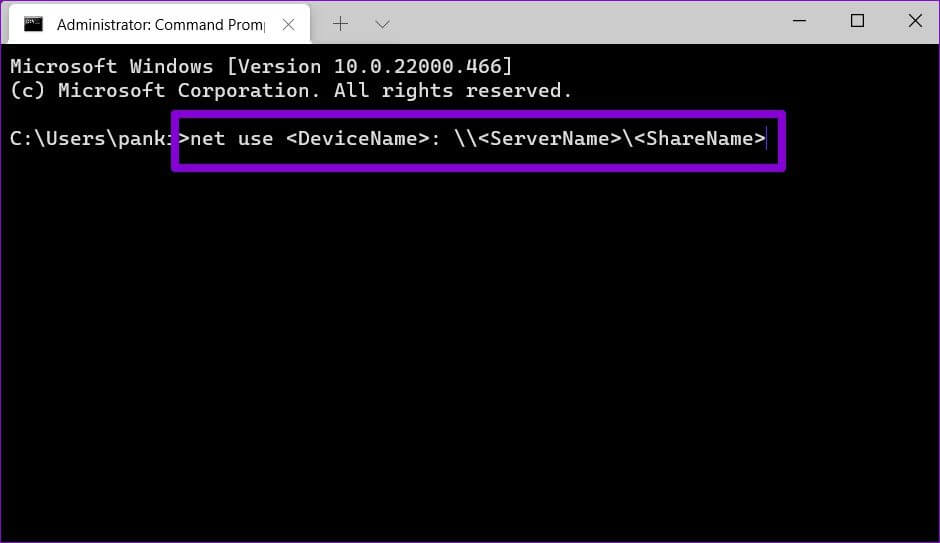
Step 1: Click on Windows key + X and select Windows Terminal (Admin) from the resulting list.
Step 2: Write the details like: Computer name, server name, and shared folder name In the next command then press Enter.
net use : \\ \

2. Enable file sharing support
Before moving on to advanced solutions, you need to ensure that the sharing protocol is enabled on your computer. Here's how.
Step 1: Open menu START YOUR , and type run ميزات windows Or turn it off, and press Enter.

Step 2: Locate the folder “SMB 1.0 / CIFS File Sharing Support” and select it.
Restart your computer For the changes to take effect and to see if you can access the shared folder.
3. Enable network discovery
Another reason your computer may not be able to access a shared folder is that network discovery is disabled. Turning it on will allow your computer to view and access shared folders on the same network.


Step 1: Open start menu , And type Control Panel , And press Enter.


4. Check folder permissions
Incorrect settings or incomplete sharing permissions can also be the reason you can't access the shared folder. Follow the steps below to ensure the folder permissions for the shared folder are configured correctly.
Step 1: Click on Windows key + E to turn on File ExplorerRight-click the folder you want to share and select Properties.

Step 2: in Properties window , switch to tab to share. Then click Advanced Sharing.

Step 3: Next, tap Permissions.


5. Run the troubleshooter
Windows 11 includes a troubleshooter for every major utility. So, if the solutions above don't help, try running the shared folder troubleshooter and let it fix the problem for you.
Step 1: Click search icon in Taskbar. Write Troubleshoot settings , And press Enter.


Step 3: Click the button "employment" Next to shared folders.

6. Check sharing services
If you still can't access the shared folder on Windows, you need to check if the network and sharing services on your computer are running.
Step 1: Click on Windows key + R to start Run command. Write services.msc And press Enter.


7. Use the Registry Editor
If nothing works, you can modify the computer's sharing policies in the registry editor. The Windows registry is an integral part of the Windows operating system. We recommend that you do so. Backup registry files Before you try anything to save yourself if things go south.
Step 1: Click on Windows key + R , And type regedit , And press Enter.

Computer\HKEY_LOCAL_MACHINE\SOFTWARE\Policies\Microsoft\Windows\LanmanWorkstation
If you can not find LanmanWorkstation , right click on Windows key , and go to New , and select a key. Name it LanmanWorkstation.


Sharing is caring
Availability Share files with computers on the same network A lot of convenience for the table. We hope that one of the solutions above fixed the "Cannot access the shared folder" issue in Windows 11, and you can access the shared folder on your Windows 11 computer.