As personal computers become permanent devices, we'll often come across information or items we'd like to share with others. While screen sharing is an option, it's not practical. Instead, you can take a screenshot on your Windows 11 device. Then save or share it as desired. Read on to learn how to take a screenshot in Windows 11.
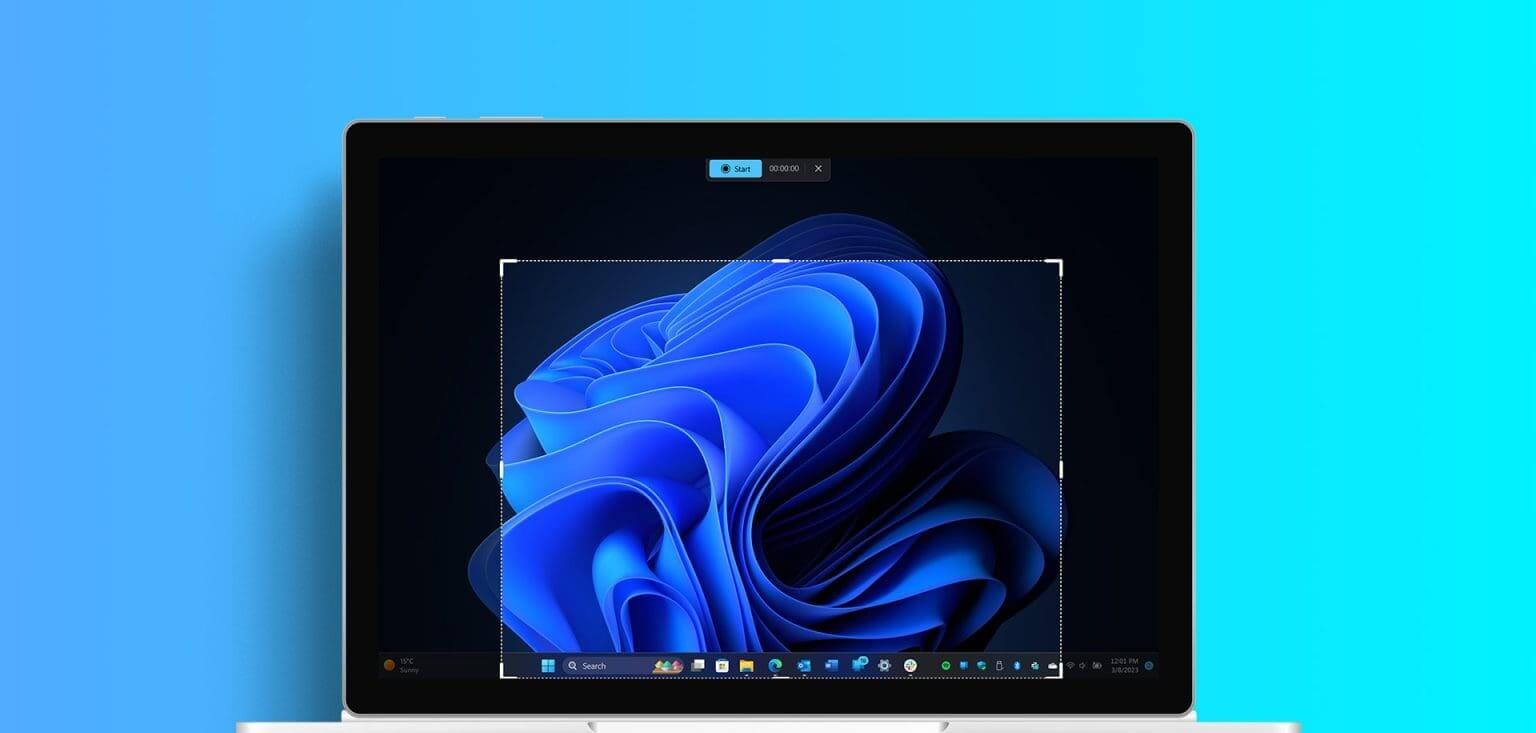
Before we get into the ways to take screenshots in Windows 11, it's important to understand what type of screenshot you need. If you just want to save it for your history, a full-screen screenshot will work fine. However, if you're sharing it with someone, you should take a screenshot of the relevant portion of the screen.
Here's how to take each type of screenshot on Windows.
Note: Windows computers save screenshots in PNG format by default. You can refer to our guide for easy ways to convert PNG screenshots to JPG on Windows.
1. Use keyboard shortcuts to take a screenshot.
Certain keyboard shortcuts can be used to take a screenshot of your entire screen at once. Both use the button Print Screen It can be used instead, which is especially useful if you have any broken keys on your keyboard.
Keep reading to learn how to use Print Screen shortcuts to take screenshots in Windows 11.
I. Using Print Screen + Windows Key
One of the most common and easiest ways to take a screenshot on Windows 11 is to use Windows key + PrtSc (Print Screen). This will instantly take a screenshot of your entire page and save it to your Screenshot folder.
However, if you want to take a screenshot of only part of the page, you can reconfigure the key. Print Screen To open Cutting ToolThen use the application. Snipping Tool To take cropped screenshots. Here's how.
Step 1: Open Settings using Windows key + I.
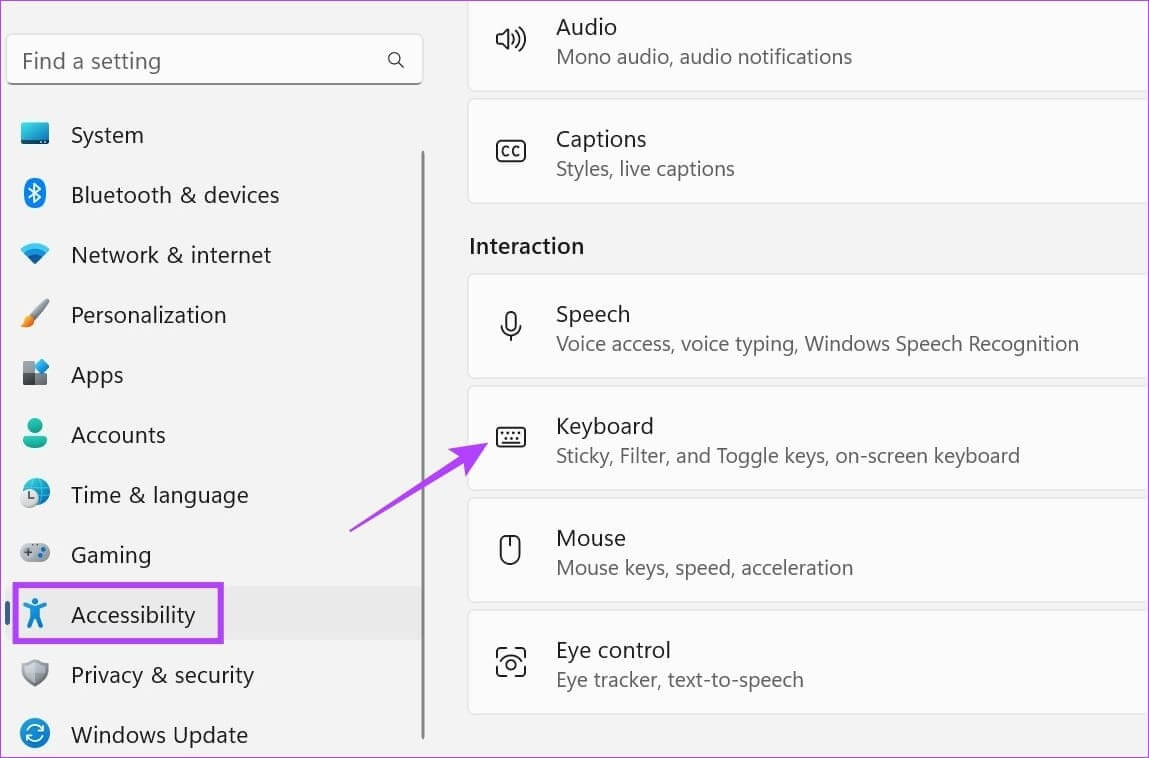
Step 2: From the menu sidebar, click accessibility.
Step 3: Here, click on keyboard.
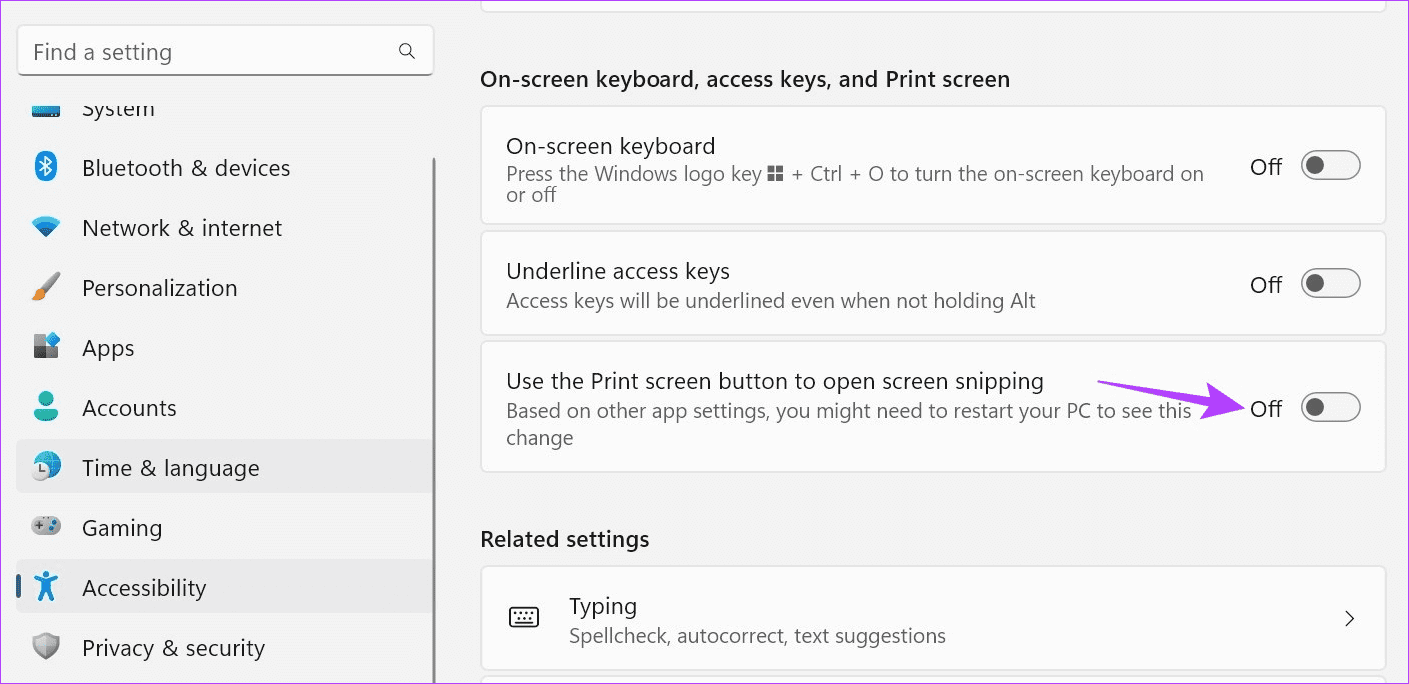
Step 4: Now, turn on the toggle switch. Use the Print Screen button to open the screen saver..
Note: You can also turn on the “Use Print Screen to open Snipping Tool” toggle switch, if available.
II. Using Alt + Print Screen
Besides the traditional Print Screen option, you can also use the Alt + Print Screen shortcut to take a screenshot on Windows 11. This will also take a full-screen screenshot.
However, please note that the screenshot will not be saved and will only be copied to the clipboard. Therefore, you must open any program, such as The painter, And paste it using Ctrl + V keys.Then save the screenshot and use it as you like.
2. Take a screenshot of a selected area using the Snipping Tool.
As the name suggests, you can snip your screen to take a partial or full-screen screenshot using the Snipping Tool in Windows. It's similar to the Snip and Sketch tool in Windows 10. It can crop out excess space using various screenshot mode options and even add an outline to the screenshot. You can also delay the opening of the Snipping Tool option to take a delayed screenshot.
Note: Screenshots captured with the Snipping Tool are not saved automatically. You must use the Save option to save them manually.
Now, let's take a look at how to use the Snipping Tool to take a screenshot in Windows 11.
1. Take a delayed screenshot
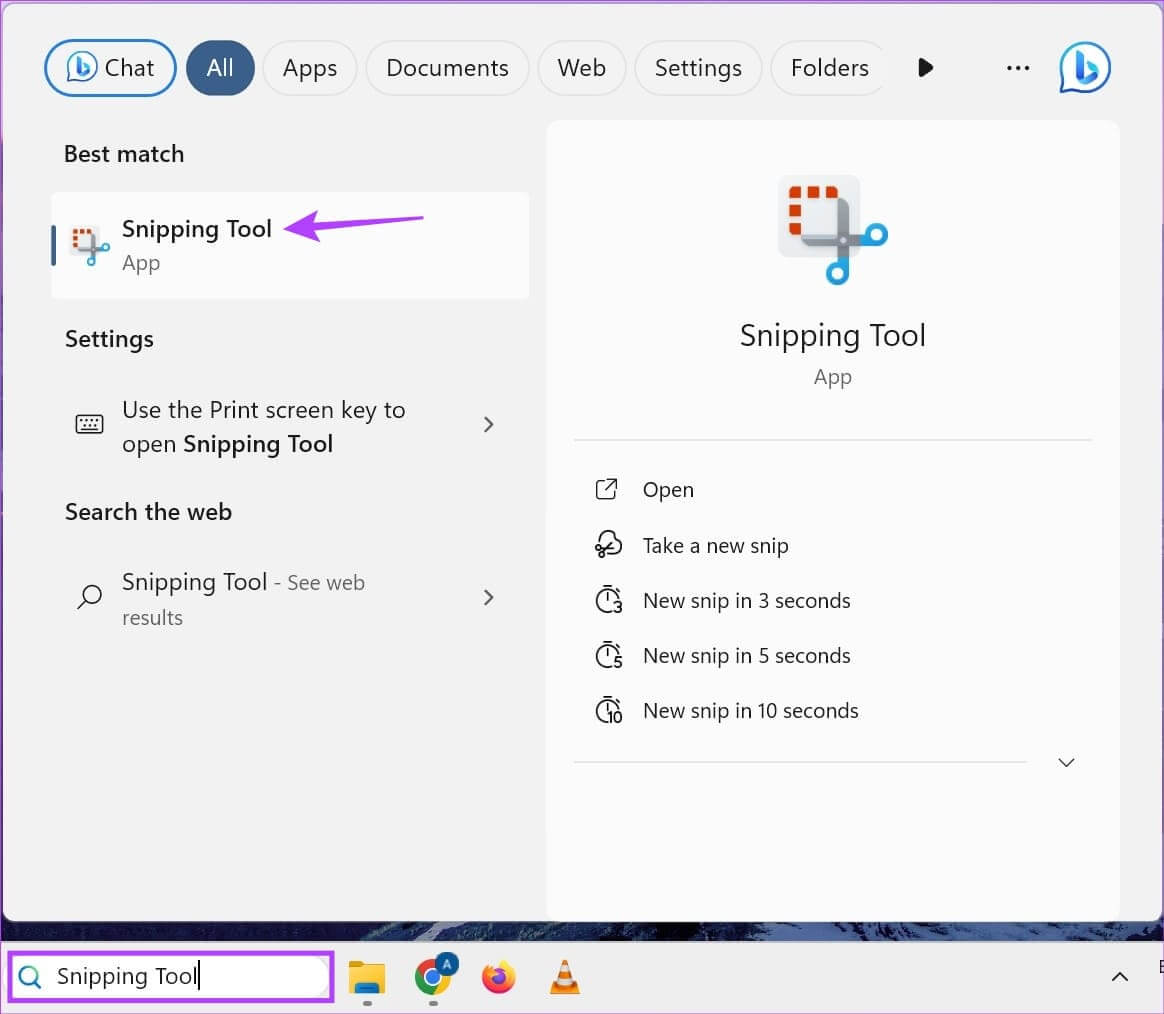
Step 1: Go to search and type Cutting ToolFrom the search results, click the Snipping Tool app.
Tip: Check out how Open Snipping Tool on Windows.
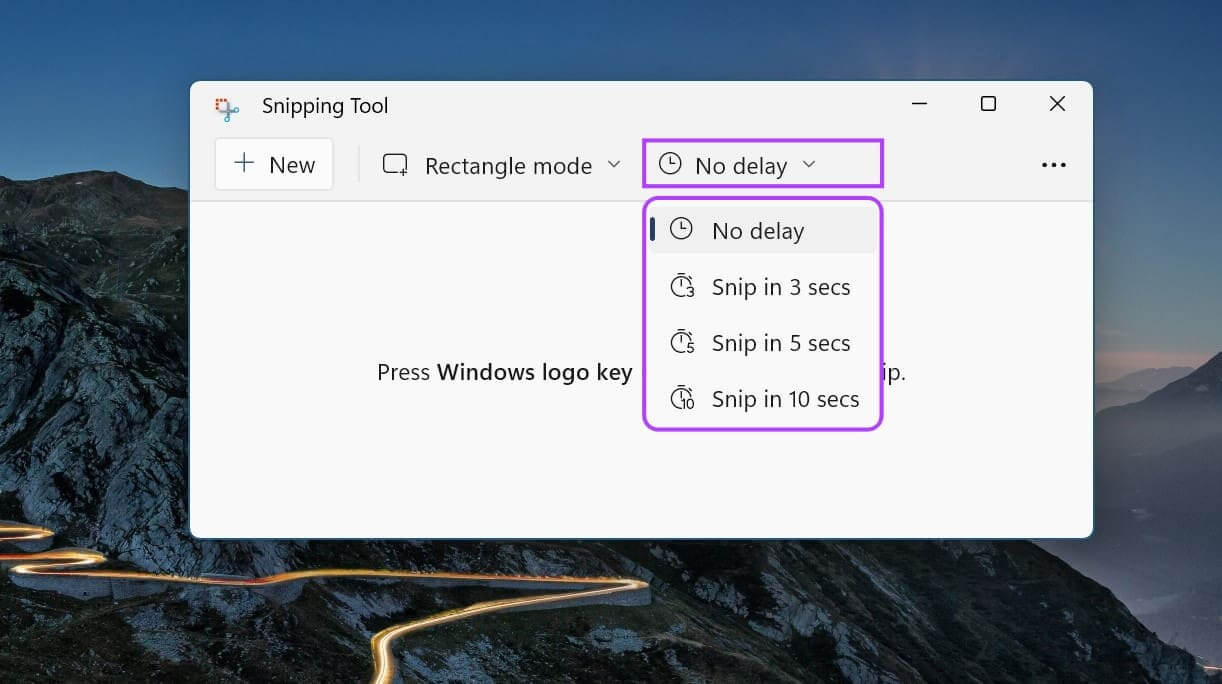
Step 2: Here, click on the option No delay.
Step 3: From the drop-down menu, select Delay time.
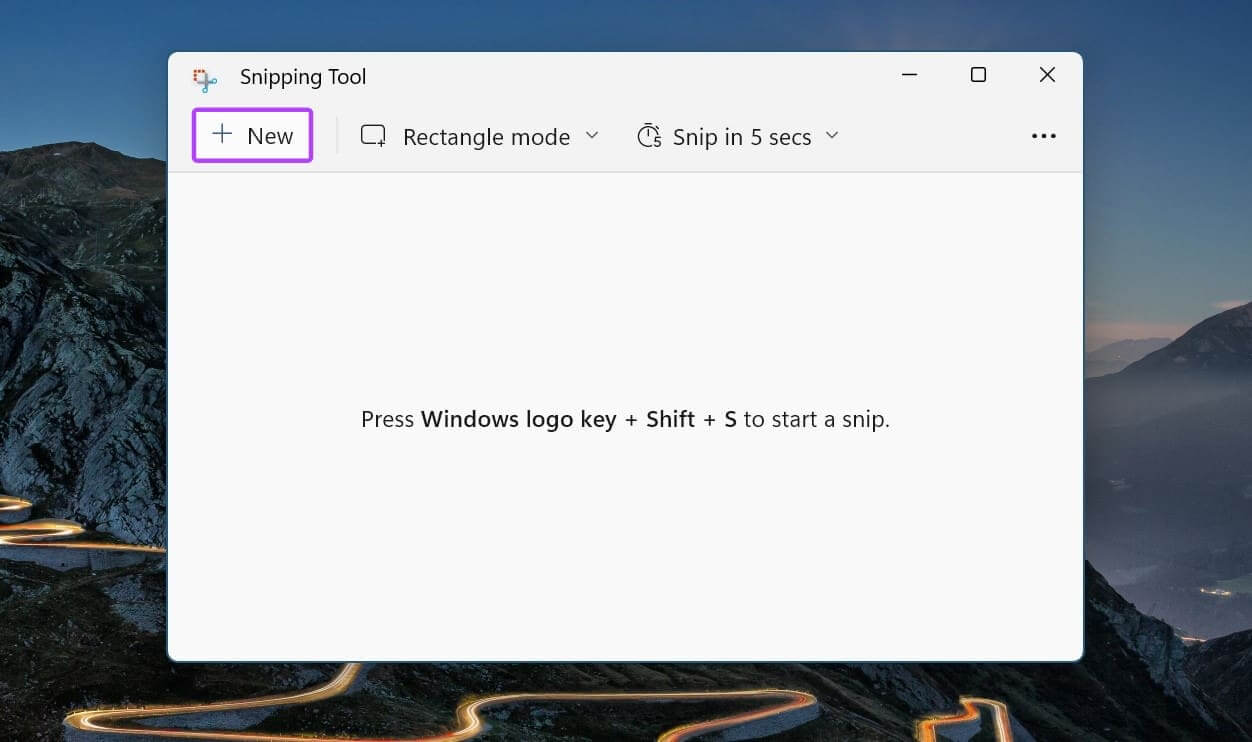
II. Take a full or partial screenshot
Step 1: Click Search And type Cutting tool. Open the app from the search results.

Step 3: From the drop-down menu, click Desired status.
Step 4: Then press new.

This will close the Snipping Tool window and open the Snipping Screen. If you want, use the Snipping Tool shortcut to take a full or cropped screenshot. Here's how.
Step 1: use Windows shortcut + Shift + S To open Cutting tool.
Step 2: Here, click on Mode. Required parts.

III. Add an outline to screenshots
Step 1: Go to search, and type Cutting Tool, and open the Snipping Tool app.

Step 3: Here, click on Settings.
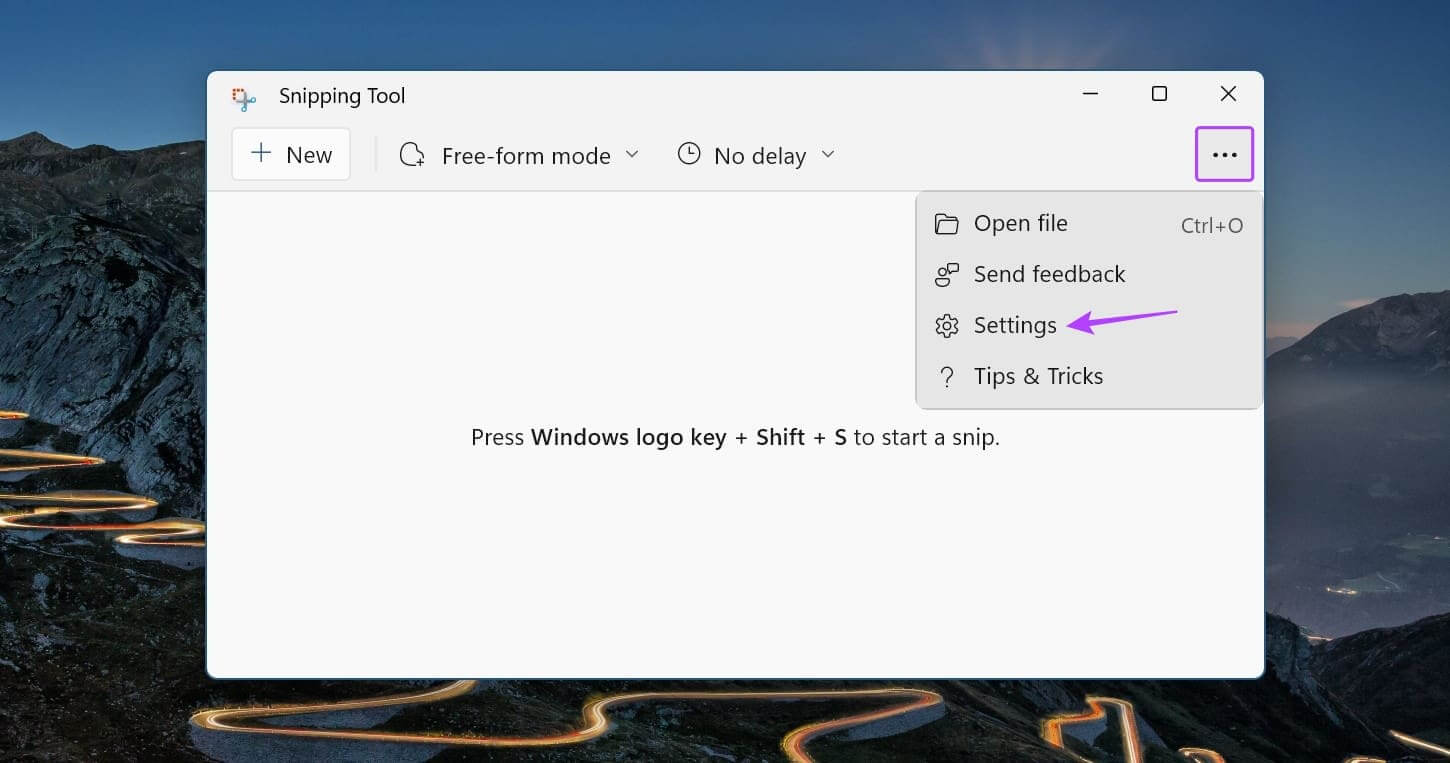
Step 4: Scroll down and turn on the Clipping Layout toggle. Then tap Arrow icon.
Step 5: Once the options appear, change the color. Detailed plan And thickness accordingly.
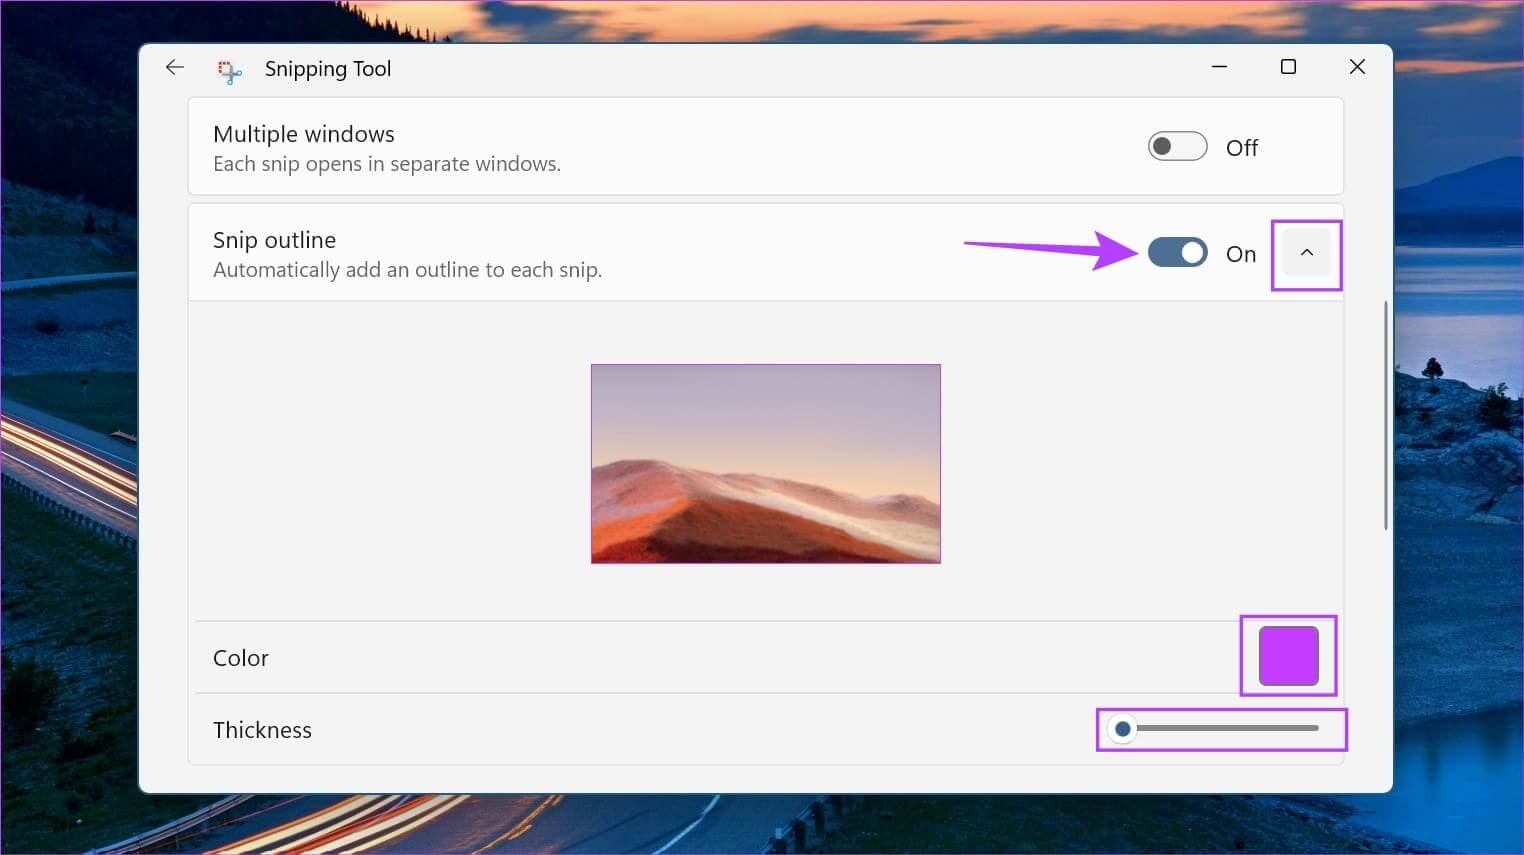
3. Take a screenshot without the Print Screen button using the Game Bar
Although the Xbox Game Bar is primarily geared toward gaming, it can also be used to take screenshots and record your screen on Windows 11. This is definitely useful when you want to take a screenshot with the cursor icon visible.
However, please note that Xbox Game Bar cannot be used to take screenshots or record your screen in File Explorer or the Windows desktop. Follow the steps below to enable and use Xbox Game Bar on Windows 11.
I. Using the screenshot option
Step 1: use Windows Key + G shortcut To open Xbox GameBar.
Step 2: First, click on the icon pin To pin the game bar to your desktop.
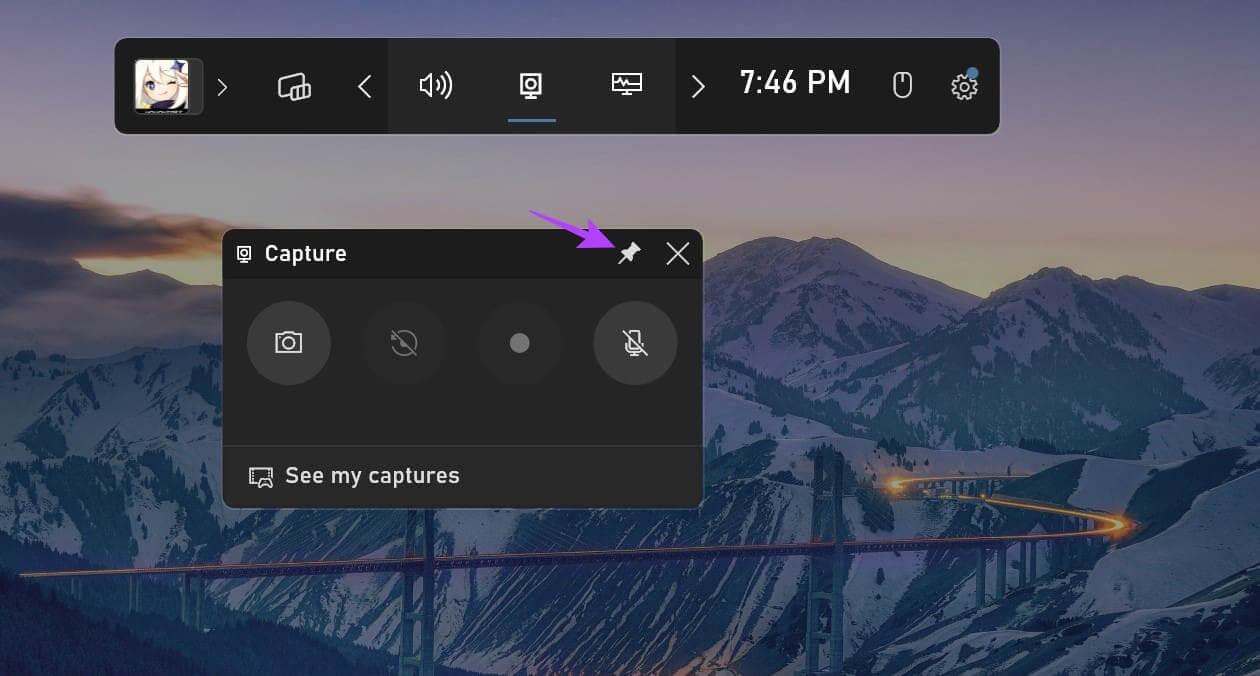
Step 4: Once you have taken the screenshot, tap “Watch my footage.”
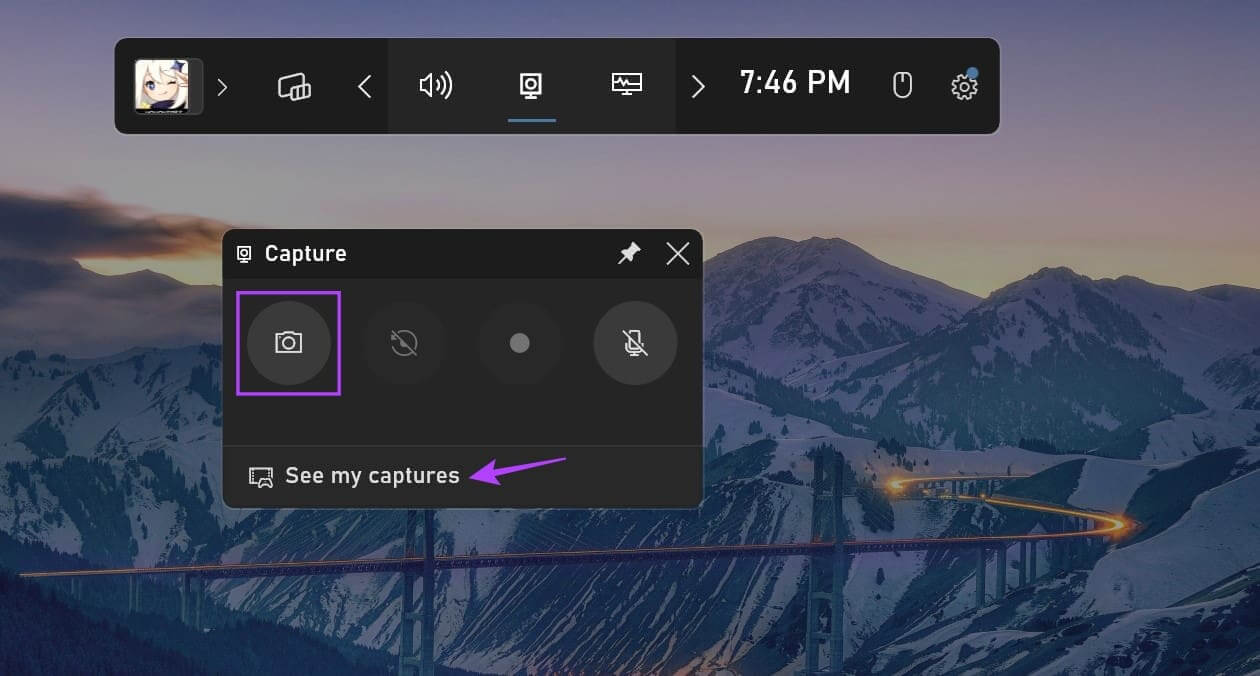
This will instantly open screenshots taken with Xbox Game Bar.
Tip: See our explanation if Xbox Game Bar not working on Windows 11.
II. Using the registration option
Step 1: Go to the window you want to screen record and use the Windows + G shortcut to open Xbox Game Bar.
Step 2: Then click on the icon pin To install it on your desktop.
Step 3: Here, click on the button Register.
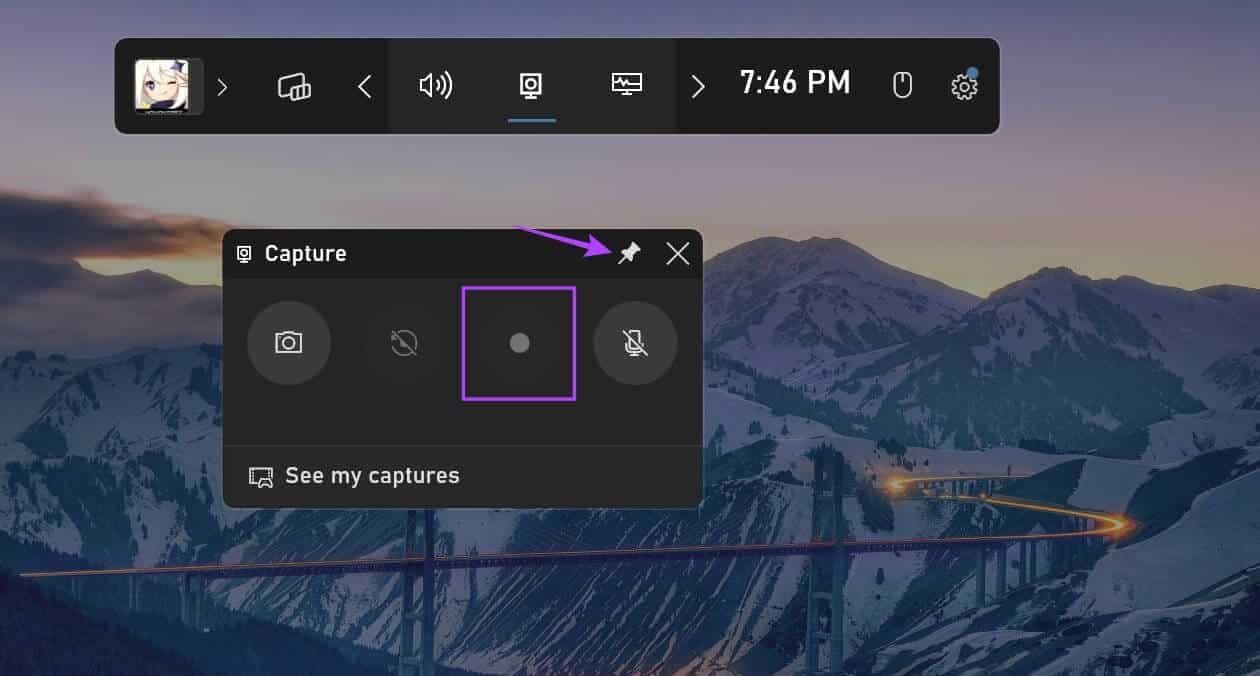
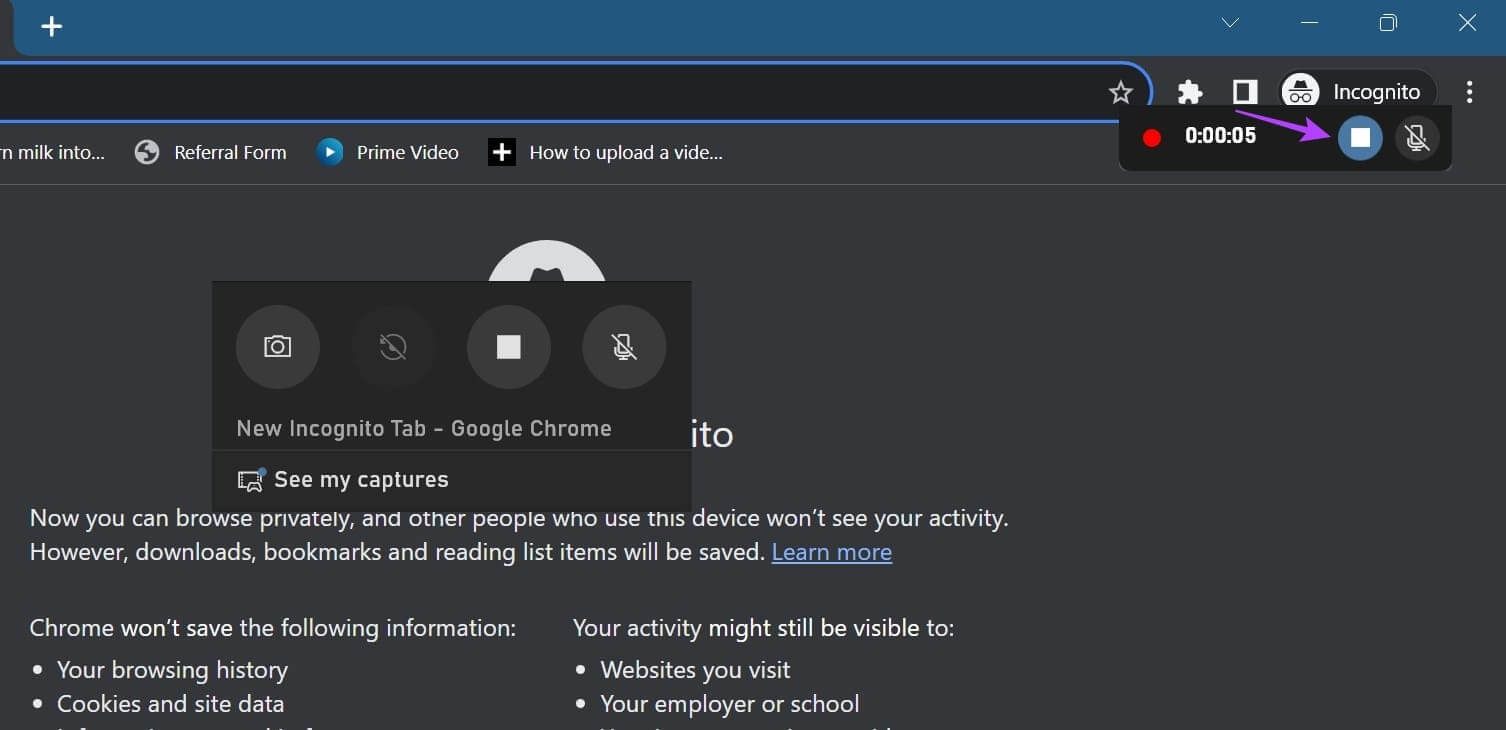
Step 5: Here, click on the option “Recording a game clip” Or “Watch my footage” In the Game Bar window.
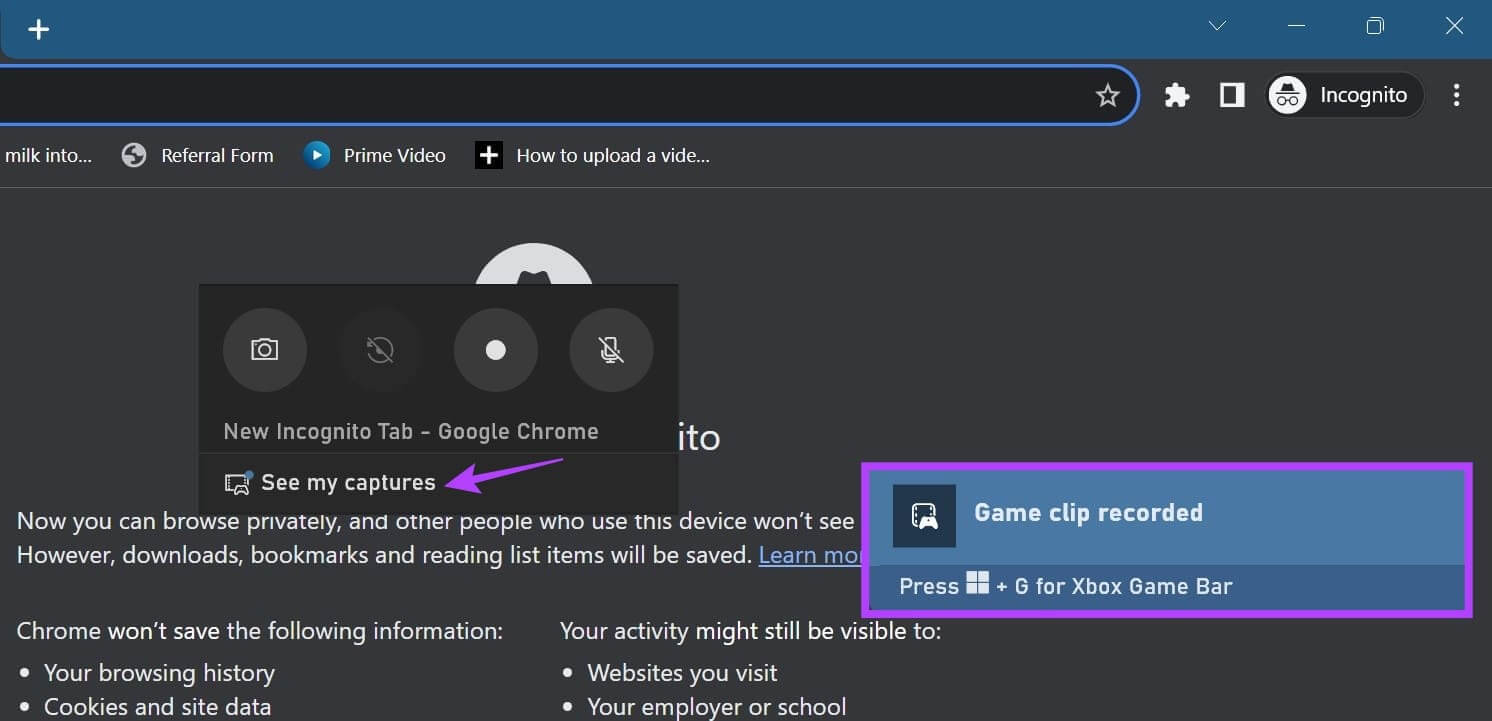
Additionally, since using Xbox Game Bar is a bit restricted when recording the screen of certain apps, you can Use other methods to record your screen on Windows 11 Without using Xbox Game Bar, follow the steps above to take a screenshot with the cursor visible.
4. Capture full-screen screenshots using Chrome, Edge, and Firefox
While you can use the methods above to take a screenshot of the currently visible area of the screen, there may be times when you want to take a screenshot of the entire page at once. This is useful when you're using a browser and want to avoid taking multiple screenshots across the page. For more details on how to do this, see our tutorial on How to take full-page screenshots on Chrome وEdge وFirefox.
common questions:
Q1. Where does Windows 11 save your screenshots?
The answer: While most screenshots are typically saved to the Screenshot folder, if you're using another program, such as Xbox Game Bar, the location may differ. You can either look in the program's settings menu or click the Screenshot location options, if they appear, to find where to save them. For more details, you can also see our explanation about Where to find screenshots in Windows 11.
Q2. Can you take screenshots in Windows 11 using third-party apps?
The answer: Yes, many can help you. Third-party screenshot apps مثل Lightshot وShareX In screen capture on Windows 11.
Your screenshot
Screenshots are a convenient way to quickly save information on your screen. We hope this article helps you understand how to take a screenshot in Windows 11. Additionally, if you feel like your screenshots are taking up too much space, consider Change the location of the screenshot folder.


