The Intel Graphics panel is an important piece of software used for checking display resolution, adjusting refresh rates, setting color settings, setting up multiple monitors, and editing power plans on Windows. Users often access the application from the right-click context menu. After the Windows 11 update, Intel Graphics started disappearing for some users. The troubleshooting tips below will help you fix Intel Graphics not showing up after the Windows 11 update.

1. Check the context menu for Windows 11
Windows 11 received a new context menu with a new user interface and rounded corners. After the Windows 11 update, Microsoft buried the Intel Graphics Settings option in the context menu. Here's how to access and use it.
Step 1: Right click Windows desktop and select Show more options.

Step 2: It will open Familiar old context menu and you will find Intel Graphics Settings on her.

If you still can't see the Intel Graphics panel in the new context menu, follow the steps below.
2. Use alternative methods
Most users choose the context menu to access the Intel Graphics Panel. However, there are alternative ways to access the app on Windows 11.
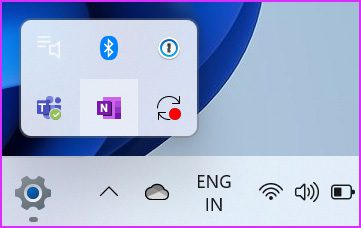
Use the taskbar
When the Intel Graphics board is running in the background, you can click up arrow symbol in Taskbar And access the application.

Find the app in the Start menu.
received Start Menu in Windows 11 A complete overhaul as well. It's now centered and comes with the same search functionality. Click on Windows key and search for Intel Graphics PanelIf you see the app in the suggestions, tap on it. Enter key to open it.


Use keyboard shortcut
You can reach Intel Graphics Board using Keyboard shortcut – Ctrl + Alt + F12 Also.
3. Reinstall INTEL graphics drivers.
Using Device Manager in Windows 11, you can easily reinstall Intel HD drives to fix the Intel Graphics not showing up issue. Follow these steps.
Step 1: Right click on Windows key and open Device Manager menu.

Step 3: Right click on it and select Uninstall the device.

The operating system will uninstall the drivers from your computer. When your computer restarts, it will install the required drivers from Windows Updates.
4. Update internal graphics drivers
Outdated Intel Graphics drivers can also cause the app to not appear in Windows 11. You can update your Intel Graphics drivers and try again.
There are two ways to update Intel graphics drivers on Windows 11. Let's show you the easy way first, and then we'll talk about updating Intel graphics drivers manually.
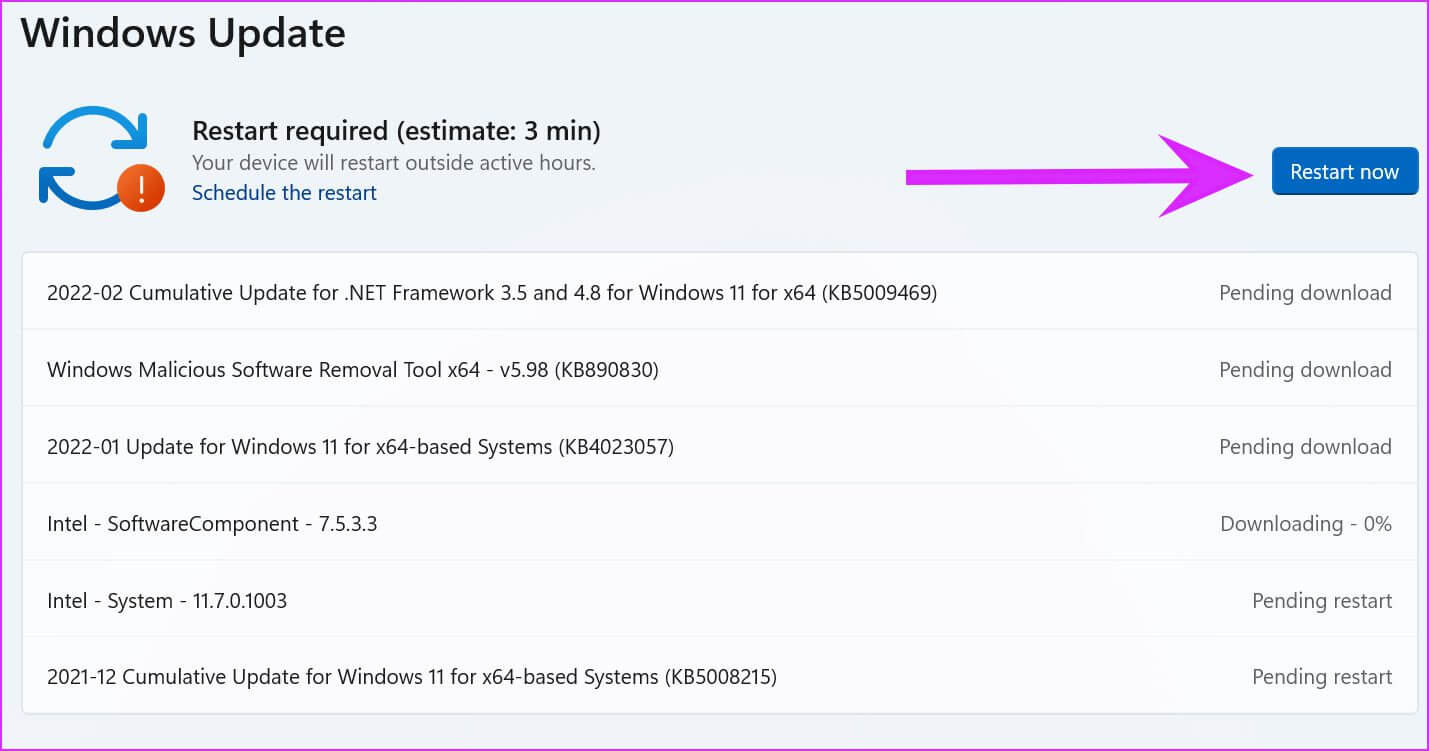
Step 1: Open Windows Settings app (use Windows + I keys).
Step 2: go to the Windows Update list.
Step 3: Go to More options and select Advanced Options.

Step 4: From the additional options, click Optional updates.

Step 5: Select and do Downloading updates Related from Intel on PC.

Restart your computer and you will see Intel Graphics Board.
5. Use the Device Manager menu
If you have already downloaded the relevant Intel Graphics drivers from the web, you can easily install them on your computer.
Step 1: Right click on Windows key and open Device Manager menu.

Step 2: Scroll down to display adapter Right click on Intel HD Graphics.

Step 3: Locate Driver Update.
You will get two options – let Windows automatically finds drivers on your computer or manually select a location to install the driver..Select the second choice To browse to the folder containing Intel HD Graphics Drivers.

Step 4: Click "review" and select file/folder The relevant one you want to install the Intel Graphics driver from. Click on Next And follow Instructions that appear on the screen.

6. Windows 11 operating system update
An Intel graphics card that isn't showing up after the Windows 11 update may be due to a buggy version released by Microsoft. You'll need to be patient and wait for the company to release a new patch.
Once Microsoft releases it, you can head over to Settings open Windows Update list to install Latest operating system.

Make changes from Intel Graphics
While you can make most system-wide changes from the Windows Settings menu, the Intel Graphics panel is useful for making video and image enhancements and other minor adjustments. The methods above will help you fix Intel Graphics not showing up after the Windows 11 update.