By default, the router has its own basic setup with a normal SSID and a weak password.
Is this enough to keep your network private?
Yes but it is not always better if you change the router SSID and password for personal use.
It's easy to create a simple password for a wireless connection. However, it's also easy for someone to guess.
Now, if you are about to change the password of your wireless router connection, you should also name it a strong SSID that cannot be guessed by someone.
If you think your SSID is visible to everyone, you can hide it.
Also, for the best security of your wireless router, you can restrict the speed. WiFi For other users or you can also hide your wireless network SSID.
After changing your router's name and password, no one will be able to easily connect to your router, and you can use it without any stress. Therefore, the system will vary for different routers. Simply follow the steps below for the routers:
Different company routers are available in the market like Netgear, Tp-Link, Digisol, Tenda, D-Link Router, etc.
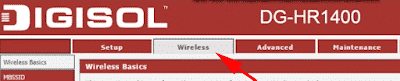
Change WiFi network name and password on Digisol Router
Step 1
First, open a web browser and enter 192.168.2.1 in the address bar, then press Enter.


Step 2
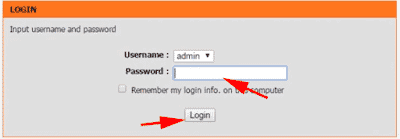
then type "adminIn both the username and password boxes, then press the button. OK.[“admin"This is the default username and password for the Digisol router.
The step 3
Then go to the option “wireless"which you will see at the top of the web page.
a step 4
Now find the Username box (SSID is the name of your router). Then type in the name you want to assign.
a step 5
Then scroll down the page and find the password field and enter the password you want to set and press apply.
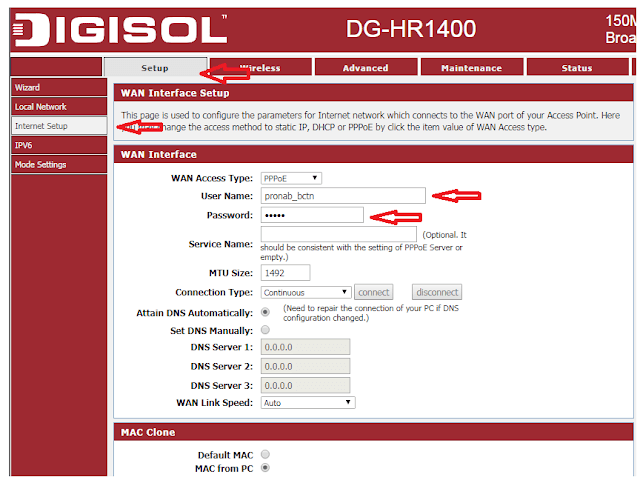
The setup will now take a few seconds, and your router will be disconnected. Now, you need to choose a new router name and enter a password to connect to that network.
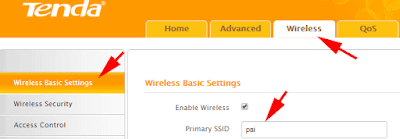
How to change Wi-Fi SSID and password on Tenda router?
Step 1
First, open your web browser and enter 192.168.0.1 in the address bar, then tap Enter.
Step 2
then type "admin"In the password box and click OK.["admin" is the default password for Tenda router]
The step 3
Now click on “wirelessFrom the top of the router page. Then go to the optionBasic Wireless Settings".
a step 4
Here you will see the primary SSID. Just type the name. SSID For your router, select what you want. Then, press the OK button. [SSID is the WiFi name]
a step 5
Then go to the option Wireless security Which you will see on the left side of the page. There, you will see a box “safety keyThen, type the password you want to set. Then, press the OK button to save the new settings.
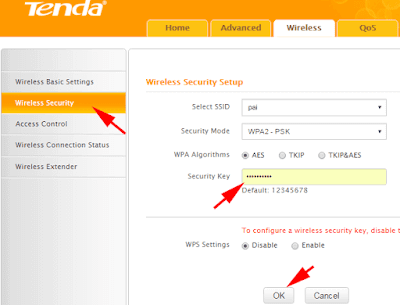
After saving the settings, your router will be disconnected and then you have to choose a new router name and give the new password to connect again.
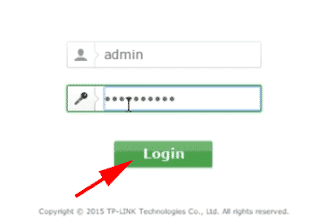
How to change WiFi network name and password on TP-Link Router?
Step 1
Go to 192.168.0.1 to open the login page.
Step 2
then type "admin“In each login box, click the OK button. [“Admin” is the default username and password for the TP-Link router.]
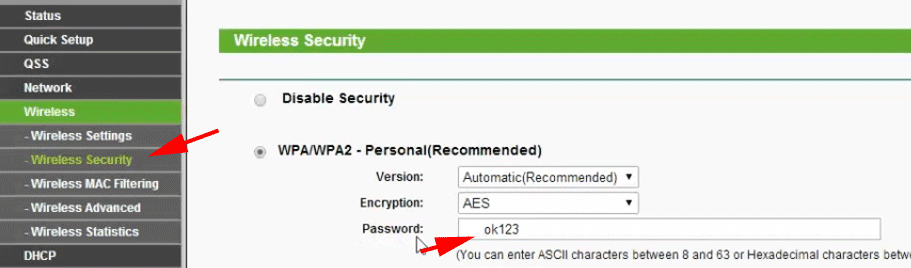
Step 3
After entering the router page, click on the “Wireless” option from the left side of the router page.
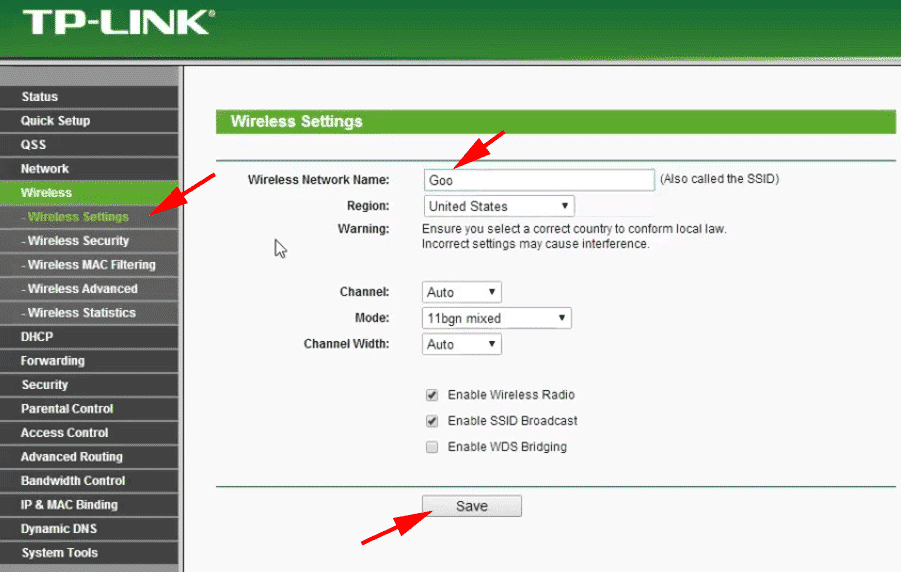
step 4
Here, you'll see the name of your wireless network. Then, type in the name of your router, and then press the Save button.
step 5
After that, click on the option “Wireless security" which you'll find on the left side. There you'll see the password box. Simply fill in your password. Then click the save button.
step 6
Then restart your router to activate your last saved settings.
After saving the settings, your router will be disconnected and then you will have to choose a new router name and put the new password to connect again.
How to change Wi-Fi name and password on D-Link Router?
Step 1
First, open your web browser and enter 192.168.1.1 in the address bar, then tap Enter To access the router's login page.
Step 2
then type "admin" in the password box and press OK. ["Admin" is the default password for the D-Link router.]
Step 3
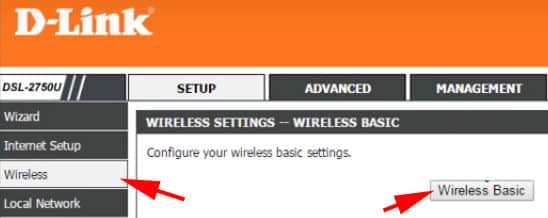
After entering the router's web page, click on Wireless which you will see on the left side of that page.
step 4
Then click on Primary Wireless.
step 5
Here you will see the name of the wireless network (SSID) and then type the name SSID For your router, do whatever you want. Then click the Apply button. [SSID is the name of the router]
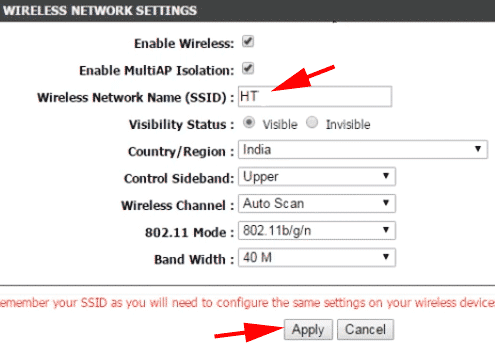
step 6
Now click on the option Advanced (Advanced Options) which you will find at the top of the web page, then click on “Security settings".
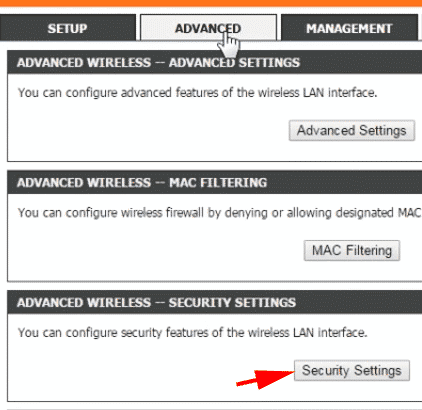
step 7
After opening the security settings page, simply scroll down and locate WEP Key1. This is the password field. Enter the new password you want to set and press the Apply button.
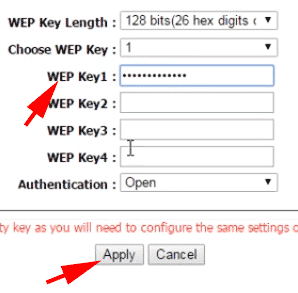
After applying the settings, your SSID name will be changed. Simply select the new name and enter the new password to reconnect.
How to change WiFi network name and password on Netgear router?
Step 1
First, go to 192.168.0.1 Or 192.168.1.1 To access the router login page.
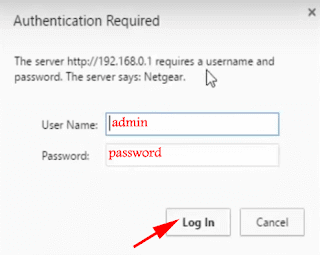
Step 2
then type "adminIn the login box, type “Password“ in the password box as well, then press the Login button. [“Admin” is the default login and “Password” is the default password for the Netgear router.]
Step 3
Then click on “Wireless Settings,” and you’ll now see the Name (SSID) option. Here, type the name of the router you want to set.
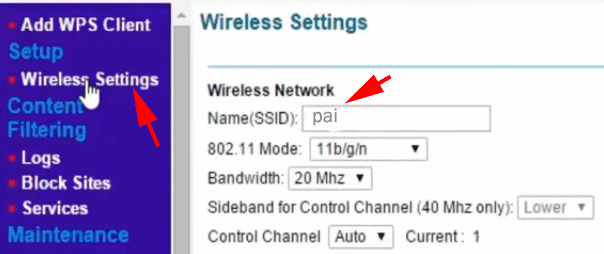
step 4
Then go to the Pre-Shared Key box, which you'll find at the bottom of this page. Now, type in the password you want to set and click the Apply button to save your settings.
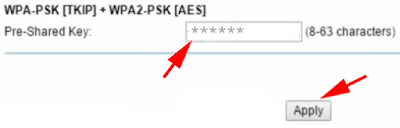
After applying the settings, your router will take a normal reboot to complete.
So, these were the simple ways to change the SSID and password of any wireless network on any router. It's also recommended to create a strong SSID so that no one can guess your router's SSID and password.