Whether you install multiple programs and applications or regularly update your Windows computer, all of these activities create temporary files to ensure a better experience. Over time, these temporary files can take up a significant portion of your storage space and slow things down. Fortunately, Windows 11 lets you delete These temporary files are stored in several different ways.

Deleting temporary files is completely safe as it doesn't affect your data in any way. You can delete these files manually using the Settings app or the Disk Cleanup utility. Alternatively, you can use Storage Sense to automate the process. In this post, we'll walk you through each of these methods in detail. So, let's get started.
1. Clear temporary files using the Settings app
gives you Settings app in Windows A complete breakdown of the various temporary files stored on your computer. It allows you to view the various temporary files and delete unwanted ones. Here's how to do it.
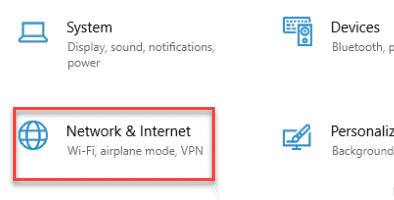
Step 1: Right click on start menu or press Windows key + X To open Quick Links List and select Settings from the list.

Step 2: in System Department , Click Storage On your right.

Step 3: Click Temporary files.

Step 4: Windows will offer you List of file types In addition to Amount of occupied storage.


Step 5: use checkboxes To determine Files you want to deleteOnce selected, you will see how much storage space the selected files are taking up at the top.

This list also includes files you've downloaded from the internet and saved in your Downloads folder. If you want to keep these files, make sure to deselect Downloads.
Step 6: Finally, tap Remove files button.

That's all there is to it. Windows will delete all temporary files and free up storage space for you.
2. Clear temporary files with Disk Cleanup
Another way to clear temporary files on Windows is via the Disk Cleanup utility. Unlike the Settings app, Disk Cleanup lets you clear temporary files on a drive and partition basis. Here's how to use it.
Step 1: Click Search code in Taskbar , And type Disk Cleanup , and select First result that appear.

Step 2: Use the drop-down menu to select the drive from which you want to clear temporary files. Then click "OK".

Step 3: Under Files to delete, use the check boxes to select Temporary files that you want to remove. You can select the file type to view its description.

Step 4: After selecting the relevant options, you will see how much total storage space these files occupy. Next, click "OK" to follow.

Step 5: When the confirmation prompt appears, click Delete files button.

Disk Cleanup will begin deleting the selected temporary files from your computer. Similarly, you can run Disk Cleanup for other drives on your computer.
3. Automatically clear temporary files using the storage feature
Although clearing temporary files is very easy, manually deleting these files every few weeks can be tedious. Fortunately, Windows 11 also lets you automate This whole process is done using Storage Sense.
Storage Sense is a tool built into Windows that manages your storage by deleting unwanted files at regular intervals. To set up Storage Sense on Windows 11, follow the steps below.
Step 1: Click Start button , and select gear icon to turn on Settings appAlternatively, you can also press the key. Windows + I shortcut To open Settings app.

Step 2: in System Department , Click Storage option.
Step 3: within Storage management Enable the switch next to storage sense.

Step 4: Next, tap Storage Sense To view Additional Settings.

Step 5: within Clean temporary files Check the box that reads Keep Windows running smoothly by automatically cleaning up system files and temporary applications.

Step 6: Next, run “Automatically clean up user content” option to configure Cleaning schedules.

Step 7: Use the drop-down menu within Run Storage Sense Choose from the available options: every day, every week, every month, or while free disk space is low.

You can also configure Storage Sense to delete files from the Recycle Bin and Downloads folder at regular intervals.

Windows will automatically launch Storage Sense based on your selected configuration and delete temporary files from your computer. Alternatively, you can launch Storage Sense manually by clicking the "Run Storage Sense now" button.

Remove junk files
Clearing temporary files is a great way to free up space on Windows. Especially for those using a small SSD, deleting temporary files on Windows 11 from time to time can help free up valuable storage space and improve performance.