Setting your computer to an accurate date and time is vital if you want to avoid any issues while browsing or using Apps on Windows 11. Normally, Windows uses the Network Time Protocol (NTP) to connect your computer to an Internet time server to synchronize its clock. But when this fails, you can use the troubleshooting tips below to fix time synchronization failure on Windows 11.

1. Check the date and time settings.
You can start by checking your Windows date and time settings to make sure they're set to update automatically. Here's how.
Step 1: Click on Windows key + I to turn on Settings appGo to. Time and Language tab and open Date and time settings.

Step 2: Enable the switches next to “Automatically set time” و “Set time zone automatically”.

Step 3: Go to Additional Settings And press Sync now.

2. Restart Windows Time Service.
The Windows Time Service is a small program that needs to run in the background to synchronize the time. Ideally, this service should start automatically when your computer boots up. However, if the service encounters an error while starting, restarting it may help.
Step 1: Click on Windows key + R To start the command, type services.msc , And press Enter.


Step 2: in window Services Locate the service Time In Windows, right-click on it and select Reboot From the menu. If the service is not running, tap Start.

Additionally, you can also configure the Windows Time service to run automatically at startup by modifying its properties.

3. Change the time server
If the problem persists, you may consider switching to a different time server to fix the time synchronization error. Note that you will need to Log in with administrative account privileges So it works.
Step 1: Click on Windows key + S To open Windows Search. Write Date and time settings In the search box, press Enter.

Step 2: Scroll down to Settings Related and click Overtime.

Step 3: Will be opened Date and Time List WindowWithin. Internet Time Tab And click Change settings.

Step 4: Use the dropdown menu next to server To determine different server And press Update now.

Check to see if the time sync error is now resolved.
4. Force time synchronization with the command prompt
If switching to a different server doesn't help, you can use Command Prompt To reset the Windows Time service configurations and force Windows to synchronize time, here's how.
Step 1: Click on Windows key + X and select Windows Terminal (admin) option from the list.

Step 2: turn on The following commands One by one.
net stop w32time w32tm /unregister w32tm /register net start w32time w32tm /resync
After running these commands, Windows should be able to synchronize the time.
5. SFC scan
If Windows is missing any important system files, such problems may arise. In such cases, running an SFC (or System File Checker) scan will help restore missing or corrupted system files with their cached versions.
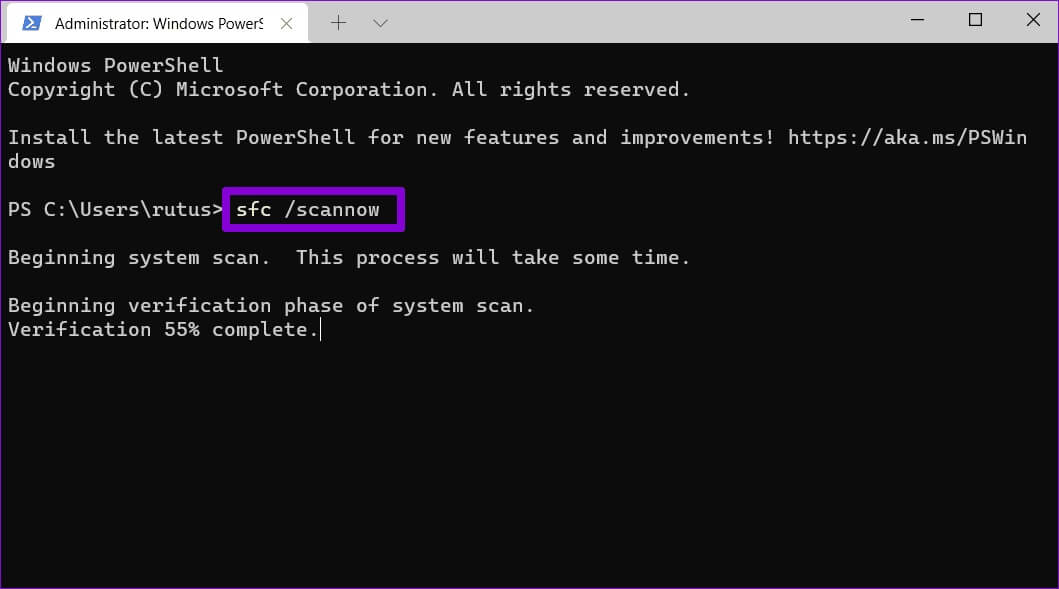
Step 1: Open start menu , And type cmd , and tap Run as administrator option To open Command Prompt With rights responsible.

Step 2: Paste the command below and press Enter.
SFC / scannow

6. TWEAK Record
Many users can fix time synchronization issues by adjusting the Windows update interval. To do the same on your computer, you'll need to apply a tweak using the Registry Editor.
Since the Registry Editor holds important settings for Windows and its system applications, you should only use this method if the ones above don't work. Also, Back up your registry files Before making any changes.
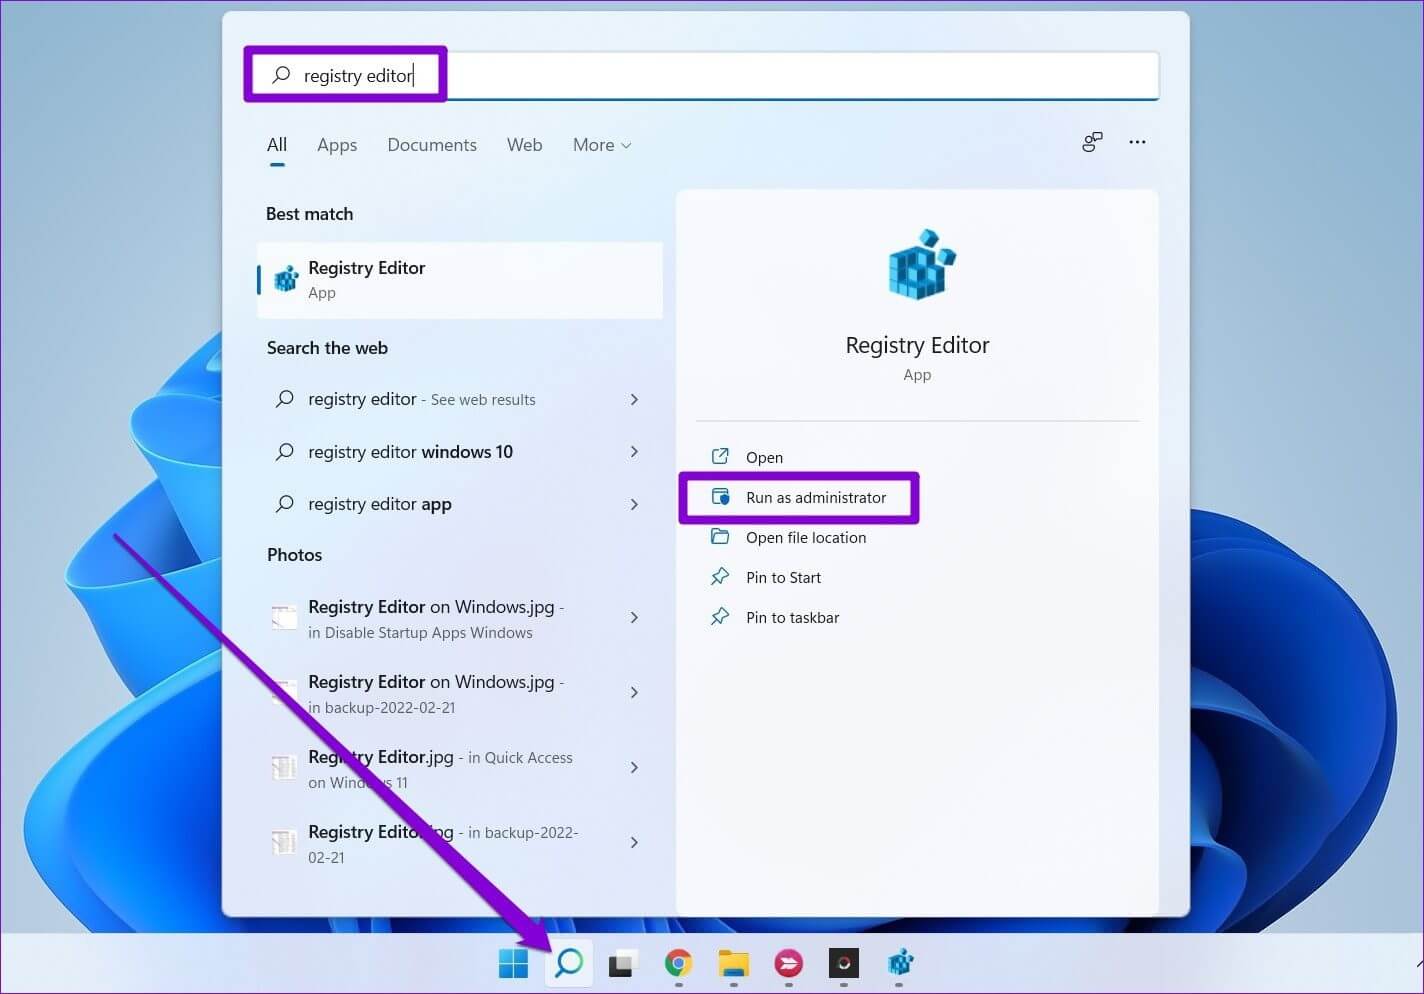
Step 1: Click on Windows key + R to start Dialog box. Write regedit And press Enter.

Step 2: in Registry Editor window Use the address bar at the top to move to the next key.
HKEY_LOCAL_MACHINE\SYSTEM\CurrentControlSet\Services\W32Time\TimeProviders\NtpClient
Step 3: Double click SpecialPollInterval key and change its value to 86400. Click on "OK" to save the changes.

Restart your computer For the changes to take effect and see if this has resolved the issue.
7. Add more time servers
Finally, if the above solutions don't work, there may be a problem with one of the servers you're using to synchronize time. You can add more time servers to Windows and try connecting to them to fix this. Read on to learn how.
Step 1: Open Window Search , And type Registry Editor , And press Enter.
Step 2: Use the right side or address bar To move to the next key. You will find Time servers The one on your right.
HKEY_LOCAL_MACHINE\SOFTWARE\Microsoft\Windows\CurrentVersion\DateTime\Servers

Step 3: Right click anywhere on the empty space , and go to New , and select String value.

Step 4: In the Value Name field, enter Server number. Since we already have two servers, we will enter the third server. In Value data field , write time.google.com And press OK.

You can create more string values to add more time servers if you like. Once added, follow the steps in
The third method above to change the time server on Windows.
always on time
These time synchronization errors can easily lead to: Connection issues with many apps On Windows. Additionally, any files or documents you create may also end up with an incorrect timestamp, leading to further problems. We hope one of the solutions above helped you fix the time sync failure issue on Windows 11 once and for all.