Janna Theme License is not validated, go to the theme options page to validate the license, you need a single license for each domain name.
Top 6 Ways to Fix Windows 11 Stuck at Restart Screen
Is your Windows 11 PC stuck on the screen when it restarts? While Windows 11 has improved a lot in terms of stability, issues like Slow boot timesRandom closure It's annoying for users. Whether corrupted system files or a recent Windows update is causing Windows to get stuck at the restart screen, this guide contains practical solutions to help fix Windows 11 stuck at the restart screen.
Step 1: Press and hold physical power button until done Turn off your computer Yours. Wait a minute or two before restarting it.
Step 2: When your computer starts to boot, press and hold power button Wait a few seconds until your computer restarts. Repeat this step to interrupt the boot process three times. The fourth time, when Windows greets you Auto-repair screen , Locate Advanced Options.
Step 3: Next, tap find the mistakes and resolve it.
Step 4: Then go to Advanced Options.
Step 5: in Advanced Options screen , Click Startup Settings.
Step 6: Click on Restart button to reach Startup Settings menu.
Step 7: finally , Press 4 or F4 On the keyboard to restart the computer Safe Mode.
After you boot your computer into Safe Mode, you can use the methods below to prevent Windows from crashing when you restart the screen.
2. Uninstall recent Windows updates
Since the issue often occurs after installing a recent Windows 11 update, uninstalling it may help. Here's how.
Step 1: Right click start menu and select Settings from the list.
Step 2: Go to Windows Update tab and select Update history.
Step 3: Scroll down to Settings Related and click Uninstall updates.
Step 4: Locate Update recently installed from the list and click on Uninstall button above.
3. Enable Secure Boot
Secure Boot is an essential security feature that allows your computer to boot only with trusted software from the original equipment manufacturer (OEM). If Secure Boot is disabled on your computer, Windows may fail to boot properly or crash when you restart your computer.
To check the Secure Boot status on Windows 11, follow the steps below.
Step 1: Right click start menu" and select "employment" from the resulting list.
Step 3: In the System Information window that opens, under System Summary , check out Secure Boot State from the right part.
If Secure Boot is enabled, you can proceed to the next method. If it isn't, follow the steps below to enable Secure Boot on Windows 11.
Step 1: Open start menu Click on the icon gear to turn on Settings app.
Step 2: In a sign System tab , Locate Recovery.
Step 3: tap on Restart button Now next to Advanced startup.
Step 4: Click find the mistakes and resolve it.
Step 5: After that, go to Advanced Options.
Step 6: in Advanced Options , select an option UEFI firmware settings.
Step 7: Click Reboot.
Your computer will then boot into the BIOS. Note that the UEFI settings screen will vary depending on the manufacturer and model of your computer.
Step 8: Go to Safe Boot Option within boot menu And press Enter to enable it.
Step 9: Finally, press F10 To save changes and exit BIOS.
try to Restart the computer Yours to see if it can boot normally.
4. Perform an SFC scan
Corrupt or missing system files can also hinder the Windows boot process andPrevent it from closingThe SFC (System File Checker) scan is a useful tool that can scan and repair these system files on its own. Here's how to use it.
Step 1: Right click on the icon start menu and select Windows Terminal (Admin) option from the resulting list.
Step 2: Type The order mentioned below And press Enter.
SFC / scannow
If there are any files worth recovering, follow the instructions to recover them and restart your computer.
5. Delete files from the program distribution folder.
Windows stores downloaded update files in the SoftwareDistrubution folder before installing them. If these files become inaccessible for some reason, you can delete them and download Windows Update again. Here's how.
Step 1: Right click start menu" and select "employment" from the resulting list.
Step 2: Type C: \ Windows \ SoftwareDistribution In the text field and press Enter.
Step 3: Locate all files In the software distribution folder and click on trash icon To delete it.
Open now Settings app Check for any new Windows updates.
6. Windows 11 Update
Finally, you can go ahead and download any pending Windows updates. If all goes well, Windows will update successfully and your computer will boot normally.
To download pending Windows updates, follow the steps below.
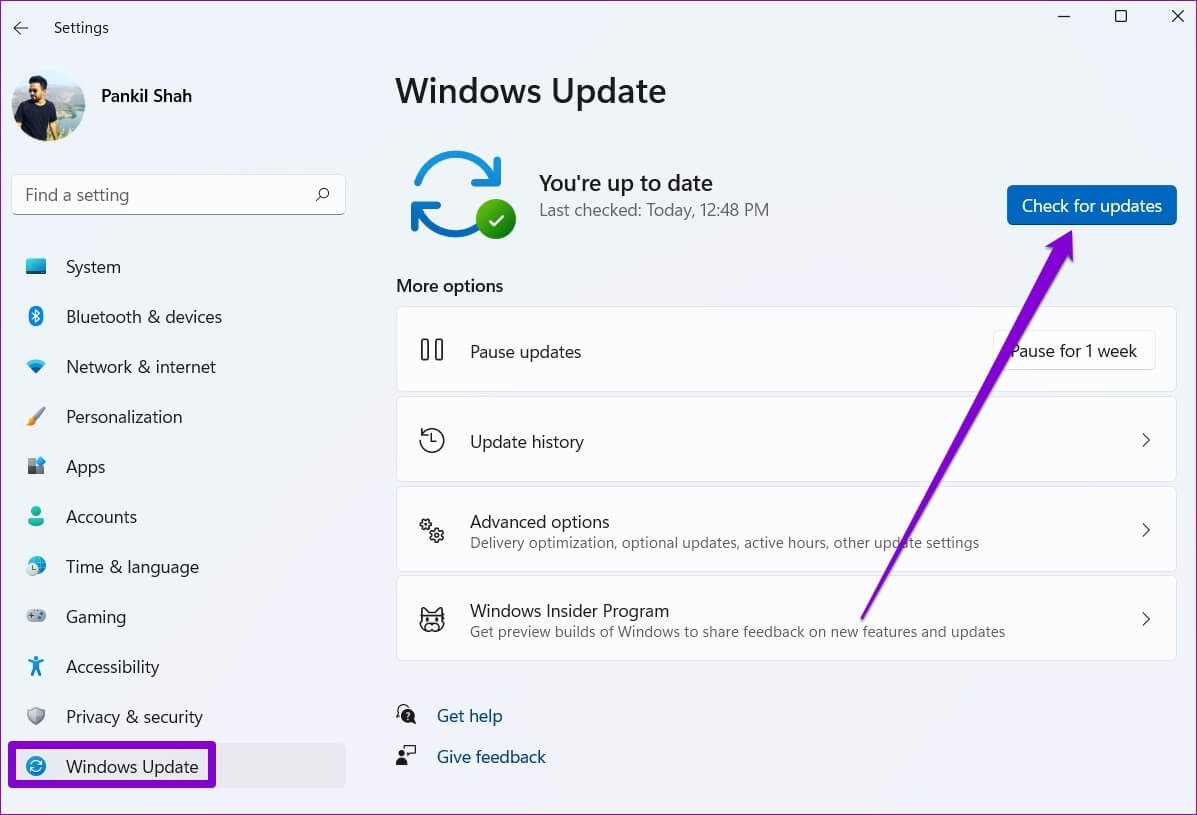
Step 1: Right click start menu and select Settings from the menu that appears.
Step 2: Go to Windows Update section And click Check for updates To download and install any pending updates.
Avoid getting into trouble
These Windows startup issues can be frustrating and prevent you from using your computer for hours. Working with the solutions above should help you fix Windows 11 stuck at the restart screen.