There's no need to dwell on the importance of a microphone on your computer. Just think of all your Skype or Zoom meetings, and you'll already realize how much of a setback a non-functional microphone can be on your Windows 11 or Windows 10 laptop. In this guide, we'll walk you through how to fix a microphone not working in Windows.

It may not be common for your microphone to not work, but several factors can cause this problem. A common culprit is not installing updates properly. It could also be a hardware issue, in which case, your technician may be your best bet to fix it.
Here we'll go through the steps to fix the microphone not working issue in Windows 11 and 10. It's best to follow all of these methods in chronological order for a systematic resolution. However, if you think your microphone is muted, skip to steps XNUMX, XNUMX, and XNUMX for a quick fix.
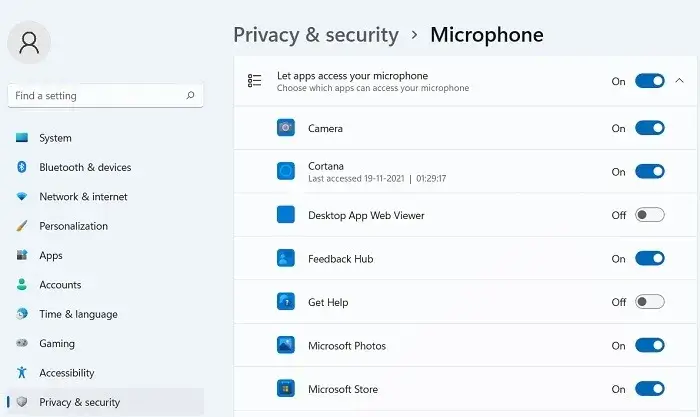
1. Check your microphone privacy settings.
In 2019, Microsoft introduced new privacy features for Windows that give you more granular control over which apps access your microphone. A side effect of this is that some apps may be blocked from using your microphone without your knowledge.
To check your Microsoft privacy settings in Windows 10 and 11, follow the steps below:
- In Windows 10, go to “Settings -> Privacy -> Microphone.” The corresponding option in Windows 11 is Settings -> Privacy & Security -> Microphone.
Alternatively, you can also perform a Start menu search to search directly for: Microphone privacy settings.
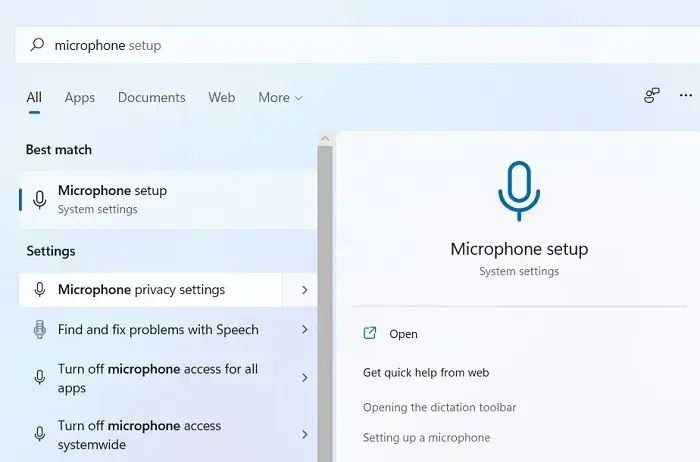
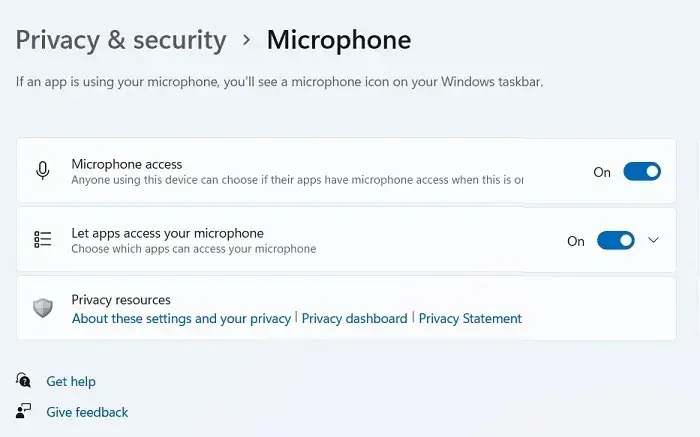
2. Click "A change" Make sure to set the slider. “Access to microphone” In Windows 11 on "employment". This will broadly mean that the microphone is now enabled on your computer.
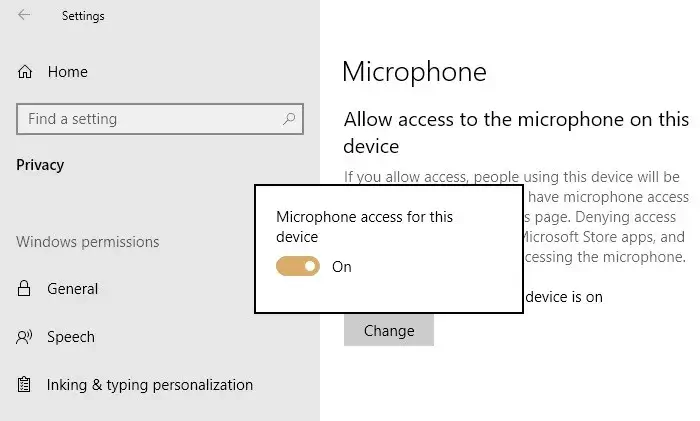
3. In Windows 10, go to “Allow access to the microphone on this device” Make sure the slider is turned on. If it appears "turning off" , click on "A change" To restart it.


4. Make sure the slider under is set to Allow apps to access your microphone on "employment"Look in the Microsoft Store app list to make sure the apps you want to use with your microphone are running.
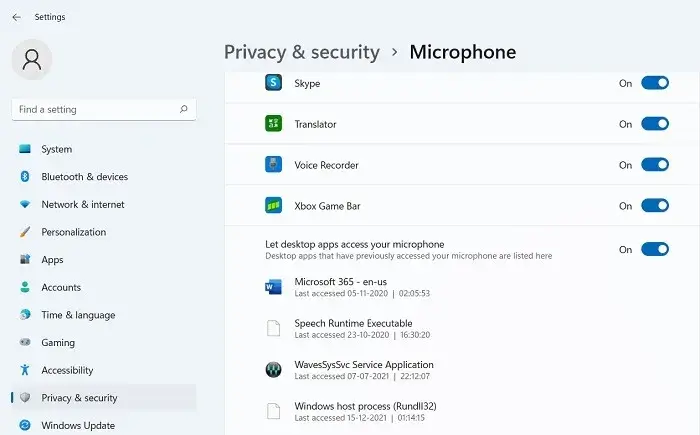
5. Of course, you probably use many apps that are not from the Microsoft Store, so to make sure they are enabled in Windows 10, scroll down further and set the slider “Allow desktop apps…” on "employment". In Windows 11, the corresponding option is “Allow desktop apps to access your microphone.” Turn the slider to "employment".
2. Check the microphone driver.
After you've finished scanning for microphone privacy issues, you should check that your microphone drivers are installed and working properly. It's highly recommended that you check your drivers, as they may be faulty or simply outdated.
If you have a newly installed version of Windows and still have an outdated microphone driver, you will likely encounter issues with no sound, recording failure, or a muted microphone.
To check the driver's status, follow these steps:
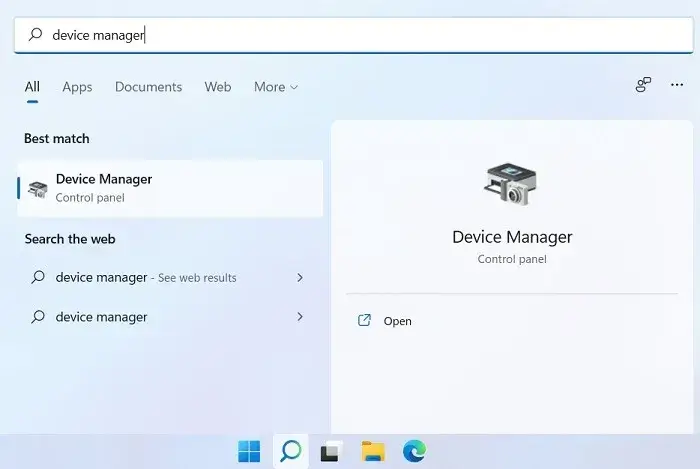
- In the list START YOUR , Look for "Device Manager"You can also search for “Devmgmt.msc” of Run command by pressing Win + R.
2. In the Device Manager window, find Audio, video and game controllers and expand it.
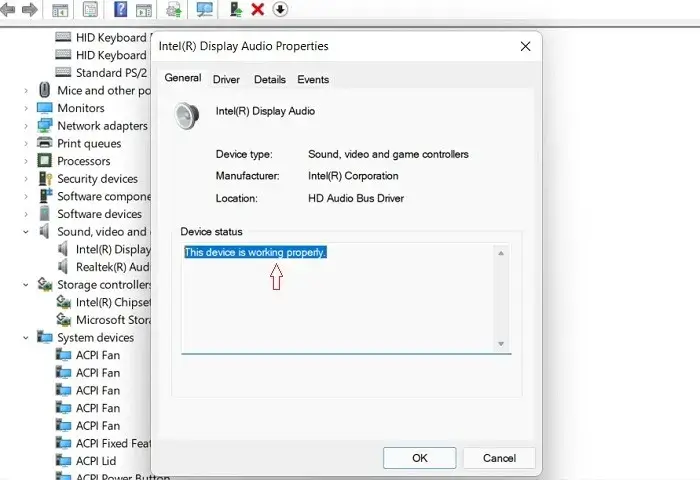
3. Once expanded, you will see your audio drivers. Note that the names of these will vary depending on the manufacturer. In my case, I have two called Intel(R) Audio Display و “Realtek High Definition Audio.”
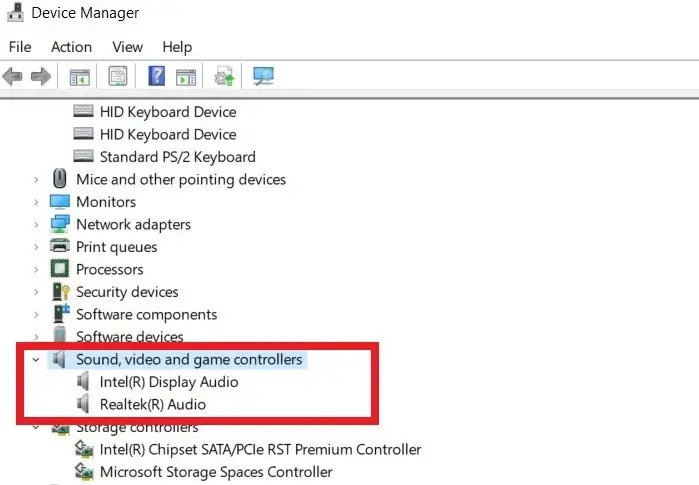
4. in Intel(R) Display Audio Right-click and select Properties. In the Properties tab, General , check that the device is working properly.
5. If it is not working properly, click on the Driver tab and select the option "Update".
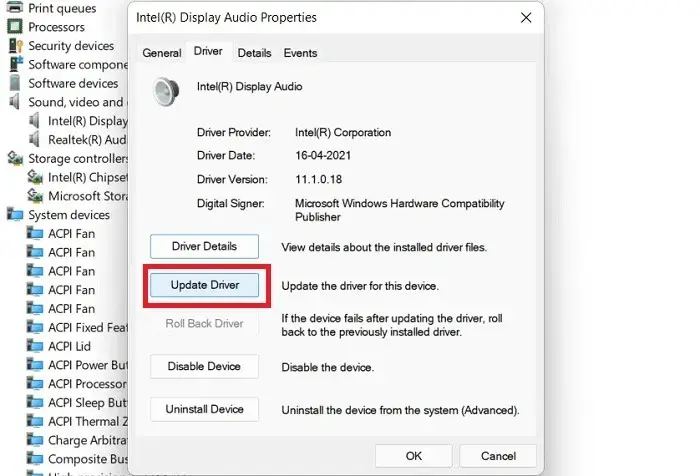
6. Repeat steps 4 and 5 for the other audio drivers.
7. Restart your computer and check if the microphone issue is fixed.
3. Disable and re-enable the microphone
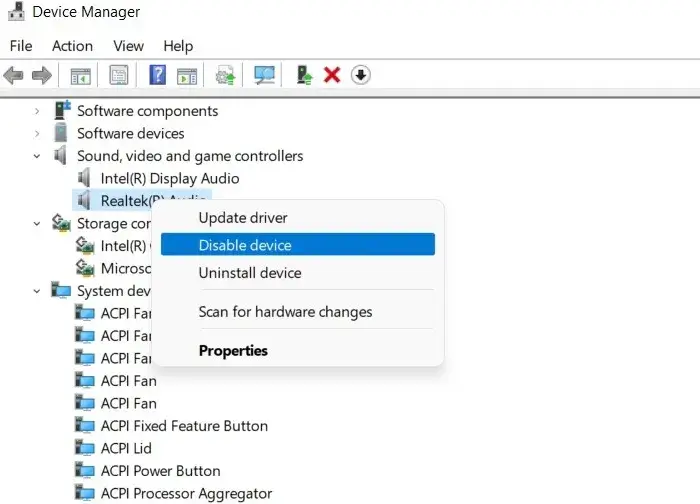
From the same Device Manager, you can try disabling and re-enabling the microphone device to troubleshoot any audio issues.
- Go to "Device Manager" By searching for it in the search list "Start" Or from the matter "employment" by typing "Devmgmt.msc".
- Go to Audio, video and game controllers Expand it to locate the microphone device you're using. Right-click to disable the device.
3. After a few seconds, right-click on the microphone device again to re-enable it.
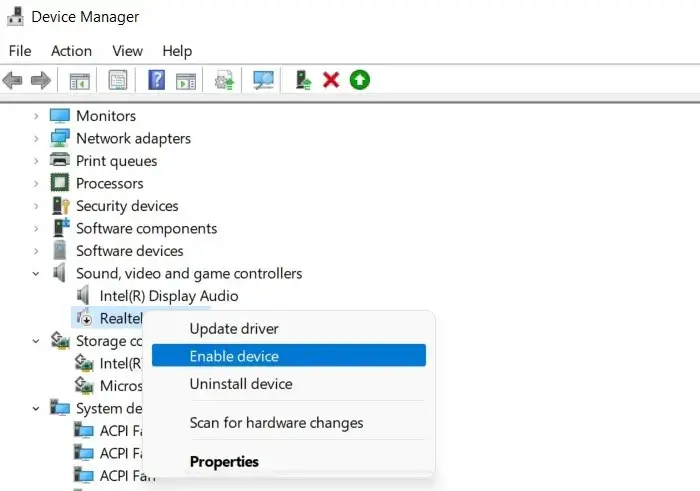
4. Repeat the procedure for all audio drivers on your device to see if the microphone not working in Windows 10/11 issue is resolved.
4. Check your sound settings.
There are a variety of audio tweaks that can ensure your Windows microphone starts working again. These include audio enhancements, full green bars, and some advanced settings.
Follow the instructions below for our Windows system:
Windows 10 operating system
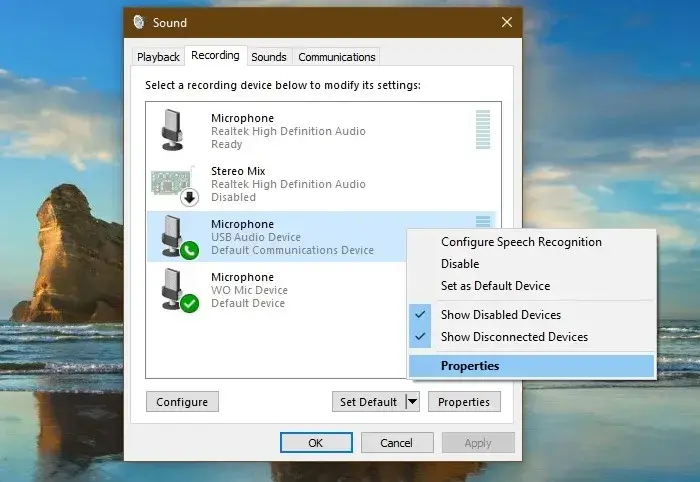
- In the Windows 10 taskbar, right-click on the sound icon in the far right corner and select the option "Voices".
![]()
2. In the tab "Registration" In the Windows 10 Sound Control Panel, click Microphone and select the option "Properties". Check if the full green bars are moving on the selected virtual microphone.
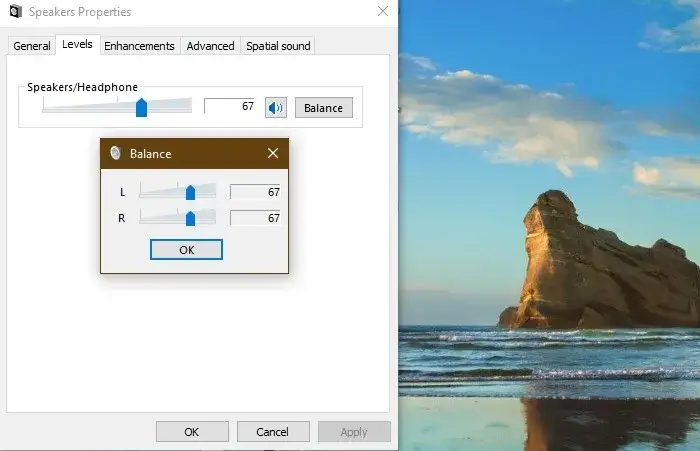
3. Select the tab Levels Increase the volume. Do the same with the speaker/headphone and "Balance it."
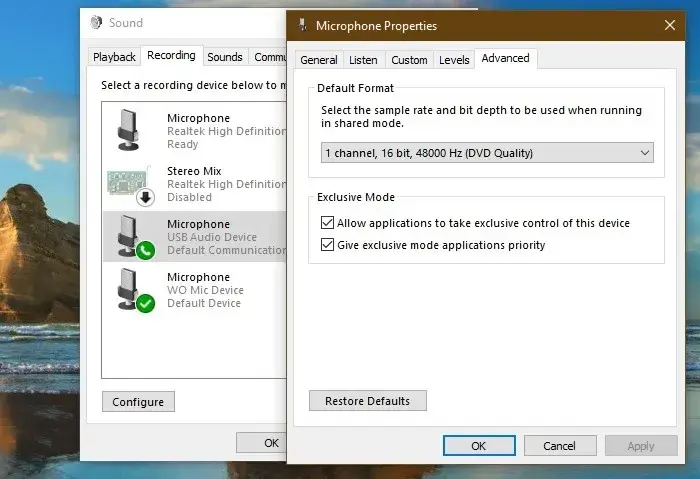
4. Go to the tab "Advanced Options" In the microphone properties, check the fields: Exclusive status , including Allow apps to take exclusive control of this device و “Prioritize exclusive mode apps.”
5. Apply these changes and click on "OK"Restart your device to see if the microphone issues are resolved.
Windows 11 operating system
- In Windows 11, right-click the speaker icon next to the sound icon in the taskbar and select “Sound settings”.

2. Once the Sound Settings page opens, scroll down to "microphone". Click it to open a new menu.

3. On the next screen, you should be able to see details of the microphone used on your device. Realtek Audio may appear as the default on your PC or laptop. If you're using a headset, it will appear as the microphone.
4. Verify that you have selected and enabled the correct device in Windows 11 to act as the default microphone. Click it once to open it. Microphone features.
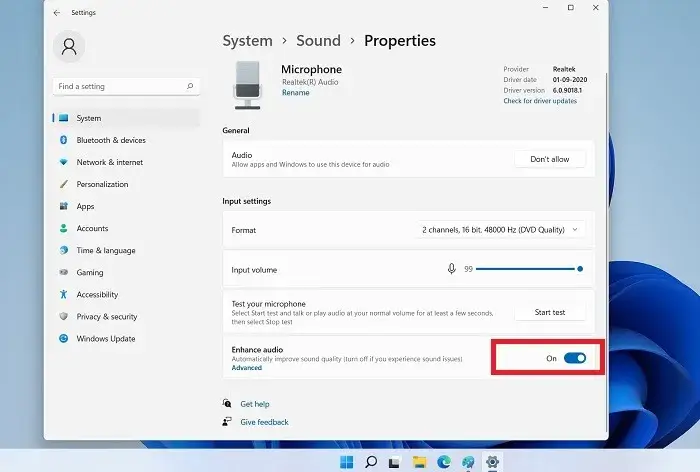
5. Go to the tab Levels In the microphone properties, check that the maximum volume levels are set.

6. Go to the tab "Advanced Options" For the same pop-up window, check that the mode is selected. Enable audio enhancements In addition to Exclusive status.
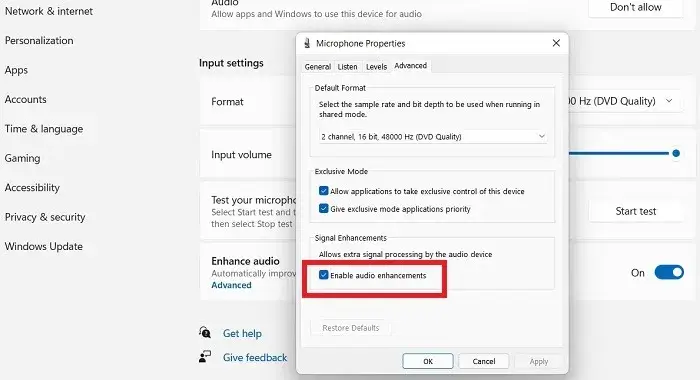
7. Click "OK" Restart your Windows 11 computer to check if the microphone issues are resolved.
5. Test your microphone
You can also test your microphone's audio levels from the Windows 11/10 sound settings. To do this, follow these steps.
- In Windows 11, go to “Sound Settings” From the search menu followed by Input Settings و Microphone test. For Windows 10, the option is "Settings" The equivalent is "the sound" followed by "Input".

2. Click "Start the test" In Windows 11, to test the volume level on the device. In Windows 10, once the icon appears Microphone test By default, just talk.
3. In both cases, the test microphone will report the available microphone volume as a percentage of the total volume. If the number is too low, it means you need to adjust the microphone volume using other techniques.

6. Audio Troubleshooter
You can troubleshoot any audio issues including your microphone by running the built-in Windows audio troubleshooter.
- In Windows 11/10, right-click the sound icon in the far right corner of the taskbar and select Troubleshoot sound issues.

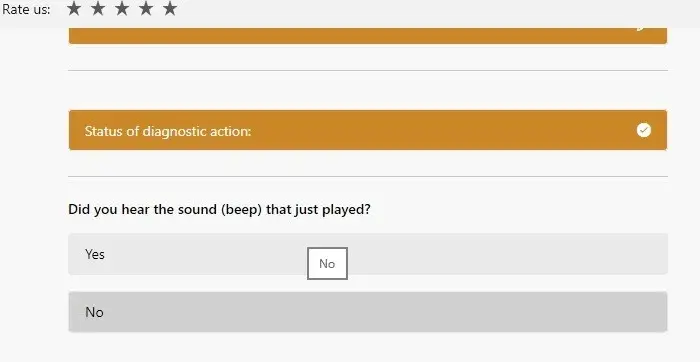
2. The computer will detect any audio errors and recommend fixes for you. You just need to read the prompts and click on the options that you think will work for you.

3. It begins with a quick scan for sound issues on your Windows device. This will run a series of random tests—for example, playing an alert sound. You need to confirm whether you can hear the sound produced by your computer.
4. The audio troubleshooter will focus on one possible cause of the sound problems on your device. It could be a missing or outdated audio driver. Take corrective actions as recommended; for example, reinstall the drivers.

Once the corrective solution is adopted, the microphone-related audio issues should be fixed.

7. Speech recognition configuration
One of the best solutions to microphone issues on your Windows 11/10 device is to reconfigure it for speech recognition. This is a practical tip if you're experiencing microphone issues during Zoom or Skype calls.
- Go to "control Board" From the search menu, go to “Ease of access” followed by speech recognition.
- Locate “Microphone setup” To ensure that your computer is working properly with speech recognition.

3. Select the type of microphone you want to use for speech recognition. If there are no external devices connected to your laptop or PC, select Desktop microphone. Click "the following" to follow.

4. Make sure the microphone is positioned correctly. It should be no more than 2 feet (0.6 meters) from your mouth and pointing directly at your head.
5. Adjust the microphone volume by reading the displayed sentences in your natural voice. This will quickly move the green bar—indicating that your microphone is good for speaking.

6. Look for a confirmation status that the microphone you are using is ready to use with your computer. Click "ending" To exit this wizard.

Frequently Asked Questions
Q1. How do I reset my microphone in Windows 11/10?
answer. To reset your microphone in Windows 11/10, you need to set it as the default device. First, set up your microphone for speech recognition using a simple wizard, which can be done from “Ease of access” in "control Board" (See above).
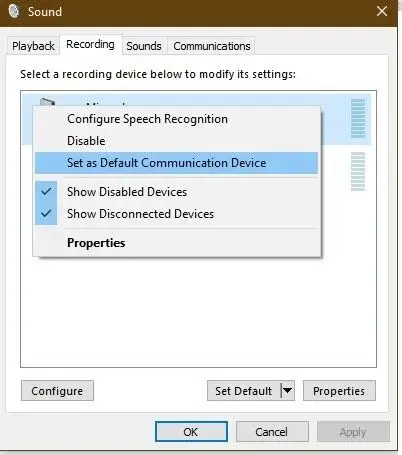
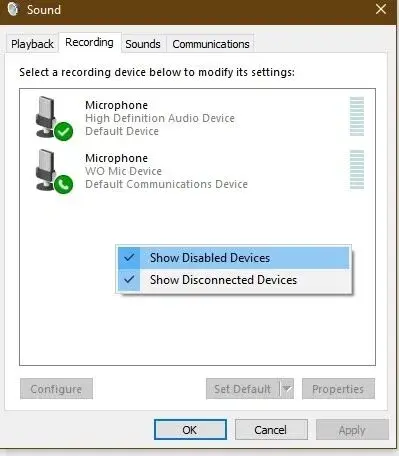
Next, go to the far right corner of the taskbar and find the menu. "Voices"Here in the tab "Recordings" You need to enable the intended microphone as the default speaker.
Q2. Why is my Windows microphone not showing up in Device Manager?
answer. Sometimes the microphone device doesn't appear to be visible in Device Manager. This can be resolved by going to “Sound Control Panel” of "Sounds" In the sound icon on the taskbar. Here, under the tab "Register" , You should see all available microphones. Right-click to view disabled microphones on your Windows device. You'll need to re-enable them.
For more Windows fixes, check out our guide on: How to fix windows not going to sleep وFix the latest Windows 10 update issues.