You may need to share your computer with multiple people for various reasons. Windows 10 offers and manages all file permissions at the system level. It keeps your data protected from other users. On a Windows 10 computer, files created by other users are accessible by default. You can change file permissions in Windows 10; if you are an administrator, this will restrict other users to editing only their files. File permissions can be changed easily. In this article, we provide you with a useful guide that will teach you how to change file permissions in Windows 10.

How to Change File Permissions in Windows 10
in Windows 10 You may encounter file permissions issue in the following scenarios:
- When other users set permissions for files that you are not allowed to view on a shared computer.
- You want to change system files although editing system files is not recommended because it results in unexpected problems.
- Protected data that you have downloaded from USB or external that you want to change on your computer.
- Want to make changes to files transferred from other operating systems such as macOS?
- You want to remove other users' permission to prevent them from viewing certain shared files.
Are file permissions and file properties different?
It is important to understand the difference between file permission and attributes before learning how to change file permissions in Windows 10.
- File attributes – These are the properties of the file. For example, whether it is read-only or not. The attributes remain the same even if Copy the file Or upload, download, or email it. Typically, themes don't require administrator rights to edit.
- File permissions – They are usually computer-specific, meaning the permissions may change if the file is opened on another computer. They control who can access the files and their content.
Things to take into account
Before we can get into how to change Windows 10 permissions, you need to know what level of user rights you need to change file permissions in Windows 10.
- System files and folders: You need administrator user rights to change file permissions.
- User files: You are requesting administrator privileges or user account credentials on Windows.
- Files owned by TrustedInstaller: To make changes to a file or folder controlled by TrustedInstaller, administrative user rights are required.
Method 1: Edit the user profile in the folder security properties
This method applies to all users. Generally, dealing with files and folders you own is not a problem. However, some people have reported being unable to change files they own or that they created. After logging in with the correct user account, follow these steps to modify file permissions on Windows 10.
1. Open File Explorer by pressing Win + E keys At the same time.
2. Navigate to the file whose permissions you want to change.
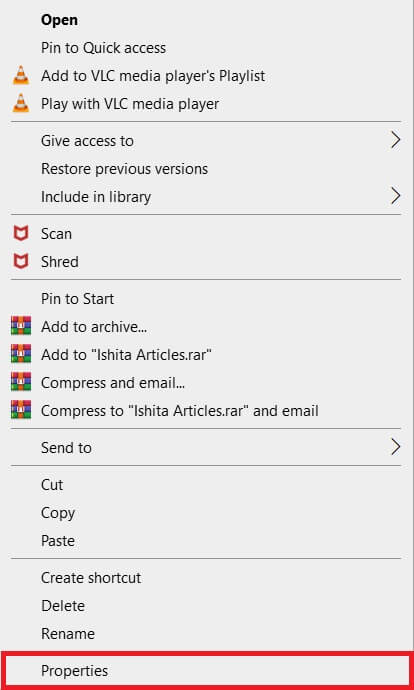
3. Right-click on it and select "Characteristics" from the context menu.
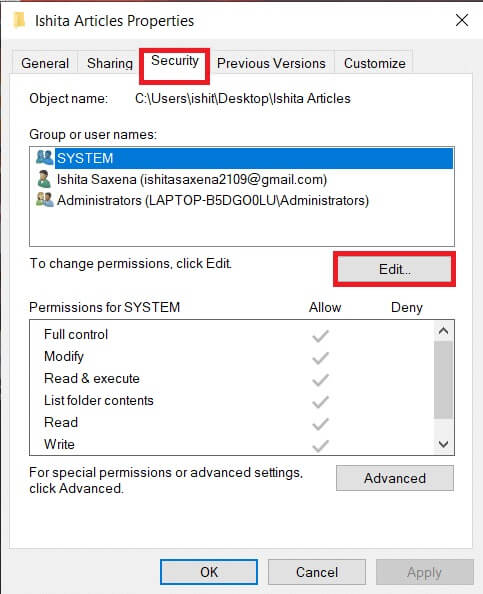
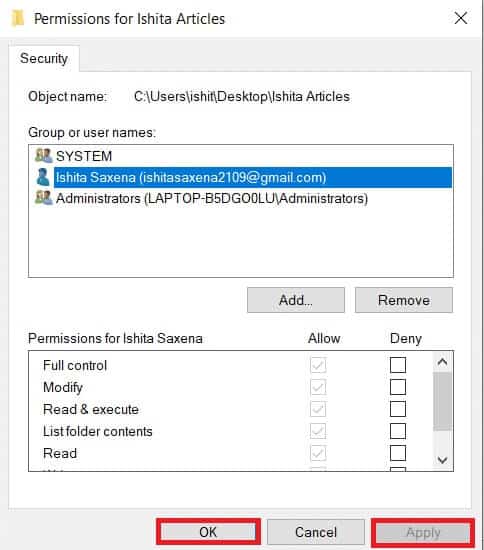
4. Switch to the tab "safety" And click "Release".
You can check and modify permissions for each user or group listed in the next window.
5. Select a user or group.
6. Each user may have different permissions. For example, if the Full Control check box is selected under the Deny column, the specified user will not be able to open the file.
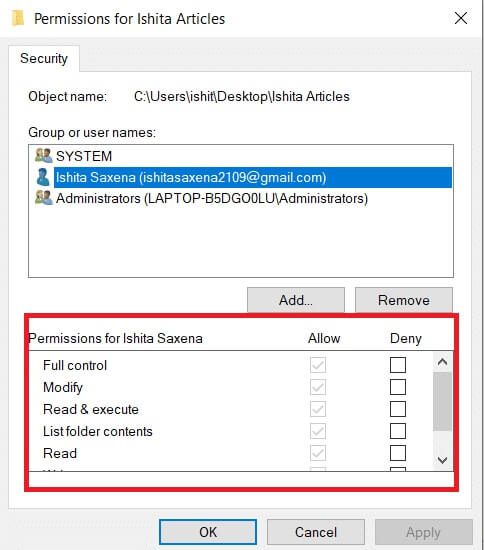
7. You will see the following options:
- Full control – The user can read, write, change, or delete the file.
- amendment - The user can read, write, and change the file.
- Read and execute – The selected file can be read or played.
- Contents of the menu folder – The file can be viewed in the selected folder.
- reading - The file can be opened by the user.
- Writing - The file can be edited or created by the user.
Check the permission boxes as per your requirements. Click Apply > OK.
Method 2: Replace all sub-object permission entries
In some cases, permissions can't be changed. Permissions under the "Allow" column are grayed out and can't be selected. You can change this by going to Advanced Settings. Here's how.
1. Follow Steps 1, 2, and 3 From the first way to open Folder properties.
2. Go to Security tab And click "Advanced Options".
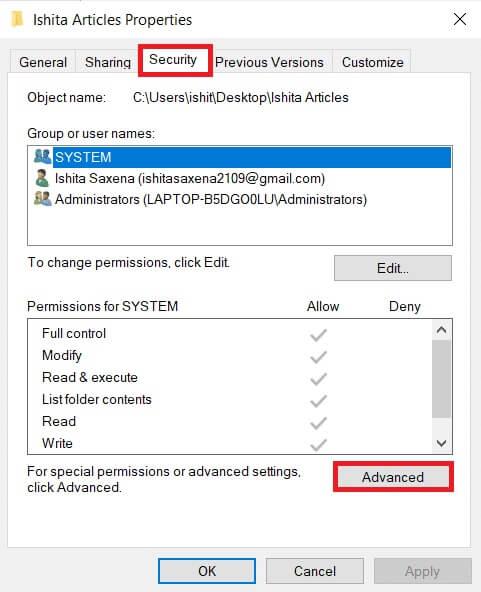
3. Check the box that says, Replace all child object permission entries with inheritable permission entries from this object and select Your user account.
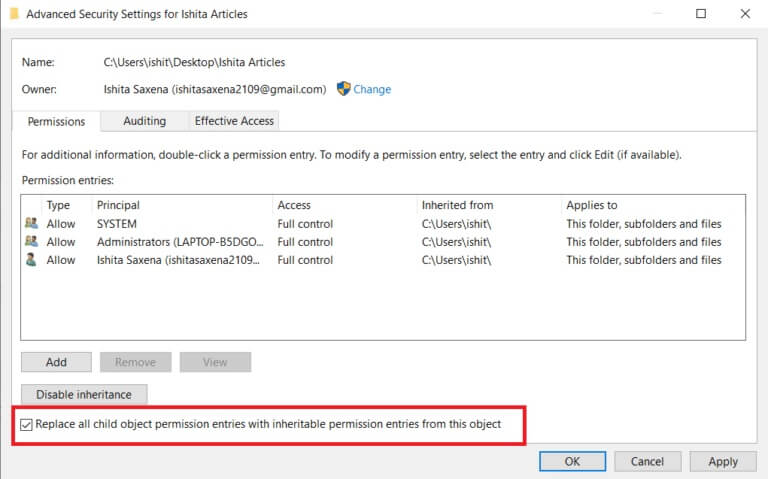
4. Click Application. After that a confirmation prompt will appear, click on Yeah.
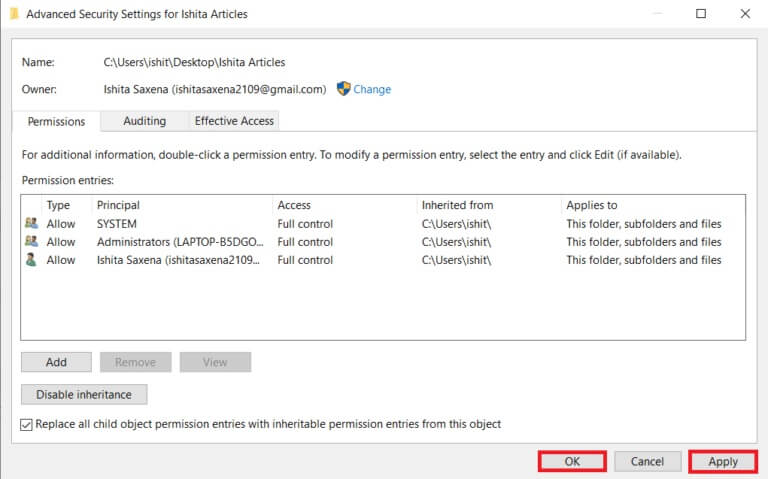
You should be able to view and change the permissions of a selected folder or file and understand how to change file permissions in Windows 10.
Method 3: Add a new administrator profile
Sometimes a user isn't listed at all in the Users or Groups box. In this scenario, you must manually add the user before you can grant them permissions. Otherwise, they won't be able to access the files because they aren't in the user list. Follow these steps to add a user and grant them file permissions.
1. Right click on folder/file which you want to share and select "Characteristics" from the list.

2. Switch to the tab "safety" and select "Release".
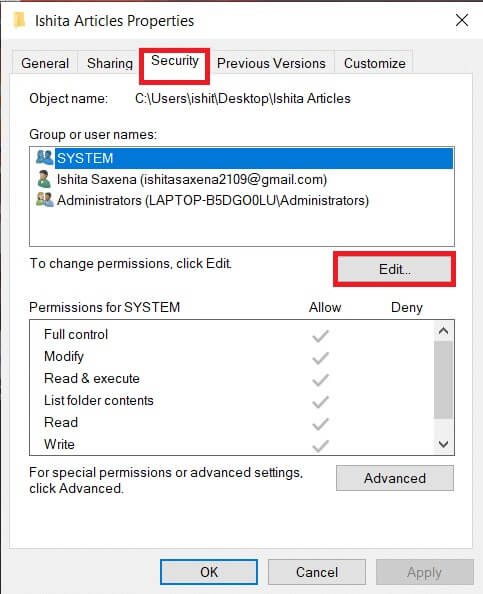
3. Click addition.
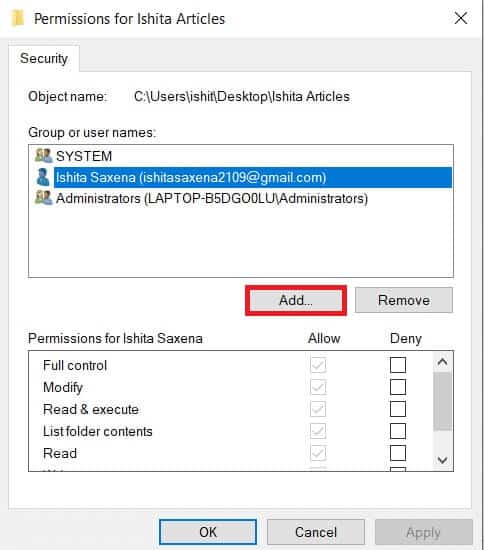
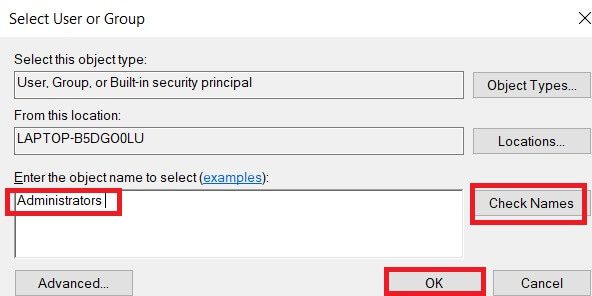
4. In the Enter the name of the object to select box in the prompt window, type the name of the user you want to grant access to. Click Name verificationIt will automatically detect and verify the username. Click on OK.
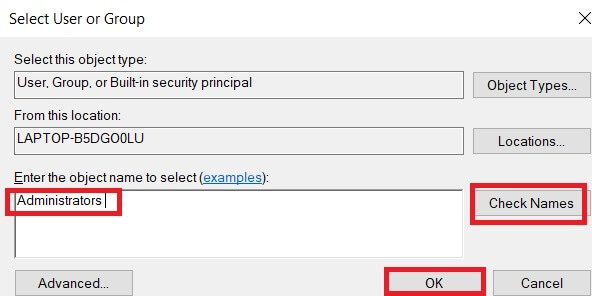
5. The username will now appear in the Security tab under Group or user names.
6. Select User name And grant it permission as preferred. Click on Apply > OK.
Method 4: Change ownership to administrator
You can easily change a file's permissions by taking ownership. It's the simplest way to modify a file. Follow the instructions below to gain full control of a file by taking ownership.
Option 1: Change ownership from advanced security settings
1. Follow Steps 1 and 2 From the second way to move to Advanced Security Settings.
2. Click "A change" Next to the owner section at the top of the page.
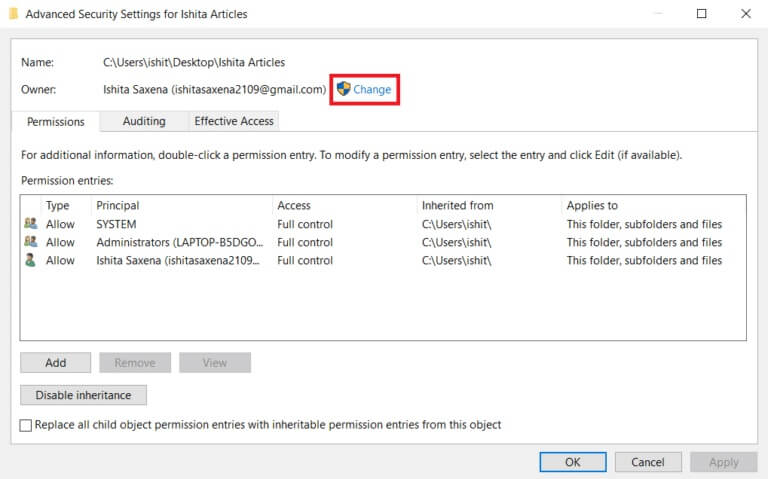
3. A pop-up window will appear. Enter your username in the Enter the name of the object to be selected box. Select Name verification Wait for it to be verified. Click on "OK" to save the changes.

4. It will be Update the owner section Now. To save your changes, select Replace owner on subcontainers and objects , then tap Apply and agree.
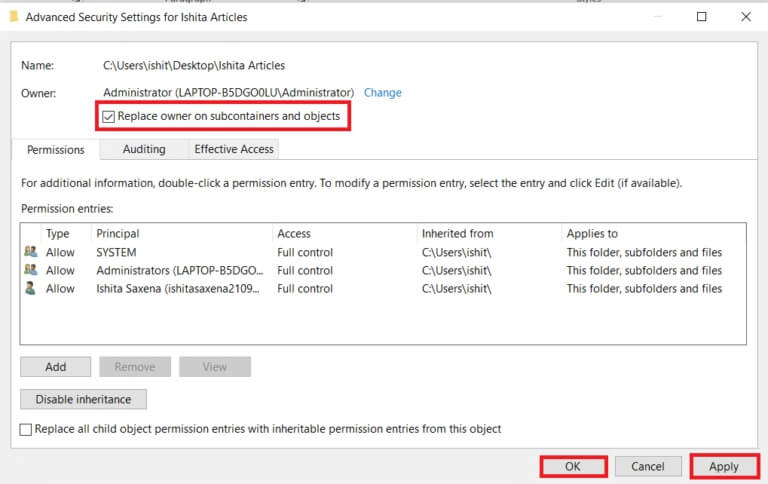
Note: You can select the “Replace all sub-object permission entries” option as some experts advise.
Option 2: Manually grant file permissions
In rare cases, you may be asked to manually grant file permissions to your account. To do this, simply follow these steps:
1. Go to Advanced Security Settings.
2. There will be a list of all the listed users. Click the button. "addition" If your user account is not displayed.
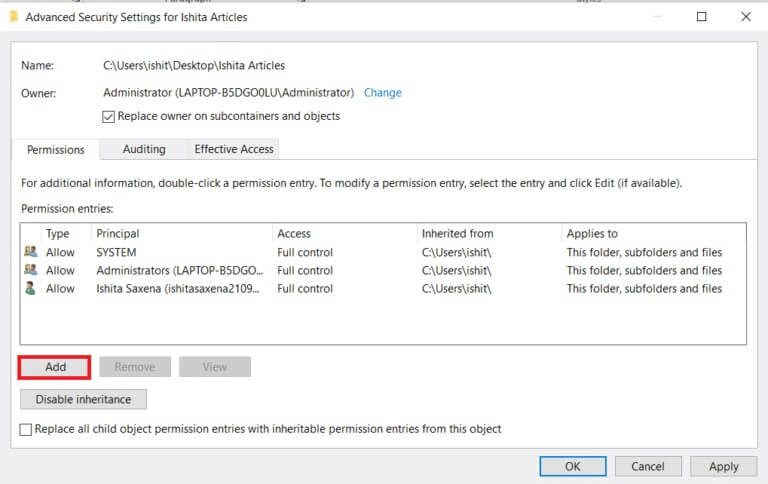
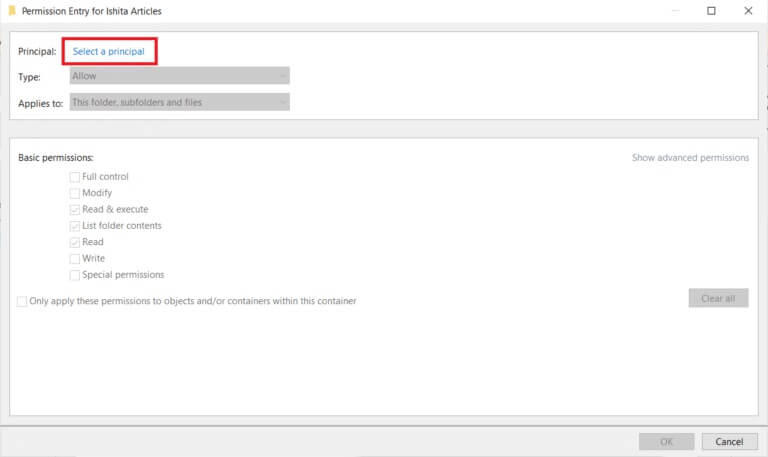
3. Click Main definition.
4. Now put your user account name in the prompt box as shown in Step 3 From the fourth method.
5. Select Full control over the type. , Locate Allow و In Applies To select this folder, subfolders, and files, click OK.
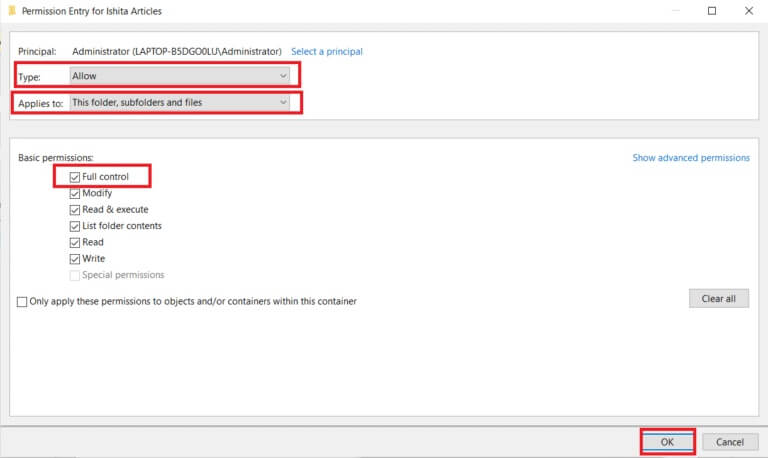
Now you have full access to the selected file.
Option 3: Through the command prompt
If you still can't take ownership of the file, you can use the Command Prompt, which will directly modify the file properties. Here's how to change file permissions in Windows 10 using the Command Prompt.
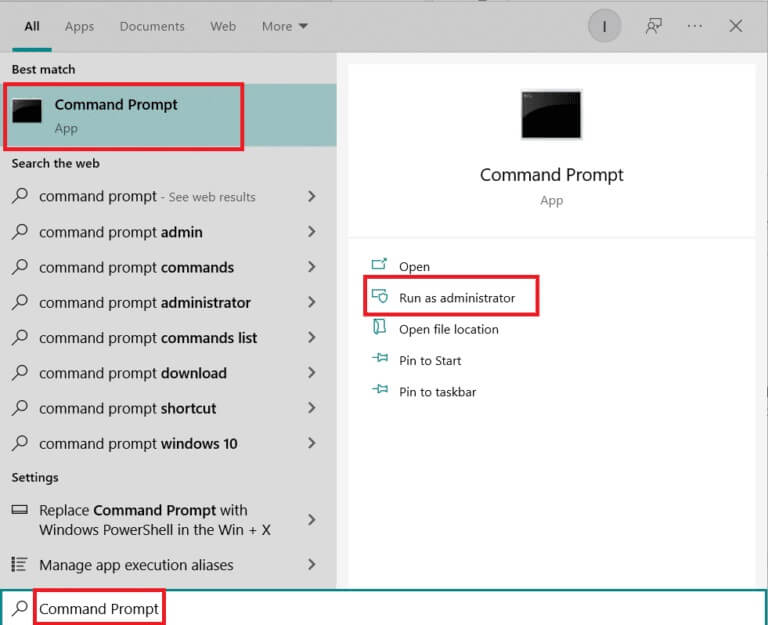
1. Press Windows key , And type Command Prompt And click Run as administrator.
2. Write Next command and press Enter key.
takeown /f path_to_folder /r /dy
Note: Replace path_to_folder with the path of the folder/file you want to own.

3. Now type the following command and enter the key.
icacls path_to_folder /grant administrators:F /T
Note: Replace admins with your own account/username.

You should now have full access to the selected folder/file after executing these two commands.
Frequently asked questions (FAQs)
s. In Windows 10, what are permissions?
the answer: App permissions allow apps to access certain components of your device, such as hardware (like GPS to determine your location) or software (like your camera). It's important to understand which apps use which permissions.
We hope this guide was helpful and that you learned how to change file permissions in Windows 10. Let us know which method works best for you. If you have any questions or suggestions, feel free to leave them in the comments section.


