Janna Theme License is not validated, go to the theme options page to validate the license, you need a single license for each domain name.
How to Use Gboard: The Ultimate Guide
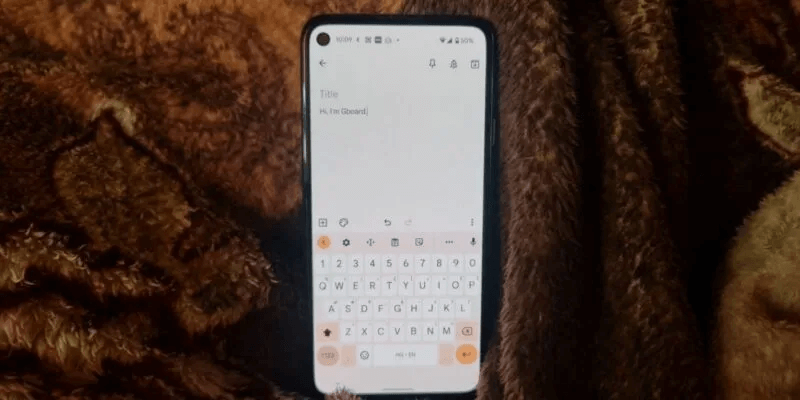
Gboard (also known as Google Keyboard) is one of the best keyboards for Android phones and tablets. It's available for free and comes pre-installed on many Android phones, especially those running stock Android. You can Install it from Play Store On any Android phone. Let's explore how to use Gboard on Android.
How to quickly access Gboard settings
Click on the icon "Settings" In the top row of Gboard to open Gboard settings or long press the comma key (,) and click Settings icon.
Instead, go to “Settings → System (General Management) → Language & input → On-screen keyboard → Gboard.”
How to enable the number row
Open "Settings" In Gboard, go to "Preferences". Turn on a toggle switch Row the numbersYou'll see a separate row containing only the numbers above the keyboard.
How to view the number plate
In addition to a dedicated number row, Gboard also offers a number pad. It's useful when you want to enter long numbers. To access it, press the key "?123" at the bottom followed by the key "1234".
You will be greeted by a number pad with large number keys.
How to write fractions and superscript
Long press a number in the number row to see available fractions and their superscript. Tap an item to add it. Alternatively, press and hold a number and release it to quickly add a superscript.
If you type emoji a lot, having a dedicated emoji key in the bottom row is a bonus. To enable it, go to Gboard Settings → PreferencesActivate the switch for. Show emoji toggle switchPlease note that when the Emoji switch is enabled, the language switcher will not appear and vice versa.
How to view popular and recent emojis
Gboard can display recently used and frequently used emoji on your keyboard layout, provided you enable the setting. To do this, go to Gboard Settings → Emojis, Stickers, and GIFsEnable the necessary switches.
How to search for emojis, GIFs, and stickers
Another way to find emojis, stickers, or GIFs in Gboard is to use its search feature. You get two types of searches in Gboard. The first lets you search across all three, i.e., emojis, stickers, and GIFs. Apart from that, you can search for each item individually as well.
Open the emoji panel by tapping on Emoji symbol Or Stickers Or GIF , Then click search icon At the bottom of the search all media.
To conduct a single search through any of them, tap the desired media icon—such as an emoji, GIF, or sticker. Tap the search button inside it and enter your search term.
Tip: Tap the clock icon to access recently used media.
How to make custom emojis
using Emoji Kitchen feature You can combine emojis to create unique custom emojis. To do this, simply open the emoji panel and type two emojis of your choice. You'll see new emoji combinations in the top row. Tap the one you want to use.
Note: Custom emojis created using this method are sent as stickers, not regular emojis. If the app doesn't support stickers, these emojis will be added as images.
How to enable floating or one-handed keyboard modes
Gboard can be used in the following three modes:
normal: Normal full screen mode.
floating: The keyboard can be dragged to any position on the screen.
One handed: It makes typing with one hand easier, as it shrinks the keyboard to one side.
To switch to floating or one-handed mode, look for its icon in the top row of Gboard. If it doesn't appear, tap three-dot icon To expand the menu, tap Floating mode or One-handed mode to activate it. Alternatively, go to Gboard Settings → Preferences → One-handed mode To enable or disable it.
To return to the normal keyboard mode from the floating keyboard, tap the floating keyboard icon to turn it off. Similarly, tap Expansion icon When using one-handed mode to turn it off.
How to resize Gboard
You can make Gboard smaller or taller to suit your preferences by going to Gboard Settings → Preferences → Keyboard Height. Select the desired height from the list.
How to enable or disable Gboard Sound and Vibration
Whether you prefer the sound of keypresses and haptic feedback, Gboard offers an option for both. Go to Gboard Settings → PreferencesEnable the toggle switches between. Sound when pressing a key و “Haptic feedback when you press a key”Once enabled, you can adjust the volume and vibration strength.
How to type symbols quickly
You can usually type symbols by clicking on Key "?123" On Gboard, open the symbol keyboard. You can also see the symbols above each letter on the keyboard. Tap and hold a letter to enter the accompanying symbol.
If you can't type the symbols this way, go to “Gboard Settings → Preferences.” Scroll down and enable the toggle switch for Long press to get icons.
Furthermore, you can long press the dot key. (.) To quickly access common symbols, long press the dot key. (.) While writing URL To enter on ، .in. , etc.
If you enjoy swiping, Gboard offers gesture typing. For starters, gesture typing requires swiping across the letters in a word to type it, rather than manually pressing each key.
Go to Gboard Settings → Glide Typing Enable the toggle for Enable scroll typingYou can also show or hide the gesture path.
Additionally, you can delete words by swiping left on the delete key. This makes typing faster, as you don't have to remove each letter individually. Turn on the toggle switch. Enable gesture deletion To activate this feature.
How to use the spacebar as a trackpad
It's often difficult to navigate through large paragraphs on mobile. In such cases, the space bar can be used to navigate through the text. To move the cursor, simply swipe right or left on the space bar. But before you can use this, go to Gboard Settings → Glide Typing And turn it on Enable gesture cursor control.
How to use cursor control
In addition to the space bar, Gboard offers a dedicated cursor movement panel. Tap the icon In the top row of Gboard or below the three-dot icon, open the cursor control screen. Use the single arrows to move left, right, up, or down on the text. Similarly, tap the arrows with a bar to move the cursor to the beginning or end of the text. You can also select, copy, and paste text.
How to create Word shortcuts
If you frequently type certain big words, you can create shortcuts for them in Gboard. For example, Make Tech Easier could have the shortcut MTE When you type MTE, Gboard will suggest Make Tech Easier in the suggestion bar. Tap it to enter text.
To create shortcuts, go to Gboard Settings → Dictionary → Personal Dictionary Select your language. You'll see any existing abbreviations. Tap icon"+" above.
Tip: Tap the three-dot icon to import or export existing shortcuts.
Type the word and its abbreviation in the provided text fields. Double-check and the abbreviation will be saved. Also learn How to create shortcuts in SwiftKey.
How to add and switch languages and layouts
Gboard lets you type in multiple languages and use different types of layouts. To add a new language, go to Gboard Settings → Languages. Click on Add keyboard.
Tip: Tap the pencil icon at the top to delete or reorder languages.
Select a language from the list. You can use the search icon at the top to quickly find the desired language. You will then be prompted to choose a keyboard layout (QWERTY, handwriting, QWERTZ, AZERTY, PC, etc.) for that particular language. You can also enable multilingual typing on the same screen.
To switch between languages, press and hold the space bar and select the desired language.
Gboard comes with a native clipboard in addition to the regular Android clipboard. Any text or image you copy will appear in Gboard case , where you can quickly paste them. Go to “Gboard Settings → Clipboard” Activate the clipboard. You should also enable the ability to show recent screenshots in the clipboard.
What's more, Gboard will automatically detect useful information like addresses and phone numbers from copied text and display them in separate tabs in the suggestions bar.
This is very useful, as you don't need to remove the extra information when pasting the text. To use this feature, enable Show items like addresses and phone numbers within recently copied text Within the clipboard settings.
To access the clipboard, click on clipboard icon In the top row in Gboard.
Generally, clipboard items will be automatically cleared after one hour. However, you can pin items so Gboard doesn't delete them. To do this, tap and hold an item and choose "Installations" from the list.
Gboard includes another useful feature that lets you translate text directly within the keyboard app. Tap the icon "translation" located below three-dot icon In the top row of Gboard. Enter Text and select اللغة which you want to translate to.
How to create a custom theme
Gboard offers a variety of themes that you can apply with just one tap. But if you want to use a custom image as your Gboard background, such as your own photo, you can do so.
Go to Gboard Settings → Theme. Click on “+” button Large. Select an image of your choice and follow the on-screen instructions to create your own custom look.
How to add or remove main borders
I prefer having a keyboard with key borders. You can always turn them off if you don't like them. So, open Gboard Settings → ThemesTap the theme you want to use. Turn off the toggle next to Key Limits and click "application".
How to delete Gboard history
You can easily remove learned words and data from your Gboard history. Go to Gboard Settings → Advanced And press “Delete learned words and data”.
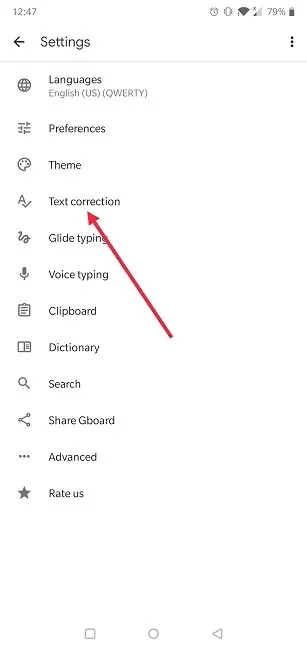
How to turn on/off autocorrect on Gboard
Go to Gboard settings. Find Text correction and press it.
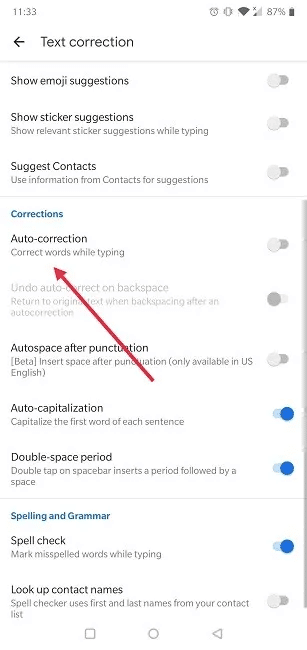
Scroll down to the Corrections section and toggle between On/OffAutocorrect optionAlternatively, you can leave autocorrect turned on and also enable the option below, which will allow you to: “Undo autocorrect on backspace.”
That's it. Now you can go back to your messaging app without worrying about typing something stupid.
get to know me How to use the keyboard Actual with your Android phone. If you're considering using SwiftKey, read on. Gboard comparison With SwiftKey and Samsung Keyboard to decide which one is best for you.