Mobile Hotspot is a useful tool that lets you share your computer's internet connection with other wireless devices. As useful as it is, there can be times when the mobile hotspot on Windows 11 can misbehave and stop working. The problem may arise due to incorrect configurations or Old drivers Or antivirus software. Whatever the case, the troubleshooting tips below should help you fix your mobile hotspot not working on Windows 11. So, let's get started.
1. Run the troubleshooter for the network adapter.
Troubleshooting tools come built into Windows 11 to detect and fix various computer problems. Therefore, you should start by using the Network Adapter Troubleshooter to let it fix your mobile hotspot issue.
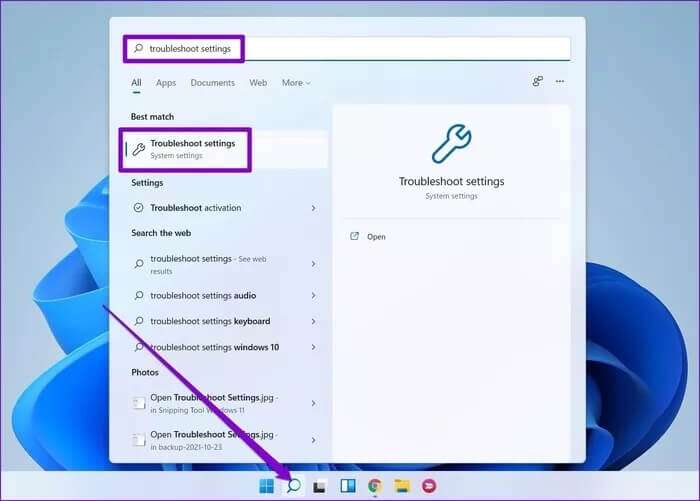
Step 1: press the . key Windows + S To open Windows Search , And type Troubleshoot settings , then press Enter.
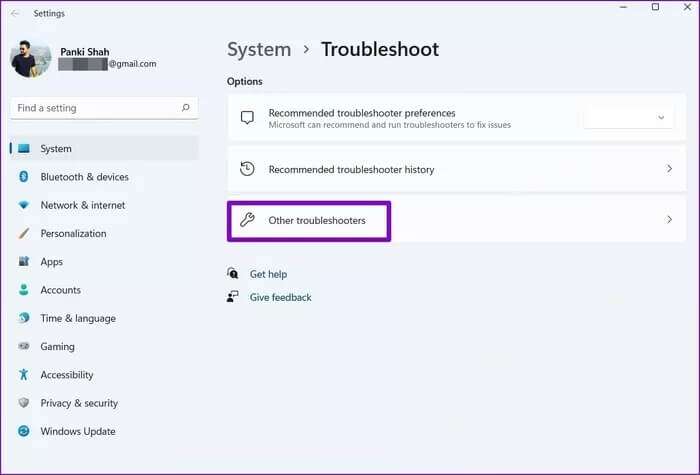
Step 2: Go to Other troubleshooters and fixes.
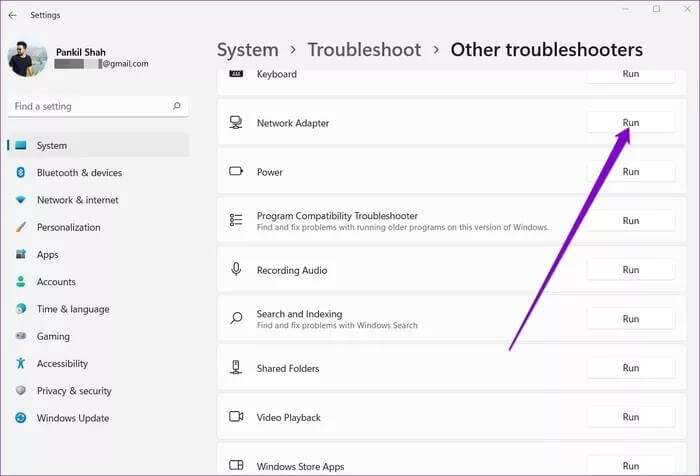
Step 3: Scroll down to locate network adapter And click Play button Next to itStart troubleshooting.
2. Turn off Bluetooth.
Sometimes, it is known that Bluetooth connection on your computer It interferes with your mobile hotspot. Therefore, you should turn off Bluetooth to see if that helps. Here's how.
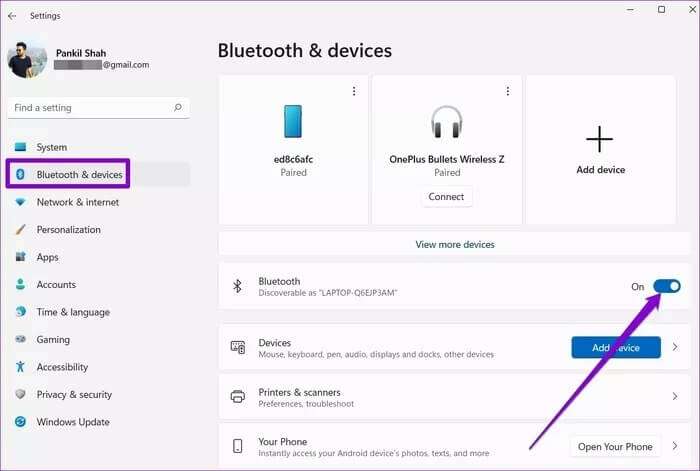
Step 1: press the . key Windows + I To open Settings.
Step 2: Use the right side to navigate to Bluetooth and devices Turn off the switch next to Bluetooth.
3. Disable antivirus software
Your computer's antivirus software can also block the mobile hotspot, citing security concerns. To rule out this possibility, disable your computer's antivirus software and try using the mobile hotspot again. If it works, you'll need to look into your antivirus software settings and disable the setting causing the problem.
If the problem persists, continue to this guide.
4. Start a wireless network service from your phone.
The Mobile Hotspot service is a small program that needs to run in the background for the hotspot to work. Ideally, this service should start every time you turn on the mobile hotspot. However, if this doesn't happen, you can try starting it manually by following the steps below.
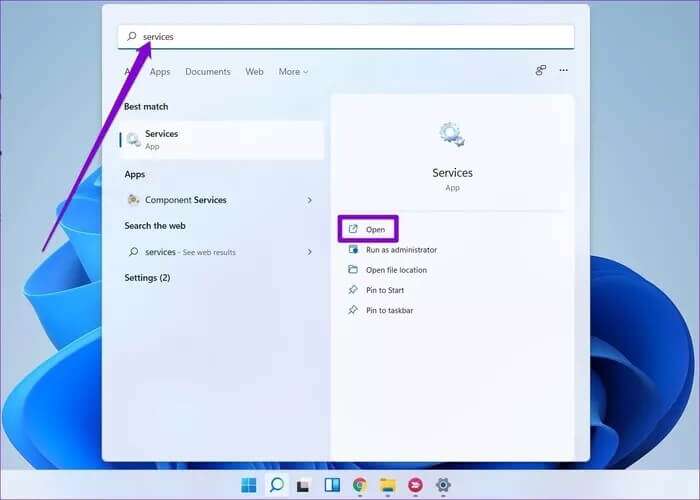
Step 1: Open start menu , And type Services , And press Enter.
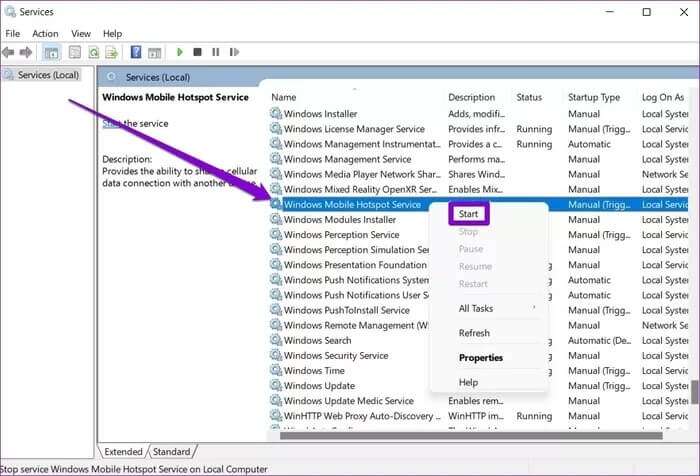
Step 2: Scroll down to locate Windows Mobile Hotspot ServicesRight-click on it and select START YOUR from the resulting list.
Check to see if your mobile hotspot is working now.
5. Check the network adapter.
If the problem persists, you will need to look into: Network adapter settings On your computer to see if the problem lies there. Here's how.
Step 1: press the . key Windows + I To open Settings. Switch to the Network & Internet tab on your left and go to Advanced network settings.
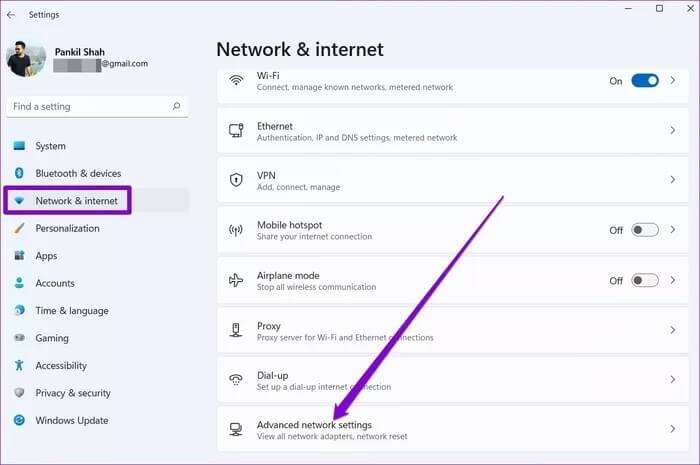
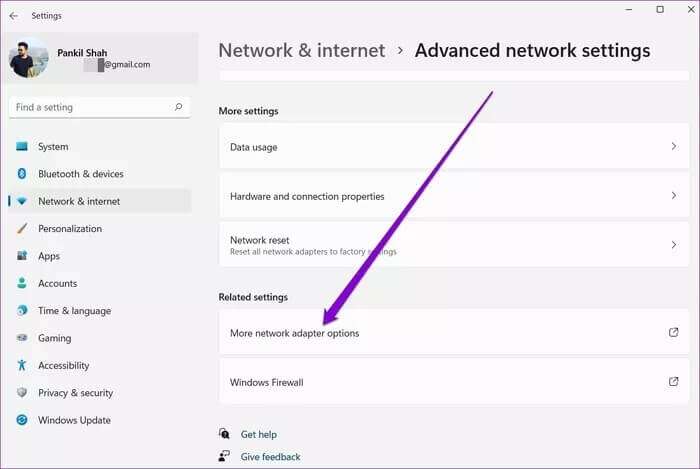
Step 2: Next, tap More network adapter optionsThis will open. Network Connections Window.
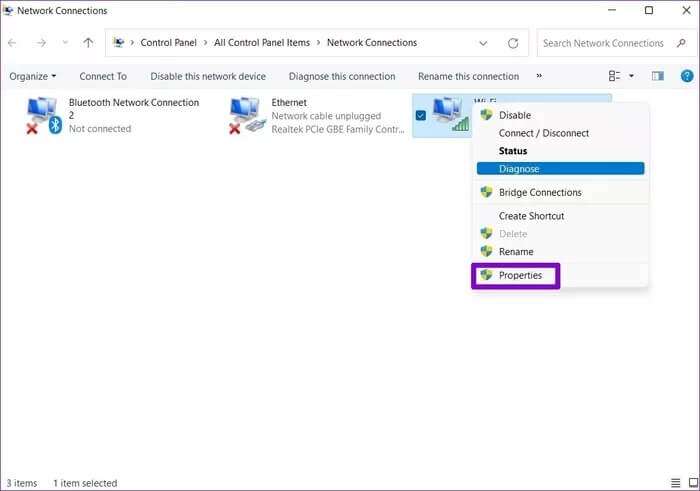
Step 3: Right click network adapter Your mobile hotspot's features will be unlocked.
Step 4: within Participation , uncheck the box “Allow other network users to connect through this computer’s Internet connection”.
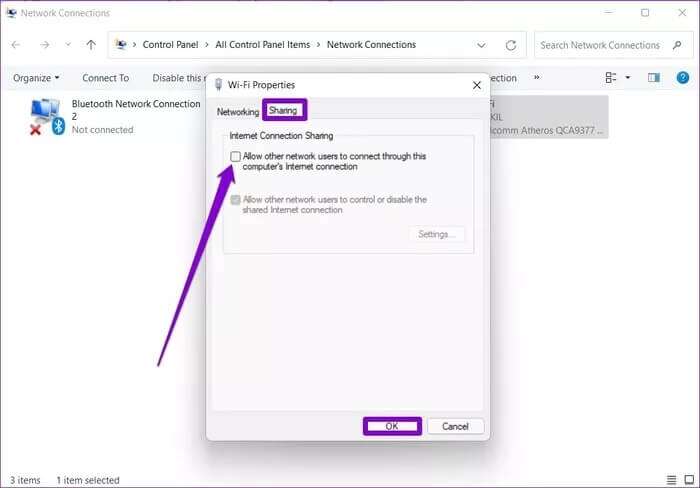
Restart your computer before using the hotspot again.
6. Update WI-FI drivers
With every Windows update, your computer's drivers are automatically updated. However, if you haven't updated your computer in a while, your mobile hotspot issue may be caused by outdated Wi-Fi drivers. Here's how to update them manually.
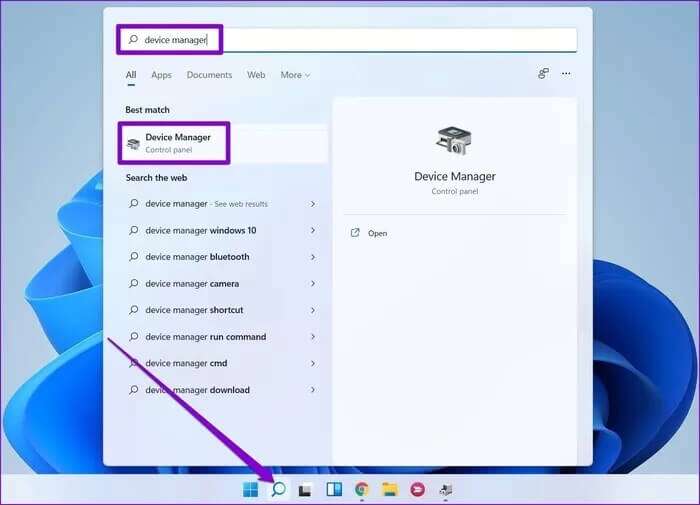
Step 1: press the . key Windows + S to reach WindowsSearch. Type device Manager And press Enter.
Step 2: Expand network adapter. Right click WiFi driver and select Driver Update.
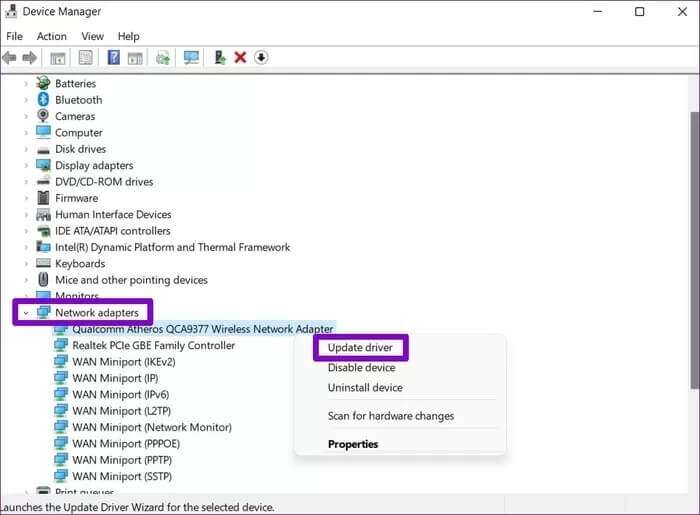
From there, follow the on-screen instructions to update the Wi-Fi drivers on your computer.
7. TWEAK WINDOWS REGISTER
If you are still bothered by mobile hotspot issues, you can try modifying the Windows registry files on your computer.
Before proceeding, it is important to know that registry files are important for the Windows operating system. Therefore, you should start with caution and free time to do this. Backup your registry files pre.
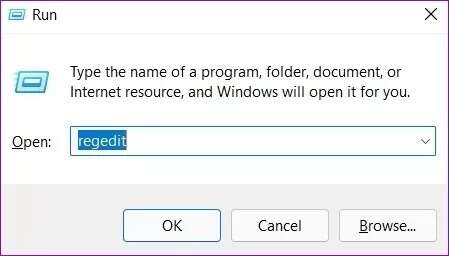
Step 1: press the . key Windows + R To open the dialog box Run. Type regedit And press Enter.
Step 2: use address bar At the top to move to the next key:
HKEY_LOCAL_MACHINE\SYSTEM\CurrentControlSet\Services\WlanSvc\Parameters\HostedNetworkSettings\
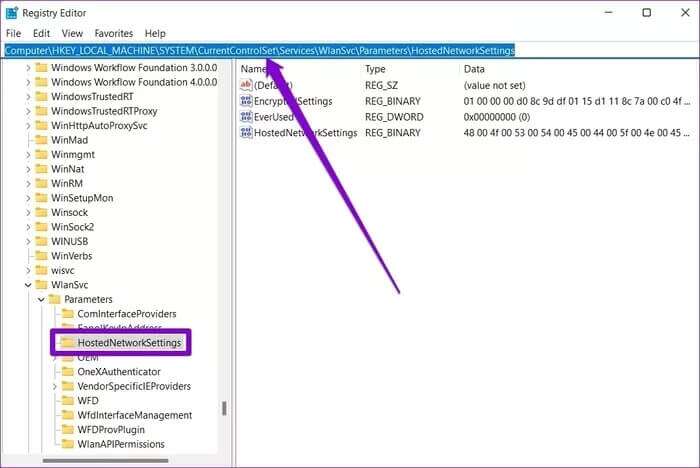
Step 3: On your right, locate HostedNetworkSettings. Right click on it and select delete.
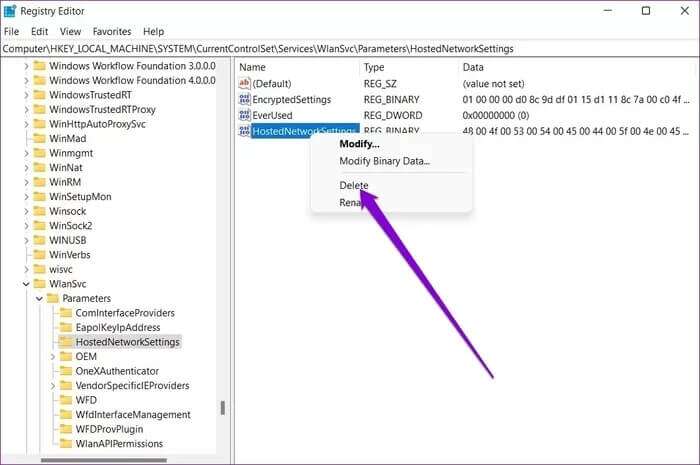
After that, restart your computer and see if you can use mobile hotspot now.
8. Reset network settings
If nothing works, you may have to Reset the current network settings on your computer As a last resort, this will remove all network adapters and restore other network settings to their defaults. This includes Wi-Fi, Bluetooth, VPN, network adapters, and Ethernet. Therefore, if incorrect settings are causing the issue, resetting your network settings should help.
Step 1: press the . key Windows + I to turn on Settings app , and go to the tab Network and the Internet , and click Advanced network settings.
Step 2: within More settings , Click Network reset.
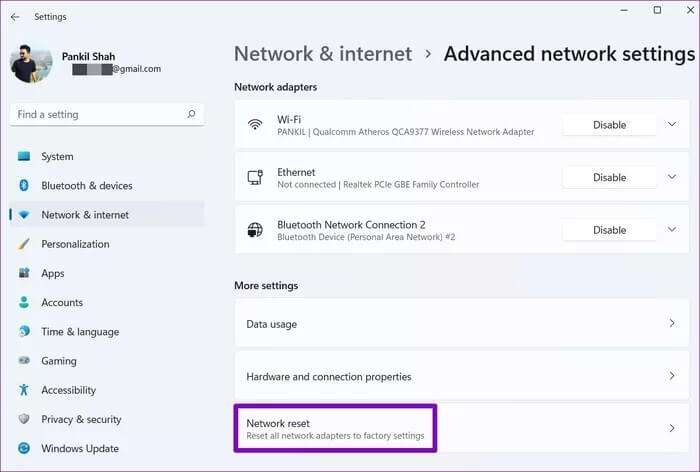
Step 3: Finally, click the button Reset Now next to Network reset.
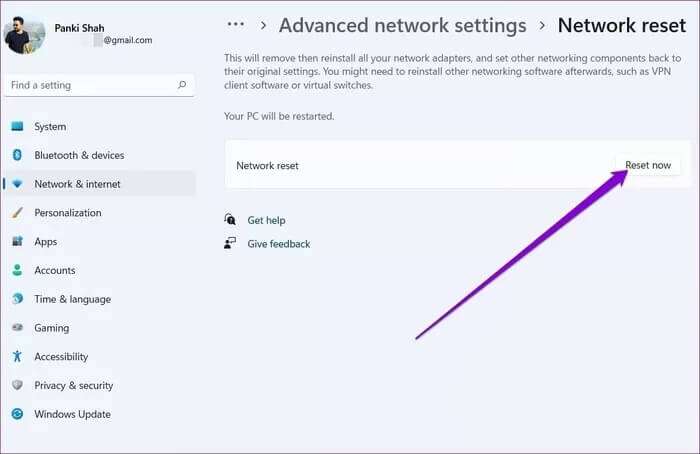
Wait for the process to finish and then restart your computer to see if that solves the problem.
Sharing is caring
Fixing a mobile hotspot not working on Windows 11 shouldn't take long. In most cases, you can resolve the issue by running the troubleshooter or updating your network adapter driver. Let us know which solution worked for you in the comments below.


